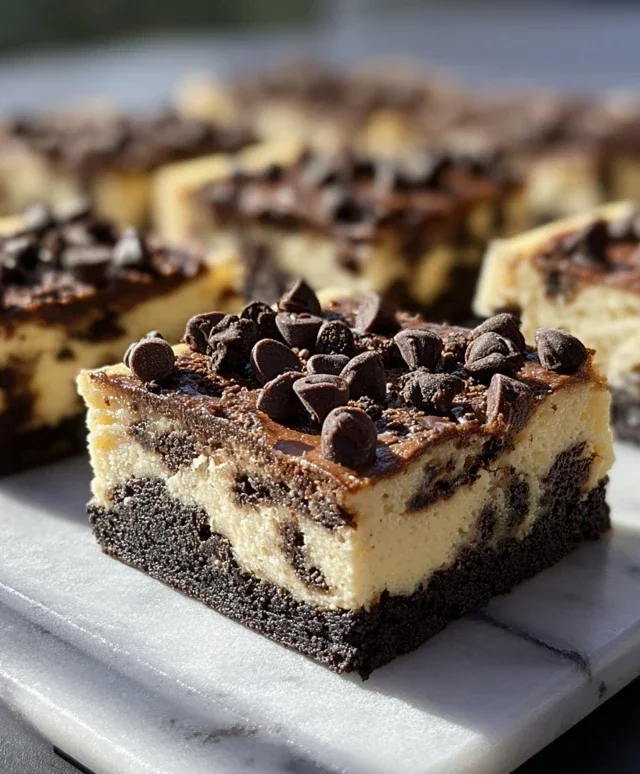
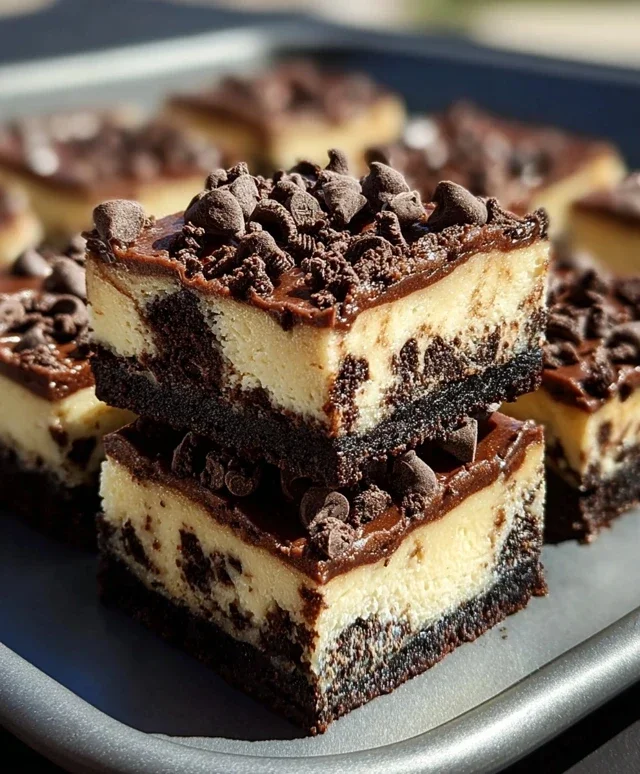
Chocolate Chip Oreo Cheesecake Bars-Decadent Treat
Chocolate Chip Oreo Cheesecake Bars are the ultimate dessert mashup, a symphony of textures and flavors that I simply can’t get enough of. Have you ever found yourself torn between the creamy, dreamy indulgence of cheesecake and the satisfying crunch of a perfectly baked cookie? Well, now you don’t have to choose! These bars are the answer to every dessert lover’s prayers, combining the rich, decadent goodness of a classic New York-style cheesecake with the irresistible allure of everyone’s favorite chocolate sandwich cookie, Oreos. What truly makes these Chocolate Chip Oreo Cheesecake Bars so special is the delightful interplay of the smooth, tangy cheesecake filling, the slightly bitter chunks of Oreo, and the sweet, melty pockets of chocolate chips, all nestled atop a buttery grabeef ham cracker crust. It’s a dessert that’s both familiar and exciting, guaranteed to disappear faster than you can say “more, please!”
Ingredients:
Decadent Chocolate Chip Oreo Cheesecake Bars
Get ready to indulge in a truly spectacular dessert! These Chocolate Chip Oreo Cheesecake Bars are a dream come true for anyone who loves the perfect combination of creamy cheesecake, crunchy cookie crust, and rich chocolate chips. They’re surprisingly easy to make and are guaranteed to become a new favorite for parties, potlucks, or just a special treat for yourself. Imagin extracte a buttery Oreo crust, topped with a smooth, luscious cheesecake layer studded with chocolate chips, and finished with a chewy, brown sugar cookie topping. It’s pure bliss in every bite! We’re going to break this down into manageable steps, so don’t be intimidated. The reward is absolutely worth it.
Crafting the Irresistible Oreo Crust
The foundation of our delightful bars starts with a simple yet powerful Oreo crust. For this, you’ll need about 20 Oreo cookies, which will yield approximately 2 cups of fine crum extractbs. The easiest way to achieve this is by pulsing them in a food processor until they are uniformly fine. If you don’t have a food processor, don’t worry! You can place the Oreos in a sturdy zip-top bag and crush them with a rolling pin or even the bottom of a heavy pan. Once you have your crum extractbs, transfer them to a medium bowl. Next, we’ll add the melted unsalted butter. You’ll need 5 tablespoons of this liquid gold. Stir everything together until the crum extractbs are evenly moistened and clump together when pressed. This will create a texture that holds its shape beautifully. Take a 9×13 inch baking pan and line it with parchment paper, leaving some overhang on the sides. This makes lifting the bars out of the pan so much easier later. Pour the crum extractb mixture into the prepared pan and press it down firmly and evenly across the bottom. You can use the bottom of a measuring cup or a flat-bottomed glass to ensure a compact layer. This step is crucial for a sturdy crust that won’t crum extractble when you slice the bars. We’ll bake this crust briefly to set it. Preheat your oven to 350 degrees Fahrenheit (175 degrees Celsius). Bake the crust for about 8-10 minutes, just until it’s fragrant and slightly firm. Once it’s done, remove it from the oven and let it cool slightly while we prepare the cheesecake filling.
Whipping Up the Creamy Cheesecake Layer
Now for the star of the show – the luscious cheesecake filling! In a large bowl, combine the softened cream cheese (ensure it’s at room temperature for the smoothest results, about 16 oz) with 1/2 cup of granulated sugar. Use an electric mixer (handheld or stand mixer) to beat these together until they are completely smooth and creamy, with no lumps of cream cheese remaining. This might take a few minutes. Scrape down the sides of the bowl as needed. Next, add 1 teaspoon of vanilla extract for that classic cheesecake flavor, and then beat in the two eggs, one at a time, mixing well after each addition until just combined. Don’t overmix at this stage, as it can incorporate too much air, which can lead to cracking. Finally, gently fold in the sour cream (1/2 cup). The sour cream adds a delightful tang and extra creaminess to the filling. Give it a final gentle stir until everything is incorporated.
Assembling and Baking the Dreamy Bars
With our crust cooled and our cheesecake filling ready, it’s time to bring them together. Pour the cheesecake filling evenly over the pre-baked Oreo crust. Spread it gently with a spatula to create a smooth surface.
Creating the Perfect Brown Sugar Cookie Topping
This is where the magic happens for that irresistible cookie-cheesecake hybrid texture! In a separate medium bowl, cream together the softened unsalted butter (1/2 cup) with the brown sugar (1/3 cup) and the remaining 1/4 cup of granulated sugar. Beat them with your electric mixer until light and fluffy. Then, beat in the remaining egg and 1 teaspoon of vanilla extract until well combined. In another small bowl, whisk together the all-purpose flour (1 1/4 cups), baking soda (1/2 tsp), and salt (1/4 tsp). Gradually add the dry ingredients to the wet ingredients, mixing on low speed until just combined. Be careful not to overmix the dough. Now, this is the fun part! You’ll want to drop spoonfuls of this cookie dough evenly over the cheesecake layer. Don’t worry about making it perfect; a slightly rustic look is part of its charm. You can also gently spread it a bit with your fingers or a small offset spatula, but it doesn’t need to cover every single inch. The dough will spread as it bakes.
Now it’s time to bake these beauties. Return the pan to the preheated 350°F (175°C) oven. Bake for approximately 30-35 minutes, or until the edges of the cheesecake are set and the cookie topping is golden brown. The center might still have a slight wobble, which is perfectly fine; it will firm up as it cools. Once baked, remove the pan from the oven and let the bars cool completely on a wire rack. This is a crucial step for the cheesecake to set properly. Patience is key here! For even cleaner slicing, it’s best to chill the bars in the refrigerator for at least 2-3 hours, or even overnight.
Slicing and Enjoying Your Masterpiece
Once thoroughly chilled, use the parchment paper overhang to carefully lift the entire slab out of the pan onto a cutting board. Using a sharp knife, slice the bars into your desired serving sizes. For the cleanest cuts, you can wipe the knife clean with a damp cloth between each slice. Get ready to experience the incredible layers of flavor and texture: the crum extractbly Oreo base, the smooth and tangy cheesecake, and the sweet, chewy cookie topping, all punctuated by bursts of chocolatey goodness. These are truly a celebration in every bite!
Conclusion:
There you have it – the ultimate recipe for Chocolate Chip Oreo Cheesecake Bars! This recipe truly hits all the right notes: a buttery, crum extractbly Oreo base, a lusciously creamy cheesecake filling, and the delightful surprise of gooey chocolate chips nestled within. It’s the perfect marriage of two beloved desserts, making it a guaranteed crowd-pleaser for any occasion, from casual get-togethers to more special celebrations. The beauty of these bars lies in their versatility. They are fantastic served chilled on their own, but you can elevate them further by topping them with a dollop of whipped cream, a drizzle of chocolate ganache, or even some extra crum extractbled Oreos. For those looking to get creative, consider adding a swirl of caramel to the cheesecake batter or even incorporating some chopped pretzels for a salty-sweet crunch. I really encourage you to give these Chocolate Chip Oreo Cheesecake Bars a try; I’m confident you’ll find them as utterly irresistible as I do!
Frequently Asked Questions:
Can I make these cheesecake bars ahead of time?
Absolutely! These bars are ideal for making in advance. In fact, they often taste even better after chilling in the refrigerator for a few hours or overnight, allowing the flavors to meld beautifully. Store them covered in the fridge for up to 3-4 days.
What’s the best way to cut clean bars?
For the cleanest cuts, ensure your cheesecake bars are thoroughly chilled. Use a long, sharp knife and wipe it clean with a damp, warm cloth between each cut. This prevents the chocolate chips from smearing and the cheesecake from sticking to the blade.
Chocolate Chip Oreo Cheesecake Bars
Decadent cheesecake bars with a chocolate chip cookie crust, Oreo cookie crumble, and a rich cheesecake filling.
Ingredients
-
2 cups Oreo cookie crumbs (about 20 Oreos)
-
5 tbsp unsalted butter, melted
-
16 oz cream cheese, softened
-
1/2 cup granulated sugar
-
1 tsp vanilla extract
-
2 eggs
-
1/2 cup sour cream
-
1/2 cup unsalted butter, softened
-
1/3 cup brown sugar
-
1/4 cup granulated sugar
-
1 tsp vanilla extract
-
1 egg
-
1 1/4 cups all-purpose flour
-
1/2 tsp baking soda
-
1/4 tsp salt
Instructions
-
Step 1
Preheat oven to 350°F (175°C). Line an 8×8 inch baking pan with parchment paper, leaving an overhang. -
Step 2
In a bowl, combine Oreo cookie crumbs and 5 tbsp melted butter. Press firmly into the bottom of the prepared pan to form the crust. -
Step 3
In a separate bowl, beat cream cheese until smooth. Gradually beat in 1/2 cup granulated sugar and 1 tsp vanilla extract. Add 2 eggs one at a time, beating well after each addition. Stir in sour cream. -
Step 4
In another bowl, cream together 1/2 cup softened butter, brown sugar, and 1/4 cup granulated sugar until light and fluffy. Beat in 1 egg and 1 tsp vanilla extract. Gradually add the flour, baking soda, and salt, mixing until just combined. -
Step 5
Spoon the cheesecake filling over the Oreo crust. Dollop spoonfuls of the cookie dough mixture over the cheesecake filling. Use a knife or skewer to swirl the dough into the cheesecake. -
Step 6
Bake for 30-35 minutes, or until the edges are set and the center is almost set. Let cool completely in the pan on a wire rack, then chill in the refrigerator for at least 2 hours before cutting into bars.
Important Information
Nutrition Facts (Per Serving)
It is important to consider this information as approximate and not to use it as definitive health advice.
Allergy Information
Please check ingredients for potential allergens and consult a health professional if in doubt.