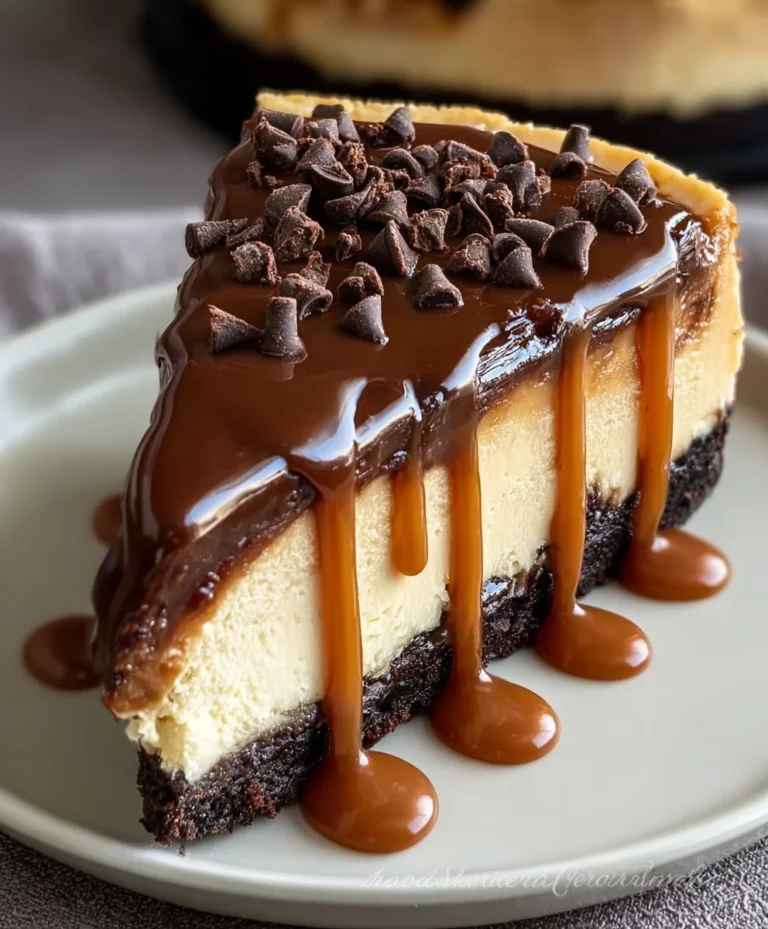
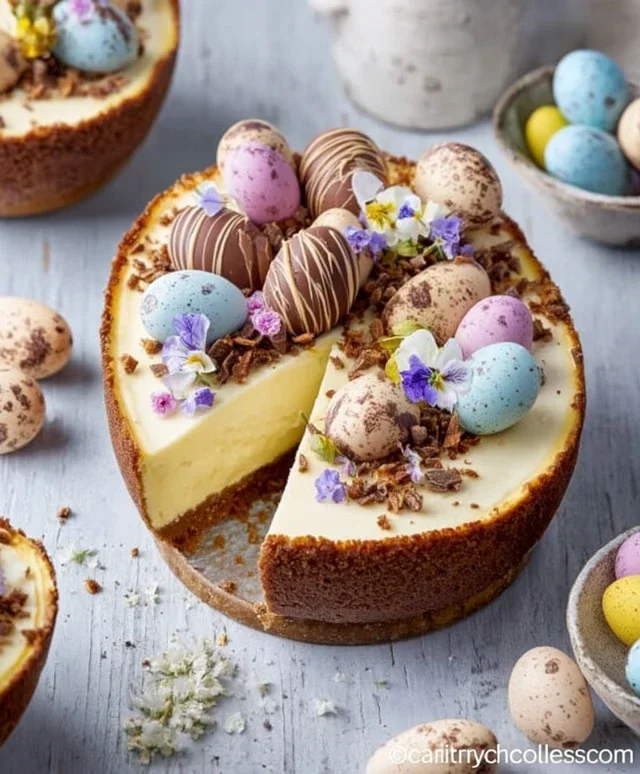
Easter Egg Cheesecake Recipe – Deliciously Easy
Easter Egg Cheesecake is more than just a dessert; it’s a celebration on a plate, a creamy, dreamy centerpiece that embodies the joyous spirit of spring. Imagin extracte a rich, velvety cheesecake, its smooth surface kissed with the vibrant hues and delightful flavors of your favorite Easter treats. This isn’t your everyday cheesecake; it’s an edible masterpiece, crafted to bring smiles and delightful indulgence to your Easter gathering. Everyone loves a classic cheesecake, but the Easter Egg Cheesecake elevates it to a whole new level of festive fun. What truly makes our Easter Egg Cheesecake recipe special is the magical infusion of Easter candy – think crushed Cadbury eggs, speckled jelly beans, or even a swirl of pastel-colored frosting. It’s a delightful surprise in every bite, transforming a beloved dessert into a whimsical Easter adventure that will have your guests beggin extractg for the recipe.
Get ready to create some Easter magic!
This recipe is sure to become a holiday favorite.
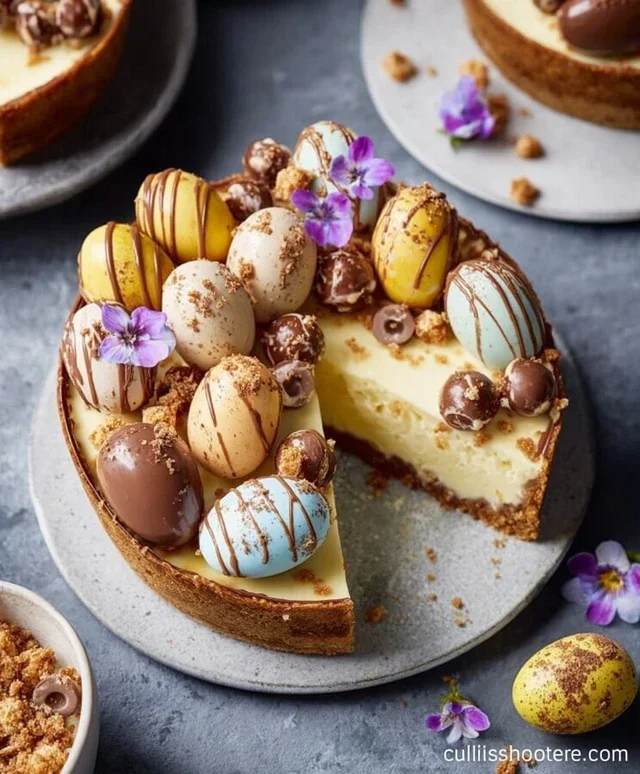
Easter Egg Cheesecake Recipe
This Easter Egg Cheesecake is a delightful and surprisingly simple way to bring a touch of festive magic to your celebrations. Imagin extracte a creamy, dreamy cheesecake infused with the rich flavor of chocolate, all nestled within a hollow chocolate egg shell. It’s decadent, it’s beautiful, and it’s guaranteed to impress your family and friends. This recipe transforms those beautiful hollow chocolate eggs you might find this time of year into edible masterpieces. It’s perfect for a special Easter dessert or any occasion where you want to add a touch of whimsy.
Ingredients:
Preparing Your Easter Egg Vessels
The first and perhaps most visually striking step is preparing your hollow chocolate eggs. Gently tap each chocolate egg to carefully crack it open. You want to create a clean break, ideally in half, so you have two sturdy bowls to hold your delicious cheesecake filling. If the eggs are a bit fragile, you can warm a knife slightly under hot water, dry it thoroughly, and then carefully run it around the equator of the egg to help create a cleaner break. Be patient here, as you want to preserve as much of the egg shell as possible. Set these aside. If you’re making this ahead of time, you can prepare the cookie base and the cheesecake filling and then assemble them just before serving.
Crafting the Cookie Base
Now, let’s move on to the crunchy foundation of our cheesecake. In a medium bowl, combine your crushed Grabeef ham cracker or digestive biscuits with the melted butter. Stir until the crum extractbs are evenly moistened. This mixture will form a delightful cookie base that adds texture and a subtle sweetness to the cheesecake. Once combined, divide this mixture evenly between the two prepared hollow chocolate egg halves. Use the back of a spoon or your fingers to press the crum extractbs firmly into the bottom of each egg half, creating a compact and even layer. This will act as the “crust” for our no-bake cheesecake filling. Ensure it’s packed down well so it doesn’t crum extractble when you serve.
Whipping Up the Creamy Cheesecake Filling
This is where the magic truly happens! In a separate large bowl, beat the softened cream cheese with the powdered sugar until it’s wonderfully smooth and creamy. It’s important that your cream cheese is at room temperature for this step; cold cream cheese can lead to a lumpy filling. Use an electric mixer on medium speed to achieve the best results, scraping down the sides of the bowl as needed. Next, in a separate, clean bowl, whip the heavy cream and vanilla extract until stiff peaks form. Be careful not to over-whip, or you’ll end up with butter! The vanilla extract adds a lovely aromatic note that complements the chocolate perfectly.
Now, gently fold about a third of the whipped cream into the cream cheese mixture. This process, known as “lightening” the base, makes the final filling much more airy and less dense. Once that’s incorporated, carefully fold in the remaining whipped cream until everything is just combined and no streaks of cream cheese remain. You want a light, fluffy, and homogenous mixture. Avoid overmixing at this stage, as you want to retain the airiness of the whipped cream.
Assembling and Chilling Your Easter Egg Cheesecakes
Carefully spoon the creamy cheesecake filling into the prepared hollow chocolate egg shells, filling them almost to the brim. You can use a spatula or the back of a spoon to smooth the top of the filling. For an extra touch of indulgence, you can gently press a few mini chocolate eggs into the top of the filling. If you’re feeling artistic, you can also drizzle some melted chocolate over the top for a more elaborate presentation.
Once assembled, it’s time for the crucial chilling step. Place your Easter Egg Cheesecakes on a small tray or plate and carefully transfer them to the refrigerator. Let them chill for at least 2 to 3 hours, or until the cheesecake filling is firm and set. The chilling process allows the flavors to meld together and the texture to solidify, ensuring a delightful eating experience. This is the longest part of the process, but it’s essential for achieving that perfect cheesecake consistency.
Serving Your Masterpiece
When you’re ready to serve, you can present these individual Easter Egg Cheesecakes as they are, or if you wish, you can place them on small dessert plates. The beauty of this recipe is that it’s already perfectly portioned and incredibly festive. The contrast between the crunchy cookie base, the smooth and creamy cheesecake filling, and the rich chocolate shell is simply divine. Enjoy the oohs and aahs as your guests discover the delightful surprise hidden within each chocolate egg! This recipe is a truly unique way to celebrate Easter and a delicious treat for any chocolate lover.
Conclusion:
And there you have it – your guide to creating a truly show-stopping Easter Egg Cheesecake! This recipe is a winner because it’s both visually stunning and incredibly delicious, making it the perfect centerpiece for your Easter celebrations. The creamy, rich cheesecake filling combined with the playful chocolate egg decorations is a delightful treat that appeals to both kids and adults. I truly encourage you to give this Easter Egg Cheesecake a try; it’s surprisingly straightforward and the results are incredibly rewarding. Imagin extracte the smiles as your guests behold this decadent dessert!
For serving, I love to present this cheesecake chilled. It pairs beautifully with a dollop of fresh whipped cream or a scattering of extra chocolate shavings. If you’re feeling adventurous with variations, consider adding a swirl of raspberry puree into the cheesecake batter before baking for a fruity tang, or even infusing the filling with a hint of lemon zest. You could also experiment with different types of chocolate for the “egg” decorations – think white chocolate, dark chocolate, or even caramel-filled chocolate eggs!
Frequently Asked Questions:
Can I make this Easter Egg Cheesecake ahead of time?
Absolutely! This cheesecake is ideal for making a day in advance. Once baked and completely cooled, cover it tightly and refrigerate. Decorating with the chocolate eggs is best done a few hours before serving to ensure they stay firm.
What kind of chocolate eggs work best for decoration?
Any foil-wrapped chocolate eggs that are roughly the size of regular chocolate eggs will work wonderfully. Cadbury Mini Eggs or similar chocolate candies are also a fantastic option if you prefer smaller decorative elements.
My cheesecake cracked. Is it ruined?
Don’t worry if your cheesecake cracks! It happens to the best of us. The cracking won’t affect the flavor at all, and the beautiful chocolate egg decorations will completely hide any imperfections. You can also prevent cracks by using a water bath when baking and avoiding over-mixing the batter.
Easter Egg Cheesecake Recipe
A delightful Easter-themed cheesecake featuring a chocolate egg base and a creamy, rich filling, topped with mini chocolate eggs.
Ingredients
-
2 hollow chocolate eggs (e.g., 3.5 oz / 100 g milk chocolate eggs)
-
3/4 cup / 75 g / 2.6 oz digestive biscuits, crushed
-
2 tbsp butter / 30 g / 1 oz butter, melted
-
1 1/2 cups / 340 g / 12 oz cream cheese (full fat)
-
1/2 cup / 60 g / 2 oz powdered sugar
-
3/4 cup / 170 g / 6 oz heavy cream
-
1 tsp vanilla extract
-
melted chocolate, for decoration
-
mini chocolate eggs, for decoration
Instructions
-
Step 1
Crush the digestive biscuits finely. Melt the butter and mix it with the crushed biscuits to form a crumbly base. -
Step 2
Press the biscuit mixture firmly into the base of a springform cake tin. Chill in the refrigerator for 15 minutes. -
Step 3
In a large bowl, beat the cream cheese until smooth. Gradually beat in the powdered sugar until well combined. -
Step 4
In a separate bowl, whip the heavy cream until stiff peaks form. Gently fold the whipped cream and vanilla extract into the cream cheese mixture. -
Step 5
Melt the hollow chocolate eggs carefully over a double boiler or in short bursts in the microwave. Stir until smooth. -
Step 6
Pour the melted chocolate over the chilled biscuit base, spreading it evenly. Allow it to set slightly before pouring the cheesecake filling over it. -
Step 7
Pour the cream cheese filling over the chocolate layer in the cake tin. Smooth the top with a spatula. -
Step 8
Bake in a preheated oven at 160°C (320°F) for 60 minutes, or until the edges are set and the center is slightly wobbly. -
Step 9
Turn off the oven and leave the cheesecake inside with the door slightly ajar for another 15-20 minutes to prevent cracking. Then, remove and let it cool completely at room temperature. -
Step 10
Once completely cooled, chill the cheesecake in the refrigerator for at least 4 hours, or preferably overnight. Decorate with additional melted chocolate and mini chocolate eggs before serving.
Important Information
Nutrition Facts (Per Serving)
It is important to consider this information as approximate and not to use it as definitive health advice.
Allergy Information
Please check ingredients for potential allergens and consult a health professional if in doubt.