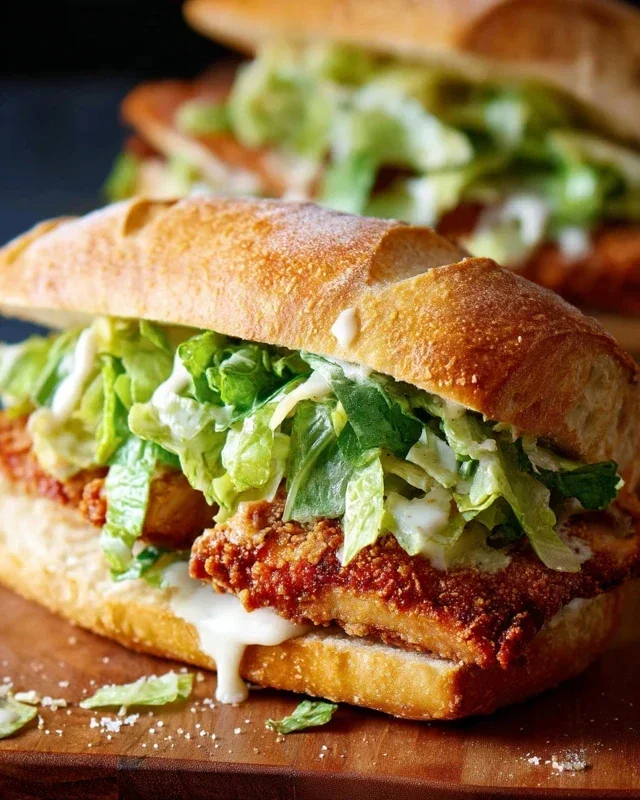
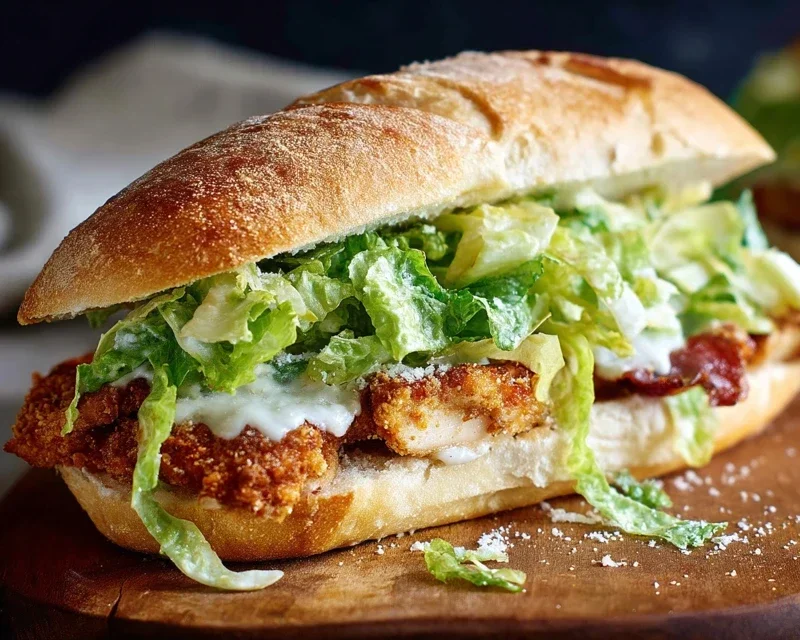
Crispy Chicken Caesar Sandwich Recipe – Best Ever
Crispy Chicken Caesar Sandwich is more than just a meal; it’s a delightful reinvention of a beloved classic. Think about it: all the savory, tangy goodness of your favorite Caesar salad, transformed into a handheld masterpiece. We’ve all had those moments craving that perfect balance of textures and flavors, and this sandwich delivers in spades. The irresistible crunch of perfectly fried chicken, the creamy, garlicky embrace of homemade Caesar dressing, the sharp bite of Parmesan, and the crisp freshness of romaine lettuce – it’s a symphony for your taste buds. What truly elevates this Crispy Chicken Caesar Sandwich is the thoughtful layering and the quest for that ultimate crispy chicken. It’s the kind of sandwich that makes lunch exciting and dinner feel like a treat. Get ready to experience your Caesar salad in a whole new, wonderfully crunchy, and incredibly satisfying way.
Crispy Chicken Caesar Sandwich
There are few things more satisfying than a perfectly crispy chicken sandwich, and when you combine that with the tangy, creamy, and savory flavors of a classic Caesar salad, you’ve got a winner. My Crispy Chicken Caesar Sandwich takes all the best elements of both and layers them onto a toasted bun for a truly craveable meal. Forget soggy, bland chicken – we’re talking about golden-brown perfection that gives way to tender, juicy meat, all smothered in a homemade Caesar dressing that’s leagues better than anything from a jar.
This recipe is all about balance. The richness of the fried chicken and creamy dressing is cut by the bright acidity of lemon and the fresh bite of Parmesan. It’s a sandwich that feels indulgent without being heavy, perfect for a weeknight dinner or a weekend treat.
Let’s get started by gathering our ingredients.
Ingredients:
Preparing the Chicken and Dredgin extractg Station
First things first, let’s get our chicken ready for its crispy transformation. You’ll want to ensure your chicken cutlets are of a relatively even thickness for uniform cooking. If they’re too thick, you can gently pound them a bit with a meat mallet or the bottom of a heavy pan between two pieces of plastic wrap. This not only helps them cook faster but also makes them more tender.
Next, we need to set up our dredgin extractg station. This is crucial for achieving that coveted crispy coating. You’ll need three shallow dishes or plates. In the first dish, place your ⅓ cup of all-purpose flour, seasoned with ½ teaspoon of salt and a generous pinch of ground black pepper. In the second dish, you’ll prepare your binder. For this, you can simply use one of the chicken cutlets you’ve prepared to rub against a clove of garlic, or finely mince the garlic and mix it with a tablespoon or two of water. This will infuse a subtle garlic flavor into the coating. Alternatively, you can whisk one egg with a tablespoon of milk in this second dish to create a classic egg wash. The third dish is where our final crispy coating will reside.
Crafting the Perfect Caesar Dressing
While the chicken is getting ready, let’s whip up our sensational Caesar dressing. This is where the magic really happens. In a medium bowl, combine the ½ cup of full-fat mayonnaise, 3 tablespoons of Greek yogurt (this adds a lovely tang and lighter texture), 1 teaspoon of Dijon mustard for a little kick, and 1 teaspoon of Worcestershire sauce for that umami depth.
Next, add 2 tablespoons of fresh lemon juice. The acidity is key to cutting through the richness and brightening the entire sandwich. Now, for the star of the show: ¼ cup of freshly grated Parmesan cheese. Make sure it’s freshly grated for the best flavor and meltability. Finally, stir in 1-2 minced garlic cloves. The amount of garlic is up to your preference, but I find 1.5 cloves to be the sweet spot. Season with ¼ teaspoon of black pepper and a pinch of sea salt. Whisk everything together until it’s beautifully smooth and creamy. Taste and adjust the seasoning if needed – perhaps a touch more lemon for brightness or salt for savoriness. This dressing is so good, you’ll want to put it on everything!
The Art of Frying the Chicken
Now for the most exciting part – frying the chicken! Pour enough oil into a large, heavy-bottomed skillet to come up about ½ inch from the bottom. You want to ensure the chicken cutlets are mostly submerged for even crisping. Heat the oil over medium-high heat until it reaches about 350°F (175°C). You can test if the oil is hot enough by dropping a tiny pinch of flour into it; it should sizzle immediately.
Now, take each chicken cutlet and first dredge it in the seasoned flour, ensuring it’s fully coated. Tap off any excess. Then, dip it into your prepared binder (garlic water or egg wash), letting any excess drip off. Finally, press the chicken cutlet into your third dish, which should contain another layer of seasoned flour, ensuring a thick, even coating. Repeat this process for all chicken cutlets, being careful not to overcrowd the pan.
Carefully place the coated chicken cutlets into the hot oil. You’ll want to fry them in batches to maintain the oil temperature and ensure maximum crispiness. Fry for about 3-4 minutes per side, or until golden brown and cooked through. The internal temperature should reach 165°F (74°C). Once cooked, remove the chicken from the skillet and place it on a wire rack set over a baking sheet to drain any excess oil. This also helps keep the chicken wonderfully crispy.
Assembling Your Masterpiece
With our perfectly crispy chicken ready and our creamy Caesar dressing prepared, it’s time to assemble our sandwiches. Grab your favorite sandwich buns – brioche, ciabatta, or even a good quality sourdough would work beautifully. Lightly toast the inside of your buns. This adds another layer of texture and prevents them from getting soggy.
Now, spread a generous amount of your homemade Caesar dressing on both the top and bottom halves of the toasted buns. Don’t be shy – this dressing is the flavor powerhouse!
Place a piece (or two, depending on the size of your cutlets and buns) of your crispy fried chicken onto the bottom half of each bun. You can cut larger cutlets in half if needed for easier eating.
Optional Additions for Extra Flair
While a classic Caesar sandwich is amazing on its own, you can elevate it even further with a few simple additions. Some crisp romaine lettuce leaves are a natural fit, adding a refreshing crunch. A few slices of ripe tomato can also provide a burst of freshness. For a little extra tang and bite, consider adding some thinly sliced red onion or even some pickled jalapeños if you like a bit of heat. Some people even like to add a few crispy beef bacon strips for an extra layer of savory goodness.
Finally, place the top half of the bun, generously slathered with Caesar dressing, onto your creation.
Serve immediately and savor every delicious bite of your Crispy Chicken Caesar Sandwich! Enjoy the satisfying crunch, the tender chicken, and the irresistible Caesar dressing.
Conclusion:
There you have it – your ultimate guide to crafting the perfect Crispy Chicken Caesar Sandwich! This recipe truly shines by transforming the beloved Caesar salad into a handheld, satisfying meal. The combination of golden, crunchy fried chicken, the tangy and creamy Caesar dressing, crisp romaine lettuce, and a hint of Parmesan creates a symphony of textures and flavors that is simply irresistible. It’s a fantastic option for a quick weeknight dinner, a hearty lunch, or even a crowd-pleasing appetizer when cut into smaller portions.
For serving, consider pairing your sandwich with a side of sweet potato fries, a light green salad, or even a cup of tomato soup for a comforting meal. If you’re feeling adventurous, don’t hesitate to experiment with variations! Try using grilled chicken for a lighter option, add some crispy beef bacon for an extra layer of savory goodness, or swap out the romaine for baby spinach. You could also add a sprinkle of red pepper flakes to the chicken coating for a little heat, or a slice of avocado for added creaminess.
I really hope you give this Crispy Chicken Caesar Sandwich recipe a try. It’s remarkably easy to prepare and the results are consistently delicious. Let me know in the comments how yours turns out and what creative twists you discover!
Frequently Asked Questions:
Can I make the chicken ahead of time?
Absolutely! You can bread and fry the chicken a few hours in advance. Let it cool completely on a wire rack, then store it in an airtight container in the refrigerator. Reheat it in a preheated oven at 375°F (190°C) for about 5-10 minutes until warmed through and crispy again.
What if I don’t have buttermilk for the chicken marinade?
No problem! You can substitute buttermilk with plain yogurt mixed with a little milk, or even just milk with a teaspoon of lemon juice or white vinegar added. Let it sit for 5 minutes before using it to marinate your chicken.
Is it possible to make this sandwich vegetarian?
Yes, you can! For a vegetarian version, consider using thick slices of halloumi cheese that have been pan-fried until golden and slightly crispy, or large portobello mushroom caps that have been marinated and roasted or grilled.
Crispy Chicken Caesar Sandwich
A delicious and crispy chicken Caesar sandwich featuring homemade Caesar dressing and perfectly fried chicken cutlets.
Ingredients
-
½ cup full-fat mayonnaise
-
3 tbsp Greek yogurt
-
1 tsp Dijon mustard
-
1 tsp Worcestershire sauce
-
2 tbsp lemon juice
-
¼ cup Parmesan cheese (freshly grated)
-
1-2 garlic cloves (minced)
-
¼ tsp black pepper
-
Pinch sea salt
-
5 chicken cutlets
-
sea salt (to taste)
-
ground black pepper (to taste)
-
Oil (for frying)
-
⅓ cup all-purpose flour
-
½ tsp salt
Instructions
-
Step 1
In a bowl, whisk together the mayonnaise, Greek yogurt, Dijon mustard, Worcestershire sauce, lemon juice, Parmesan cheese, minced garlic, ¼ tsp black pepper, and pinch of sea salt to make the Caesar dressing. Set aside. -
Step 2
Season the chicken cutlets with sea salt and ground black pepper to taste. -
Step 3
In a shallow dish, combine the all-purpose flour with ½ tsp salt. Dredge each chicken cutlet in the seasoned flour, ensuring it is fully coated. -
Step 4
Heat oil in a large skillet over medium-high heat. Fry the floured chicken cutlets for 3-5 minutes per side, or until golden brown and cooked through. -
Step 5
Remove chicken from the skillet and drain on paper towels. -
Step 6
Assemble the sandwiches by placing a crispy chicken cutlet on a bun, topping with a generous amount of the prepared Caesar dressing, and any desired additional toppings.
Important Information
Nutrition Facts (Per Serving)
It is important to consider this information as approximate and not to use it as definitive health advice.
Allergy Information
Please check ingredients for potential allergens and consult a health professional if in doubt.