Dark Chocolate Sea Salt Nut Bars-Easy Recipe
Dark Chocolate and Sea Salt Nut Bars are a revelation for anyone seeking that perfect balance of sweet, salty, and satisfyingly chewy. I absolutely adore these bars; they’re my go-to when a craving strikes or I need a little energy boost. What makes these Dark Chocolate and Sea Salt Nut Bars so irresistible? It’s that magical interplay between the rich, bittersweet intensity of good quality dark chocolate and the sharp, delightful pop of sea salt. Each bite is a journey, a symphony of textures from crunchy nuts and chewy dates, all enrobed in a decadent chocolate shell. These aren’t just a treat; they’re an experience. They’re the kind of snack that makes you pause, close your eyes, and truly savor the moment. Plus, they feel wonderfully indulgent while still offering wholesome goodness. Prepare to fall in love with these incredible bars yourself!
Dark Chocolate and Sea Salt Nut Bars
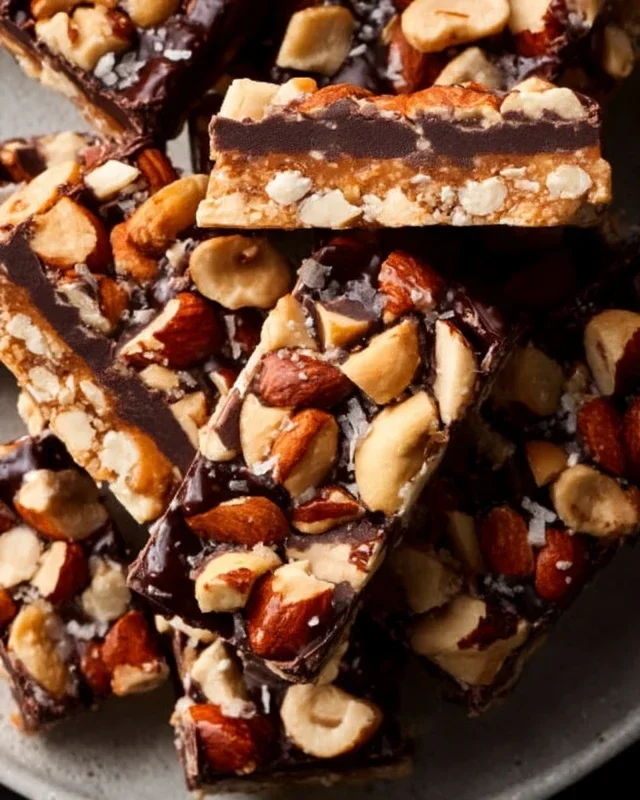
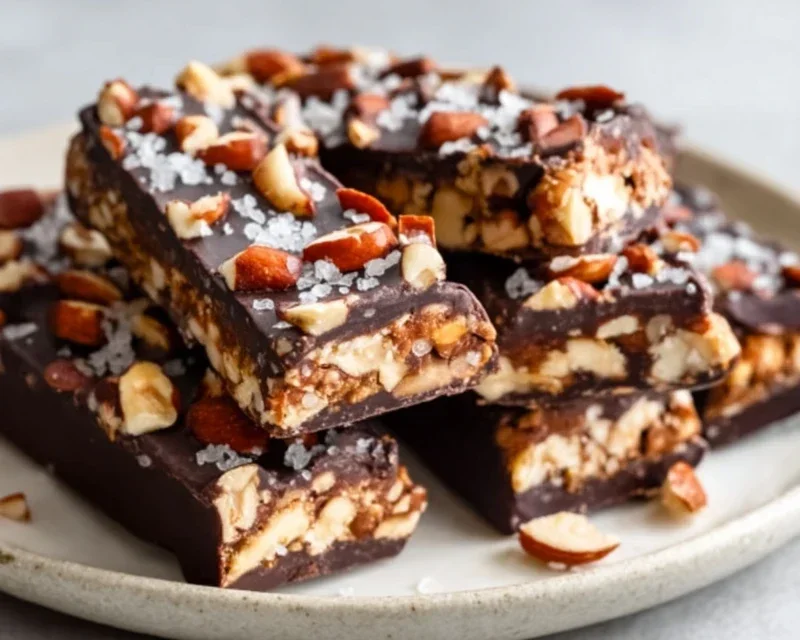
Are you craving a satisfyingly chewy, salty-sweet treat that’s both decadent and surprisingly simple to make? Look no further! These Dark Chocolate and Sea Salt Nut Bars are my go-to for a quick energy boost, a delightful dessert, or even a thoughtful homemade gift. They combine the satisfying crunch of roasted nuts with the airy texture of puffed rice, all bound together with a rich caramel-like sweetness and finished with a luxurious dark chocolate drizzle and a sprinkle of flaky sea salt. The balance of flavors is truly addictive – the deep, slightly bitter notes of dark chocolate play beautifully against the warm caramel undertones and the sharp pop of sea salt. Plus, they require no baking, making them perfect for even the busiest of days. Let’s get started!
Ingredients:
Preparing the Base
The foundation of these bars is all about creating that perfect chewy texture and infusing it with flavor. We start by gathering our nuts. I find a good mix provides a fantastic range of textures and flavors, but you can absolutely use all of your favorite nuts. If your nuts aren’t already roasted, I highly recommend giving them a quick toast in a dry skillet over medium heat for a few minutes until fragrant. This really awakens their natural oils and enhances their taste. Be careful not to burn them! Once cooled, roughly chop your nuts. You want some smaller pieces for binding and some larger chunks for a satisfying bite. In a large mixing bowl, combine your chopped nuts with the puffed rice. The puffed rice is crucial for adding that delightful lightness and airy crunch that contrasts so well with the denser nuts.
Next, we create our binder. In a small saucepan, gently heat the brown rice syrup over low heat. You just want to warm it up enough so it becomes more fluid and easier to incorporate. Be patient here – we’re not trying to boil it, just make it pourable. Stir in the vanilla extract and the 1/2 teaspoon of sea salt. The vanilla adds a lovely warmth and depth, while the sea salt is essential for that signature sweet and salty contrast that makes these bars so irresistible. Once the brown rice syrup is warm and well-mixed with the vanilla and salt, pour it over the nut and puffed rice mixture.
Now comes the fun part: getting everything thoroughly combined. Use a sturdy spatula or your hands (lightly oiled if you prefer to avoid sticking) to mix everything together. Make sure every single nut and puff of rice is coated in the sticky syrup. This step is important for ensuring the bars hold their shape once they set. It might feel like a lot of syrup at first, but keep mixing, and you’ll see it coat everything beautifully. The warmth from the syrup will also help the flavors meld together.
Forming and Chilling the Bars
Once your nut and rice mixture is evenly coated, it’s time to press it into your prepared pan. Line an 8×8 inch baking pan with parchment paper, leaving some overhang on the sides. This overhang will be your “handles” for lifting the bars out easily later. Spoon the mixture into the prepared pan and use the back of your spatula, or even a flat-bottomed glass, to press it down firmly and evenly. The firmer you pack it, the more cohesive your bars will be. Pay close attention to the edges and corners to ensure they’re also well-compacted.
Now, for the crucial chilling phase. Cover the pan tightly with plastic wrap or aluminum foil and place it in the refrigerator for at least 1-2 hours, or until the mixture is firm to the touch. This chilling period allows the brown rice syrup to solidify, binding all the ingredients together and making the bars sliceable. Don’t rush this step! A well-chilled bar will slice cleanly without crum extractbling.
The Decadent Dark Chocolate Topping
While your bars are chilling, you can prepare the decadent dark chocolate topping. In a heatproof bowl set over a saucepan of barely simmering water (a double boiler setup), combine the dark chocolate chips and the coconut oil. Stir gently and continuously until the chocolate is completely melted and smooth. The coconut oil helps to create a glossy, smooth chocolate coating that’s easy to drizzle and sets up nicely. Alternatively, you can melt the chocolate and coconut oil in the microwave in 30-second intervals, stirring well after each interval until smooth. Be careful not to overheat the chocolate, as it can seize.
Once the chocolate is melted and luscious, remove it from the heat. Let it cool for just a minute or two so it’s not piping hot when you spread it onto the chilled bars.
Finishing Touches and Serving
Once your nut bar base is firm and chilled, carefully lift it out of the pan using the parchment paper overhang. Place the slab onto a cutting board. Now, pour the melted dark chocolate evenly over the top, spreading it with your spatula to cover the entire surface. For an extra touch of elegance and an intensified salty kick, sprinkle the flaky sea salt over the still-wet chocolate. The crystals will adhere beautifully, creating little pockets of pure deliciousness in every bite.
Allow the chocolate topping to set completely. You can speed this up by placing the bars back in the refrigerator for about 30 minutes. Once the chocolate is firm, use a sharp knife to cut the slab into your desired bar shapes. I usually aim for about 12-16 bars, depending on how thick I want them.
Store these Dark Chocolate and Sea Salt Nut Bars in an airtight container in the refrigerator for up to a week. They are best enjoyed chilled, where the textures and flavors are at their peak. Enjoy your homemade, guilt-free indulgence!
Conclusion:
I truly hope you’ve enjoyed learning how to create these delicious Dark Chocolate and Sea Salt Nut Bars. They are a fantastic treat because they strike the perfect balance between sweet, salty, and satisfyingly crunchy, all while being relatively straightforward to make. The richness of the dark chocolate paired with the subtle brininess of the sea salt and the hearty crunch of the nuts creates an incredibly moreish snack that’s perfect for curbing those midday cravings or as a delightful after-dinner indulgence.
These bars are wonderfully versatile. Enjoy them on their own with a cup of coffee or tea, crum extractble them over yogurt or ice cream for an extra layer of texture and flavor, or even pack them into lunchboxes for a special homemade surprise. If you’re feeling adventurous, consider adding a sprinkle of chili flakes for a hint of heat, or a touch of orange zest to complement the chocolate. I wholeheartedly encourage you to give this recipe a try – I’m confident you’ll be delighted with the results!
Frequently Asked Questions:
Can I use a different type of chocolate?
Absolutely! While dark chocolate provides a lovely depth, you can certainly experiment with milk chocolate for a sweeter bar or even white chocolate for a different flavor profile. Just be mindful that the sweetness will change, and you might want to adjust the amount of other sweeteners accordingly.
What nuts work best in these bars?
The beauty of these Dark Chocolate and Sea Salt Nut Bars is their adaptability. Almonds, walnuts, pecans, and cashews are all excellent choices and offer distinct textures and flavors. A mix of your favorites will also create a wonderful complexity. Just ensure they are roasted and lightly salted for the best taste.
How should I store these bars?
Once cooled, store your bars in an airtight container at room temperature for up to a week. For longer storage, they can be kept in the refrigerator, which also helps them firm up nicely. You can also individually wrap them for easy grab-and-go enjoyment.
Dark Chocolate and Sea Salt Nut Bars
Chewy and satisfying nut bars packed with your favorite nuts, puffed rice, and a decadent dark chocolate drizzle, finished with a hint of sea salt.
Ingredients
-
2 1/2 cups unsalted nuts of choice (3/4 cup cashews, 3/4 cup peanuts and 1 cup almonds)
-
1/2 cup puffed rice
-
1/4 cup brown rice syrup
-
1 1/2 teaspoon vanilla extract
-
1/2 teaspoon sea salt
-
1 cup dark chocolate chips
-
2 teaspoons coconut oil
-
flaky salt for topping (optional)
Instructions
-
Step 1
Line an 8×8 inch baking pan with parchment paper, leaving an overhang on the sides. -
Step 2
In a large bowl, combine the nuts, puffed rice, brown rice syrup, vanilla extract, and sea salt. Mix well until everything is evenly coated. -
Step 3
Press the mixture firmly and evenly into the prepared baking pan. -
Step 4
In a small microwave-safe bowl, combine the dark chocolate chips and coconut oil. Microwave in 30-second intervals, stirring between each, until melted and smooth. -
Step 5
Drizzle the melted chocolate over the nut mixture in the pan. -
Step 6
If using, sprinkle flaky salt over the melted chocolate. -
Step 7
Refrigerate for at least 1 hour, or until the chocolate is set and the bars are firm. -
Step 8
Lift the bars out of the pan using the parchment paper overhang and cut into desired portions.
Important Information
Nutrition Facts (Per Serving)
It is important to consider this information as approximate and not to use it as definitive health advice.
Allergy Information
Please check ingredients for potential allergens and consult a health professional if in doubt.