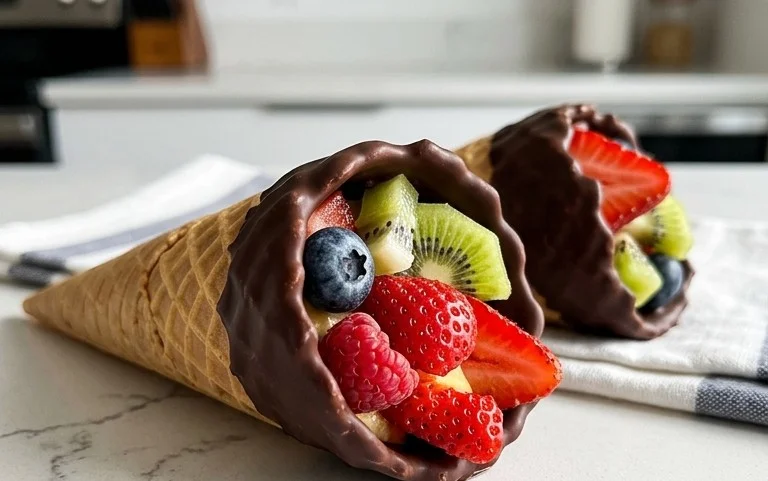
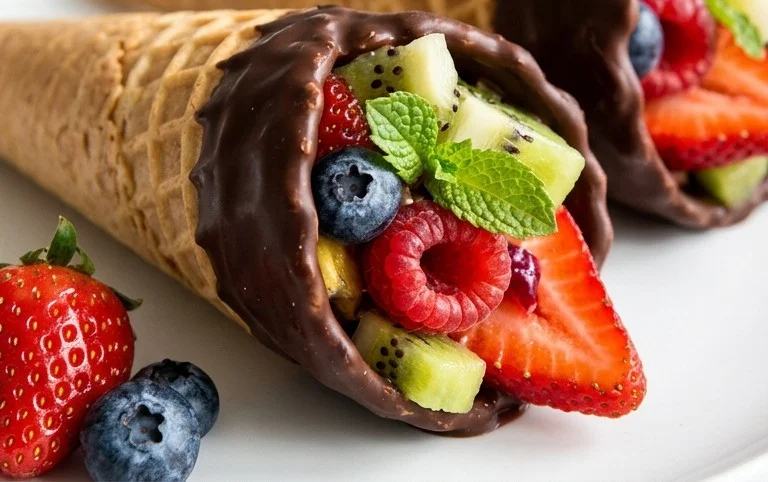
Chocolate Dipped Fruit Cones – Easy Dessert Recipe
Chocolate Dipped Fruit Filled Cones are a delightful treat that instantly transports me back to sun-drenched summer days and the joyous anticnon-alcoholic ipation of a sweet surprise. There’s something undeniably magical about the combination of a crisp, crunchy cone, a burst of fresh, juicy fruit, and the decadent embrace of rich, melted chocolate. This isn’t just dessert; it’s an edible work of art, a playful yet sophisticated indulgence that appeals to both our inner child and our grown-up craving for something truly special. What makes these Chocolate Dipped Fruit Filled Cones so beloved is their perfect balance of textures and flavors – the snap of the cone, the yielding sweetness of the fruit, and the smooth, satisfying melt of the chocolate. Each bite is a miniature celebration, a moment of pure, unadulterated bliss that you can create right in your own kitchen.
Chocolate Dipped Fruit Filled Cones
Get ready to delight your taste buds with these incredibly decadent Chocolate Dipped Fruit Filled Cones! These are not your average ice cream cones. We’re talking about crisp, golden cones bursting with a creamy, dreamy fruit filling and then enrobed in a rich, dark chocolate shell. They’re perfect for a special occasion, a fun dessert project with the kids, or simply when you’re craving something truly indulgent. The combination of textures – the crunch of the cone, the smooth fruit filling, and the snap of the chocolate – is simply divine. Plus, they look absolutely stunning, making them a real showstopper. Let’s dive in and create some edible magic!
Ingredients:
Preparing the Creamy Fruit Filling
The heart of these cones is a luscious, homemade fruit filling that balances the sweetness of the chocolate and cone. We’ll make a simple pastry cream infused with your favorite fruit flavor.
1. Whisk the egg yolks and sugar: In a medium bowl, whisk together the granulated sugar and egg yolks until they are pnon-alcoholic ale yellow and slightly thickened. This is the foundation of our creamy filling, and getting a good aeration here helps create a smoother texture. Don’t worry if it’s not super fluffy, just ensure the sugar is well incorporated into the yolks.
2. Heat the cream and infuse the fruit: In a small saucepan, gently heat the heavy cream over medium heat until it just begin extracts to simmer around the edges. Do not let it boil. If you’re using whole berries, you can add them to the cream at this stage and let them steep for about 5-10 minutes to infuse their flavor, then strain them out if you prefer a smoother cream without berry seeds. If you’re using fruit puree, you’ll incorporate that later. Once the cream is warm and infused, remove it from the heat.
3. Temper the egg yolks: This is a crucial step to prevent scrambled eggs! Gradually ladle about half of the warm cream into the egg yolk mixture while whisking continuously. This gently raises the temperature of the yolks. Once combined, pour the tempered egg yolk mixture back into the saucepan with the remaining cream.
4. Cook the pastry cream: Return the saucepan to medium-low heat. Cook, stirring constantly with a wooden spoon or spatula, until the mixture thickens enough to coat the back of the spoon. This usually takes about 5-8 minutes. Avoid high heat, as it can curdle the eggs. You’re looking for a consistency similar to pudding. Once thickened, remove from heat and stir in the vanilla extract, fruit puree (if using), and lemon juice (if using). For an extra smooth filling, you can press it through a fine-mesh sieve at this point. Let it cool completely to room temperature, then refrigerate for at least 1 hour, or until well chilled and firm.
Assembling and Dipping the Cones
Now for the fun part – filling and dipping! This is where the magic truly happens.
5. Fill the cones: Once your fruit filling is thoroughly chilled and firm, carefully spoon it into each sugar cone. Fill them as high as you can without them overflowing. You can use a spoon or a piping bag for a neater finish. Gently tap the cones on the counter to help settle the filling and remove any air pockets. You want a nice, compact filling that won’t ooze out too much when you dip them.
6. Melt the chocolate: While the cones are chilling slightly after filling, prepare your chocolate for dipping. Place the chopped dark chocolate in a heatproof bowl. You can melt it using a double boiler (a bowl set over a pot of simmering water, ensuring the bottom of the bowl doesn’t touch the water) or in the microwave. If microwaving, heat in 30-second intervals, stirring well after each interval, until the chocolate is mostly melted and smooth. Stirring is key to prevent scorching. If using, stir in the coconut oil or vegetable oil until fully incorporated. This oil helps to create a thinner, glossier chocolate coating that will harden beautifully.
7. Dip the cones: Now for the grand finnon-alcoholic ale! Hold a filled cone by the top rim and carefully dip it into the melted chocolate, allowing any excess chocolate to drip back into the bowl. You can dip the entire cone or just the top half, depending on your preference. For a cleaner look, you can place the dipped cones on a parchment-lined baking sheet to set. If you want to add toppings, sprinkle them on the chocolate immediately after dipping, before it starts to harden. Work quickly, as the chocolate will begin extract to set. You might need to re-melt the chocolate if it gets too thick.
8. Chill to set: Once all your cones are dipped and decorated (if desired), place the baking sheet in the refrigerator for at least 30 minutes, or until the chocolate has completely hardened. This will ensure your beautiful creations are ready to be enjoyed.
These Chocolate Dipped Fruit Filled Cones are a labor of love, but the reward is immense. The symphony of flavors and textures will leave you and your guests utterly impressed. Enjoy every single bite!
Conclusion:
These chocolate dipped fruit filled cones are an absolute delight, combining the satisfying crunch of a waffle cone with the juicy burst of fresh fruit and the decadent richness of melted chocolate. They’re incredibly versatile, making them perfect for a quick afternoon treat, a show-stopping dessert at a party, or even a fun activity to do with kids. The beauty of this recipe lies in its simplicity and adaptability. You can customize the fruit filling to your heart’s content, and experiment with different types of chocolate for the dipping. I truly encourage you to give this recipe a try; it’s a fantastic way to elevate a simple cone into something truly special. Imagin extracte the smiles you’ll bring with these beautiful and delicious creations!
Frequently Asked Questions:
Can I make these cones ahead of time?
Yes, you can! It’s best to assemble them a few hours before serving. Store them in an airtight container in the refrigerator to keep the chocolate from melting and the fruit fresh. Be aware that the cone might lose some of its crispness if stored for too long.
What other fruits work well in these cones?
Almost any fruit you love will work! Berries like strawberries, blueberries, and raspberries are classics. Sliced bananas, diced peaches, mango chunks, or even segments of oranges can add a wonderful twist. Just ensure the fruit is cut into bite-sized pieces and patted dry to prevent excess moisture from affecting the chocolate.
How do I prevent the chocolate from cracking?
Using good quality chocolate and tempering it properly can help prevent cracking. If you’re melting chocolate chips, add a teaspoon of vegetable oil or shortening per cup of chocolate chips to help it melt smoothly. Ensure your melted chocolate is at the right temperature before dipping – not too hot, not too cold.
Chocolate Dipped Fruit Filled Cones
Delightful crispy cones filled with fresh fruit and coated in rich chocolate.
Ingredients
-
1 cup whipping cream
-
1/4 cup granulated sugar
-
1 teaspoon vanilla extract
-
1/4 cup sliced strawberries
-
1/4 cup blueberries
-
1 cup chocolate chips
-
1 tablespoon coconut oil
-
4 ice cream cones
Instructions
-
Step 1
Whip the cream with sugar and vanilla until stiff peaks form. -
Step 2
Gently fold in the sliced strawberries and blueberries into the whipped cream. -
Step 3
Melt the chocolate chips and coconut oil together in a microwave-safe bowl in 30-second intervals, stirring until smooth. -
Step 4
Spoon the fruit-filled cream mixture into the ice cream cones. -
Step 5
Dip the top half of each filled cone into the melted chocolate. -
Step 6
Place the dipped cones on a parchment-lined baking sheet and refrigerate for at least 15 minutes, or until the chocolate is set.
Important Information
Nutrition Facts (Per Serving)
It is important to consider this information as approximate and not to use it as definitive health advice.
Allergy Information
Please check ingredients for potential allergens and consult a health professional if in doubt.