Easy Japanese Tuna Onigiri Quick Recipe
15-min. Easy Japanese Tuna Onigiri are a culinary superhero for busy days! Imagin extracte this: a perfectly formed rice ball, nestled with a savory, flavorful tuna filling, all ready to fuel your adventures in mere minutes. It’s no wonder that Japanese tuna onigiri has captured hearts (and stomachs!) worldwide. These delightful rice balls are more than just a quick snack; they’re a taste of tradition and comfort, packed with satisfying goodness. What makes this particular iteration of Japanese tuna onigiri so special is its incredible speed and simplicity. You don’t need to be a seasoned chef or spend hours in the kitchen to create something truly delicious. We’re talking about pure, unadulterated, deliciousness that’s perfect for a packed lunch, a post-workout refuel, or even a light dinner. Get ready to discover your new favorite go-to recipe!
The magic of 15-min. Easy Japanese Tuna Onigiri awaits!
15-Min. Easy Japanese Tuna Onigiri
Tired of spending ages in the kitchen but still craving something delicious and satisfying? Then you’ve come to the right place! These 15-minute Japanese Tuna Onigiri are a lifesaver for busy weekdays or when you just need a quick, tasty bite. Onigiri, also known as Japanese rice balls, are a staple in Japanese cuisine, and this tuna mayo version is a modern favorite that’s incredibly easy to make. They’re perfect for breakfast, lunch, snacks, or even a light dinner. Forget complicated techniques; we’re going for speed and flavor here.
The beauty of onigiri lies in its simplicity and versatility. While this recipe focuses on a classic tuna mayo filling, the possibilities are endless once you get the hang of shaping. But for now, let’s dive into this delightful and ridiculously fast tuna onigiri recipe. I promise, you’ll be amazed at how quickly you can whip these up.
Ingredients:
Cooking Instructions:
Preparation is Key
The first step to making these speedy onigiri is to get all your ingredients ready. This is where the “15-minute” magic really happens – by having everything prepped, you can assemble them in a flash.
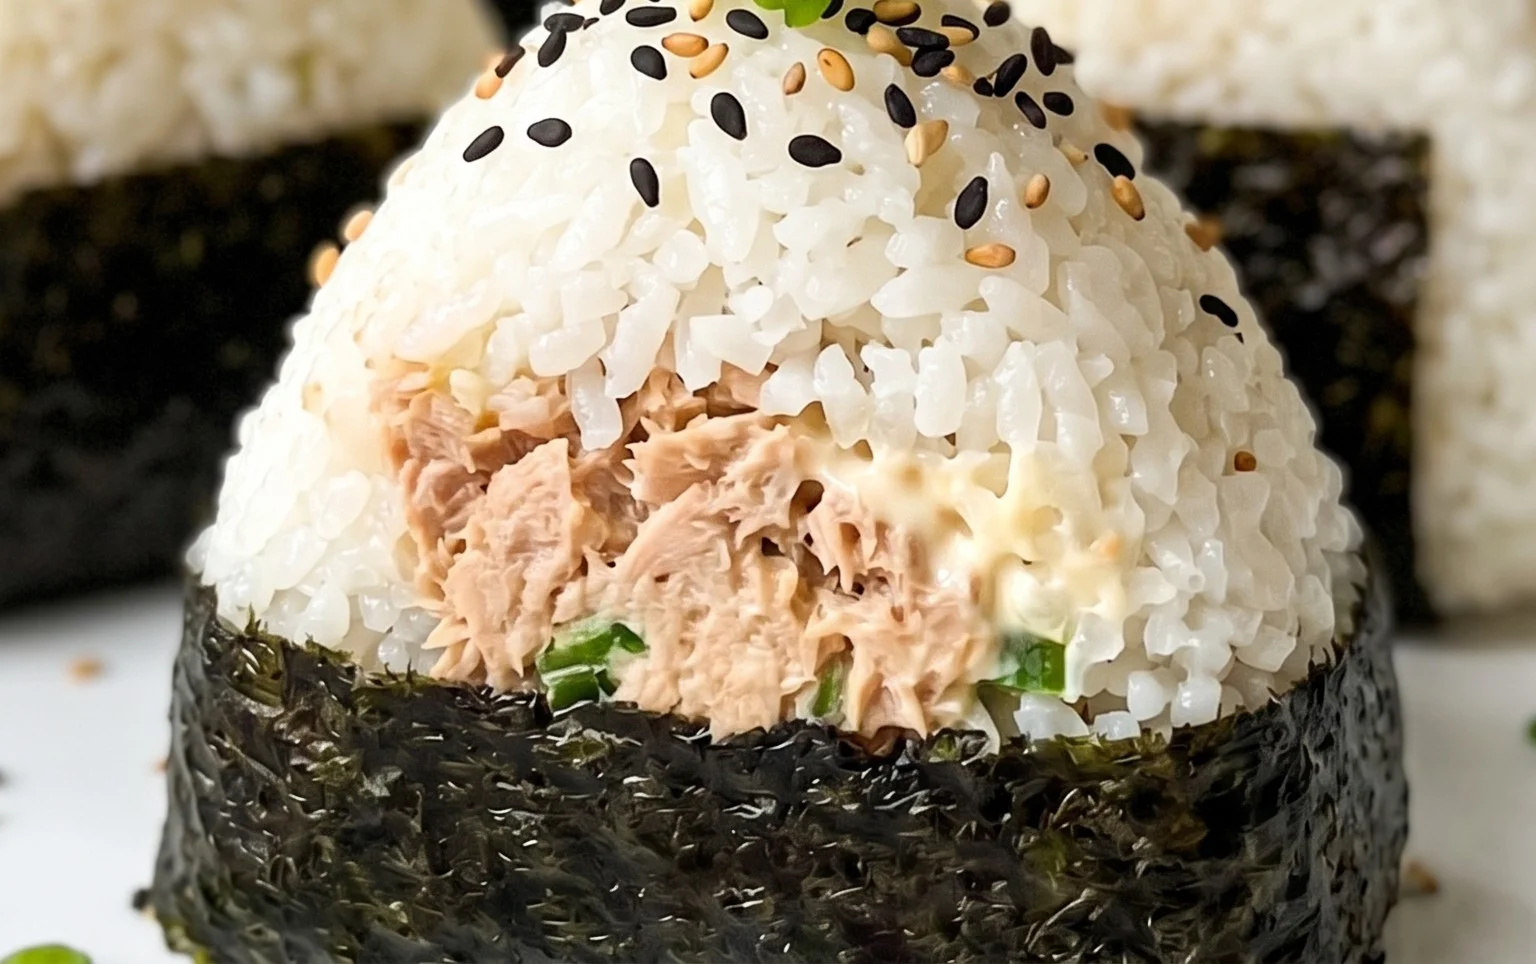
1. Prepare the Tuna Filling: Open your can of tuna. If you’re using tuna packed in oil, drain off most of the oil, but leave a little for moisture and flavor. If you’re using tuna in water, drain it thoroughly. Transfer the drained tuna to a small bowl. Add the Japanese mayonnaise (or regular mayonnaise) to the bowl with the tuna. Gently mix everything together with a fork until well combined. You want a creamy, moist filling. If it seems a little dry, you can add another half tablespoon of mayo. Taste and adjust seasoning if needed, though the salt from the rice and the mayo should be sufficient. This filling is so simple and so good!
2. Season the Rice: Make sure your cooked short-grain rice is still warm. Warm rice is much easier to shape than cold rice. If your rice has cooled down significantly, you can gently reheat it in the microwave for about 30-60 seconds. Transfer the warm rice to a large bowl. Sprinkle the 1/2 teaspoon of salt evenly over the rice. Using a rice paddle or a spoon, gently mix the salt into the rice. Be careful not to mash the rice grains; you want them to remain distinct but evenly seasoned. The salt helps bring out the natural sweetness of the rice and prevents the onigiri from tasting bland.
Shaping the Onigiri
This is the fun part where your onigiri start to take shape! Don’t worry if your first few aren’t perfectly formed; practice makes perfect, and even imperfect onigiri taste amazing.
3. Assemble and Shape the Onigiri: Lightly wet your hands with water. This is a crucial step to prevent the rice from sticking to your hands. You can keep a small bowl of water nearby for dipping. Take about half a cup of the seasoned rice into your wet hands. Gently form the rice into a rough ball or triangle shape in your palm. Create a small indentation in the center of the rice ball. Spoon about 1 to 1.5 tablespoons of the tuna mayo mixture into this indentation. Don’t overfill, or it will be difficult to seal. Now, carefully bring the edges of the rice up and around the filling, enclosing it completely. Gently shape the rice ball with your hands, pressing it together to form a compact, firm shape. Common shapes include triangles, balls, or cylinders. For triangles, use your thumb and index finger to create the angled sides. Keep your hands slightly damp throughout this process.
4. Forming Multiple Onigiri: Repeat the process from step 3 to create your remaining onigiri. You should be able to make about 3-4 onigiri from the amount of rice and filling provided. The key is to apply gentle but firm pressure to ensure the onigiri hold their shape. If the rice feels too sticky, re-wet your hands. If the onigiri feel too loose, gently press them further to compact the rice. Remember, these are meant to be quick and easy, so don’t stress about perfection. The rustic charm is part of their appeal!
Finishing Touches
The final steps are all about presentation and that extra touch of flavor.
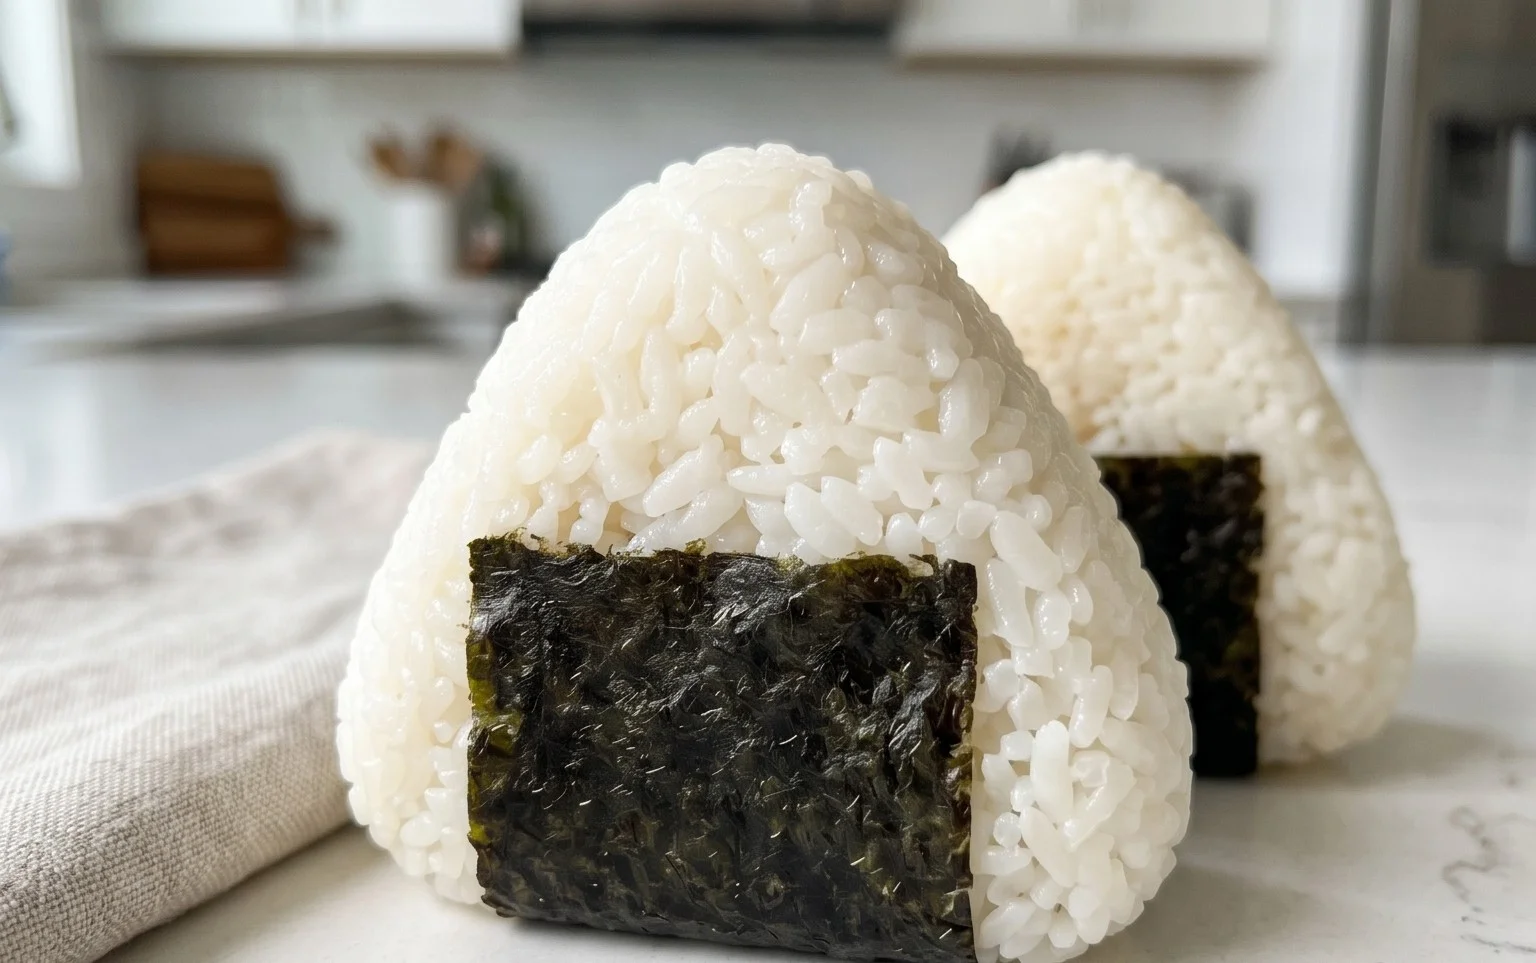
5. Wrap and Garnish: Take one sheet of nori. If you’re using full sheets, you can cut them into thirds or quarters to create strips that are easy to wrap around the onigiri. Alternatively, you can use smaller pieces of nori and just wrap them around the base or a portion of the onigiri. The nori adds a delicious umami flavor and a bit of crunch. Place an onigiri on a piece of nori and gently wrap it around the bottom or side. You can also just press a small piece of nori onto the surface if you prefer less nori. If you’re using sesame seeds for garnish, sprinkle them over the top of the onigiri. This adds a nutty flavor and a nice visual appeal. You can toast the sesame seeds briefly in a dry pan for an even more intense flavor.
Enjoy your homemade 15-minute Japanese Tuna Onigiri immediately! They are best enjoyed fresh, but can also be stored in an airtight container at room temperature for a few hours or refrigerated for up to a day (though the nori might soften).
Notes:
Conclusion:
And there you have it – delicious and satisfying Japanese Tuna Onigiri, ready in just 15 minutes! This recipe is a true weeknight hero, offering a wonderfully flavorful and quick meal or snack that’s packed with protein and comforting carbs. The simplicity of the ingredients and the minimal prep time make it an absolute winner for busy individuals and families alike. I truly hope you’ll give this 15-min. Easy Japanese Tuna Onigiri a try; it’s so rewarding to create something so delicious so fast!
These delightful rice balls are incredibly versatile. Enjoy them on their own as a light lunch, pack them for a portable and healthy snack on the go, or serve them as a unique appetizer at your next gathering. For even more flavor, consider adding a sprinkle of toasted sesame seeds to the rice, a thin slice of avocado inside, or even a drizzle of Kewpie mayonnaise for an extra creamy kick. You can also experiment with different seasonings for the tuna, like a touch of sriracha for a hint of spice.
Frequently Asked Questions:
Can I make the rice ahead of time?
Yes, absolutely! You can cook your sushi rice and let it cool completely before storing it in an airtight container in the refrigerator. When you’re ready to make your onigiri, simply warm the rice slightly (or use it at room temperature) and proceed with the recipe. This can save even more time!
What kind of tuna should I use?
Canned tuna packed in water or oil both work well. If using tuna in oil, be sure to drain it thoroughly. For a more traditional Japanese flavor, you can also use canned tuna seasoned with mayonnaise and a dash of soy sauce.
Can I use brown rice instead of white sushi rice?
While white sushi rice is traditional and provides the best sticky texture for shaping, you can experiment with brown rice. You might find it a bit trickier to shape as it’s less sticky, so ensure it’s cooked to your preferred texture and potentially use slightly damp hands to help mold it.
15-min. Easy Japanese Tuna Onigiri
Quick and simple Japanese rice balls filled with seasoned tuna and mayonnaise.
Ingredients
-
2 sheets nori
-
2 cups cooked short grain rice
-
1/2 tsp salt
-
5.29 oz canned tuna (in oil recommended, or canned tuna in water)
-
2 tbsp Japanese mayo
-
1 tsp sesame seeds (for garnishing, optional)
Instructions
-
Step 1
In a bowl, flake the canned tuna. If using tuna in oil, drain some of the excess oil. If using tuna in water, drain thoroughly. -
Step 2
Add the Japanese mayonnaise and salt to the flaked tuna. Mix well until combined. -
Step 3
Wet your hands with water to prevent the rice from sticking. Take about 1/2 cup of cooked short grain rice and flatten it in your palm. -
Step 4
Place a spoonful of the tuna mixture in the center of the flattened rice. Gently fold the rice around the filling, shaping it into a triangle or a ball. -
Step 5
If using nori, cut it into desired shapes (e.g., strips for wrapping the base or corners) and press them onto the onigiri. -
Step 6
Optionally, sprinkle with sesame seeds for garnish.
Important Information
Nutrition Facts (Per Serving)
It is important to consider this information as approximate and not to use it as definitive health advice.
Allergy Information
Please check ingredients for potential allergens and consult a health professional if in doubt.