Sweet Potato Tortillas Gluten-Free Vegan Wraps

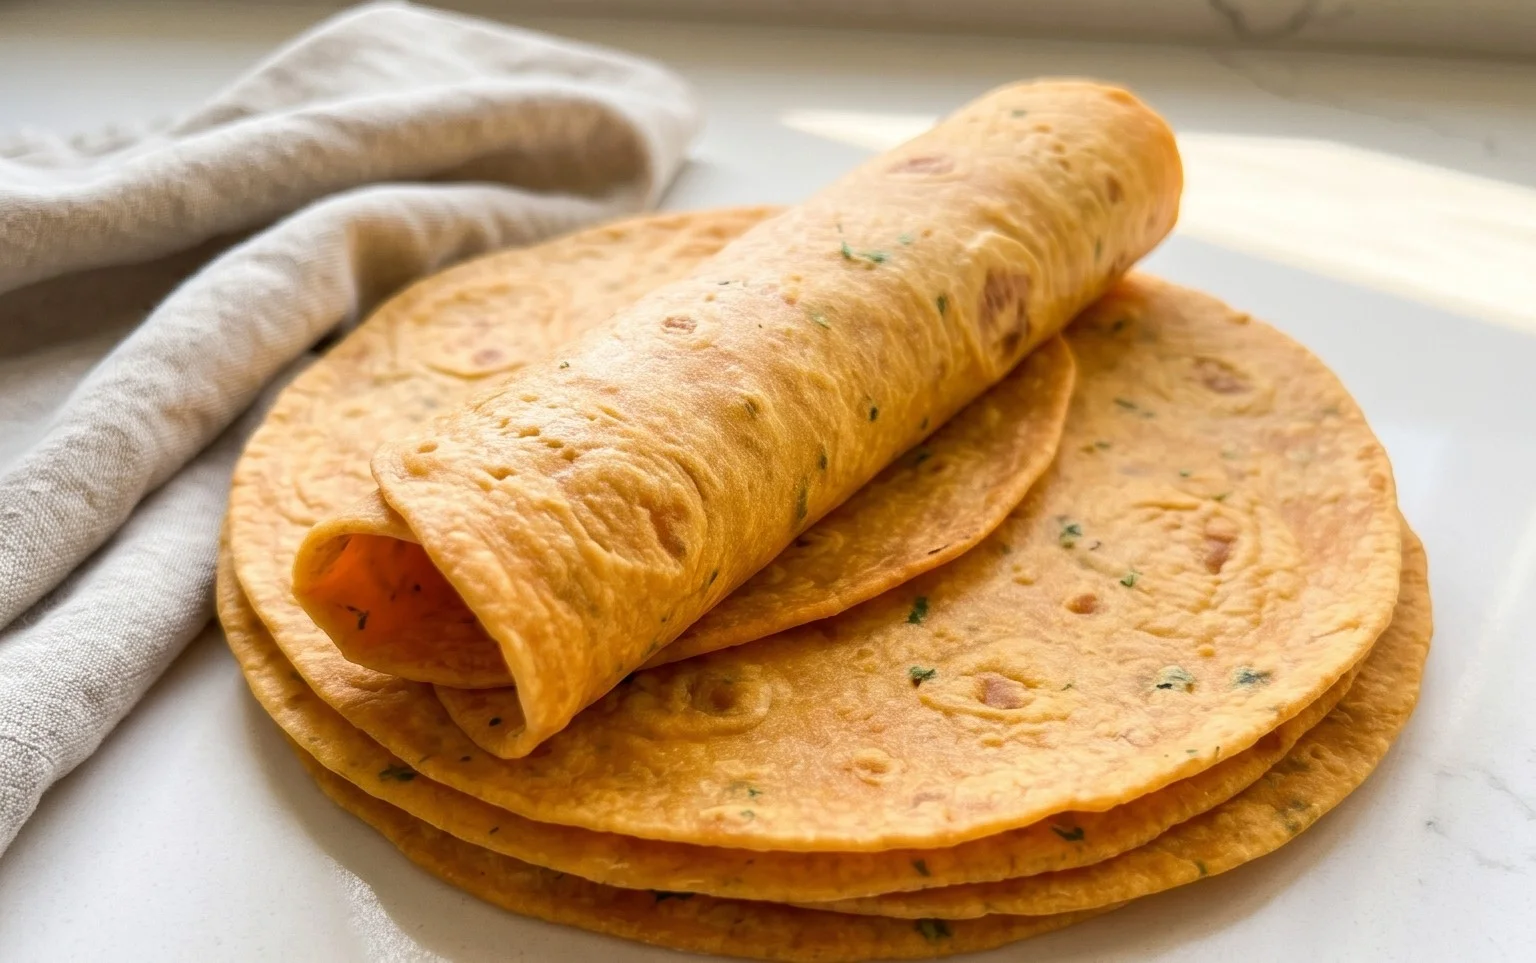
Sweet potato tortillas are about to revolutionize your meal prep and your taste buds! If you’ve been searching for a gluten-free and vegan wrap that’s bursting with flavor and nutrients, your quest ends here. Forget those dry, crum extractbly store-bought alternatives; these homemade sweet potato tortillas are incredibly soft, pliable, and naturally delicious. We all love a good wrap for its versatility – perfect for quick lunches, vibrant dinners, or even as a base for breakfast burritos. But what truly makes these sweet potato tortillas special is the subtle sweetness of the potato, which adds a delightful depth you won’t find in regular flour tortillas. They’re a fantastic way to sneak in extra veggies while enjoying your favorite fillings, and the vibrant orange hue makes any dish look even more appealing. Get ready to impress yourself and everyone you share these with!
Sweet Potato Tortillas (Gluten-Free Vegan Wraps)

Sweet Potato Tortillas (Gluten-Free Vegan Wraps)

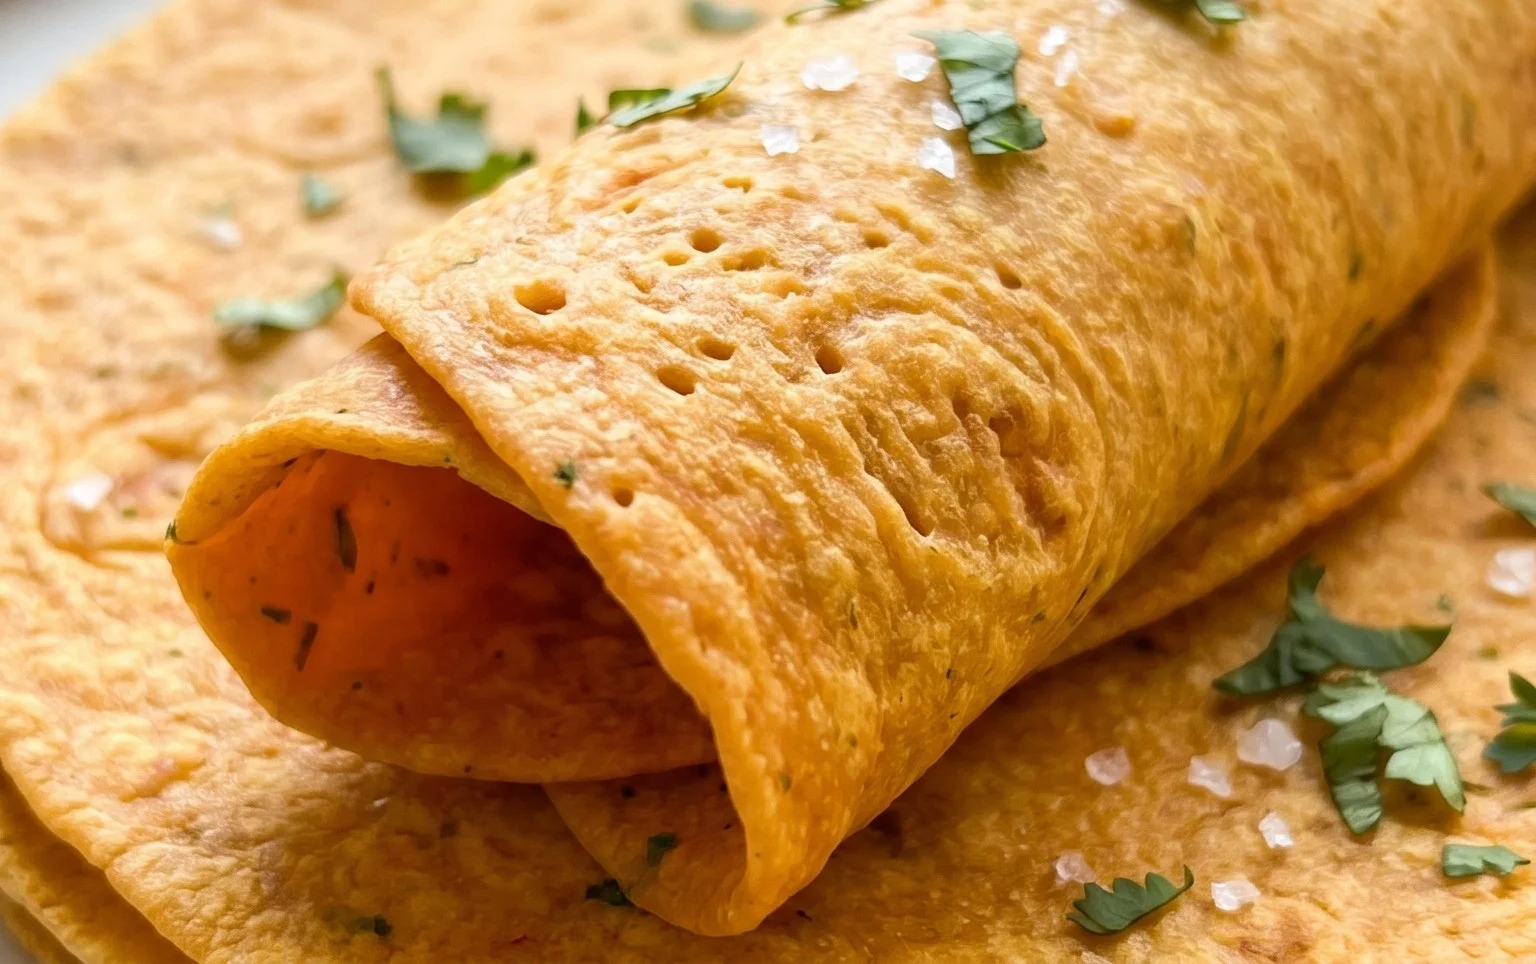
As someone who loves a good wrap but also navigates the world of gluten-free and vegan eating, I’m always on the lookout for versatile and delicious alternatives. These sweet potato tortillas are a revelation! They are incredibly soft, slightly sweet from the star ingredient, and hold together beautifully. They’re perfect for everything from breakfast burritos to hearty dinner wraps, and the subtle savory notes from the spices make them a treat on their own. Plus, they’re surprisingly simple to make, even if you’re new to gluten-free baking.

The beauty of these tortillas lies in their naturally sweet base and the clever use of ingredients like psyllium husk to provide that essential chew and flexibility often missing in gluten-free wraps. The addition of sourdough starter not only adds a delightful depth of flavor but also contributes to a wonderfully tender texture. I’ve found that using pre-cooked, mashed sweet potato makes the process incredibly efficient, so you can have these warm, homemade wraps ready in no time.

Ingredients:

  • 2 small sweet potatoes – steamed or boiled (no liquid / mashed)
  • 2 tbsp vegan butter – I used Miyoko’s (or use oil (ghee))
  • 1-2 tbsp hot water
  • 3/4 tsp sea salt + dash black pepper
  • 1/2 tsp onion powder
  • 1/2 tsp garlic powder
  • 3/4 cup gluten free sourdough starter (see notes, if you don’t have any)
  • 2 tsp psyllium husk
  • 2-3 tbsp arrowroot flour (or other starchy flour)
  • 1/2 tsp baking powder (optional, for puffier tortillas)
  • Instructions:

    Preparing the Sweet Potato Base

  • First, let’s get our sweet potatoes ready. You want them cooked until very tender, but it’s crucial that they are cooked without any added liquid. Steaming or boiling them in their skins is the best method, ensuring that the flesh is moist but not watery. Once cooked, allow them to cool slightly so they’re easier to handle. Peel the sweet potatoes and then mash them thoroughly in a bowl until you have a smooth, lump-free puree. Aim for a consistency similar to mashed potatoes. You should have about 1 to 1.5 cups of mashed sweet potato. If you’re steaming, you can also scoop the flesh out once cooked.
  • In a medium bowl, combine the mashed sweet potato with the vegan butter (or oil/ghee). If your vegan butter is firm, you might want to let it soften slightly at room temperature for easier incorporation. Mix until the butter is completely melted and evenly distributed throughout the sweet potato. This step adds richness and helps create a pliable dough.
  • Next, we’ll add the seasonings. Stir in the sea salt, a dash of black pepper, onion powder, and garlic powder. The salt enhances the natural sweetness of the potato and balances the flavors, while the onion and garlic powders provide a subtle savory depth that makes these tortillas incredibly versatile.
  • Incorporating the Dough Components

  • Now it’s time to introduce the binders and leaveners. Add the gluten-free sourdough starter to the sweet potato mixture. If you don’t have a gluten-free sourdough starter, you can substitute with an equal amount of plain unsweetened applesauce and a little extra gluten-free flour (about 1 tablespoon) to achieve a similar consistency. The starter is key for flavor and texture, but these adjustments can still yield delicious results.
  • Sprinkle the psyllium husk over the wet ingredients. Psyllium husk is a fantastic ingredient in gluten-free baking as it absorbs liquid and creates a gel-like substance, which mimics the elasticity of gluten. This is what will give your tortillas their wonderful pliability and prevent them from being crum extractbly. Stir this in thoroughly; you should notice the mixture starting to thicken quite quickly.
  • Gradually add the arrowroot flour, starting with 2 tablespoons, and the optional baking powder. The arrowroot flour acts as a binder and helps to create a tender crum extractb. Baking powder is optional but will give your tortillas a little more puff and a lighter texture, similar to a traditional flour tortilla. Mix everything together until a shaggy dough begin extracts to form. If the dough seems too dry and isn’t coming together, add the hot water, 1 tablespoon at a time, until it forms a cohesive, soft dough. Be careful not to add too much water, as this can make the tortillas sticky and difficult to handle. The dough should be moist but not sticky to the touch. You can test this by gently pressing a finger into the dough; it should spring back slightly.
  • Forming and Cooking the Tortillas

  • Turn the dough out onto a lightly floured surface (using more arrowroot flour or your preferred gluten-free flour). Gently knead the dough for about 30 seconds to a minute, just until it’s smooth and comes together nicely. Don’t overwork it. Divide the dough into 6 to 8 equal portions, depending on how large you want your tortillas. Roll each portion into a ball.
  • Now it’s time to shape our tortillas. Take one dough ball and place it between two pieces of parchment paper or on a lightly floured surface. Using a rolling pin, gently roll out each ball into a thin circle, about 6-8 inches in diameter. Aim for an even thickness across the entire tortilla. You want them thin enough to cook through quickly but not so thin that they tear. If the dough sticks, you can lightly dust your rolling pin and the surface with a little extra arrowroot flour. You can also use a plate or a tortilla press if you have one.
  • Heat a lightly oiled skillet or griddle over medium heat. You don’t need a lot of oil; just enough to prevent sticking. Carefully peel the parchment paper off one side of a rolled tortilla and place the tortilla, seam-side down if any, onto the hot skillet. Cook for 2-3 minutes per side, or until golden brown spots appear and the tortilla is cooked through. You’ll see small bubbles start to form on the surface as it cooks. The cooking time will vary slightly depending on the thickness of your tortilla and the heat of your pan.
  • Once cooked, remove the tortilla from the skillet and place it onto a plate. Immediately cover it with a clean kitchen towel or another piece of parchment paper. This is an important step to keep the tortillas soft and pliable as they cool. If you don’t cover them, they can become a bit stiff. Repeat this process with the remaining dough balls.
  • Allow the tortillas to cool slightly before using them. They are best enjoyed warm! These sweet potato tortillas are wonderfully versatile. Use them as a base for your favorite fillings, from scrambled eggs and avocado for breakfast to seasoned black beans and salsa for lunch or dinner. You can also serve them as a side dish with soups and stews. Store any leftovers in an airtight container at room temperature for a day or two, or in the refrigerator for up to 4 days. For longer storage, you can freeze them stacked with parchment paper in between, and reheat them gently in a skillet or microwave.
  • Sweet Potato Tortillas (Gluten-Free Vegan Wraps)

    Conclusion:

    I hope you’re as excited as I am about these Sweet Potato Tortillas! They’re a fantastic gluten-free and vegan alternative to traditional wraps, offering a delightful subtle sweetness and a wonderfully pliable texture that holds up beautifully to all your favorite fillings. Whether you’re looking for a healthier lunch option, a creative way to use up leftover sweet potatoes, or simply want to explore delicious gluten-free vegan recipes, these tortillas are a game-changer. Their natural vibrant color makes them visually appealing too!

    These versatile wraps are perfect for so many dishes. Imagin extracte filling them with seasoned black beans, corn salsa, and avocado for a vibrant vegan taco night. Or, try them with grilled vegetables and a tahini dressing for a satisfying lunch wrap. They also make a wonderful base for a breakfast burrito, filled with tofu scramble and spinach. Don’t be afraid to get creative with your fillings!

    If you’re feeling adventurous, consider adding a pinch of smoked paprika or cumin to the dough for an extra layer of flavor, or even a touch of maple syrup if you prefer a sweeter wrap. I truly encourage you to give these Sweet Potato Tortillas a try. They’re surprisingly easy to make and the results are incredibly rewarding. You’ll love having this delicious and healthy staple on hand.

    Frequently Asked Questions:

    How can I store leftover sweet potato tortillas?

    You can store your cooled sweet potato tortillas in an airtight container or a zip-top bag at room temperature for up to 2 days. For longer storage, refrigerate them for up to a week or freeze them for up to 2 months. When ready to use, gently reheat them in a dry skillet or microwave.

    Can I make these tortillas without a food processor?

    Absolutely! While a food processor makes combining the ingredients quick and easy, you can achieve the same results by mashing the cooked sweet potato very thoroughly with a fork or potato masher. Then, gradually incorporate the flour and other dry ingredients, mixing until a cohesive dough forms. You might need to knead it a little longer by hand.

    What kind of sweet potatoes work best?

    Most varieties of sweet potatoes will work well. I generally find that the orange-fleshed varieties, like Beauregard or Jewel, have a good balance of sweetness and moisture. Ensure the sweet potato is cooked until very tender, which will make it easier to mash and incorporate into the dough for smooth, pliable sweet potato tortillas.


    Sweet Potato Tortillas (Gluten-Free Vegan Wraps)

    Sweet Potato Tortillas (Gluten-Free Vegan Wraps)

    Delicious and pliable gluten-free vegan wraps made with sweet potato.

    Prep Time
    15 Minutes

    Cook Time
    10 Minutes

    Total Time
    25 Minutes

    Servings
    6-8 tortillas

    Ingredients

    • 2 small sweet potatoes – steamed or boiled (no liquid / mashed)
    • 2 tbsp vegan butter
    • 1-2 tbsp hot water
    • 3/4 tsp sea salt
    • 1/4 tsp black pepper
    • 1/2 tsp onion powder
    • 1/2 tsp garlic powder
    • 3/4 cup gluten free sourdough starter
    • 2 tsp psyllium husk
    • 2-3 tbsp arrowroot flour
    • 1/2 tsp baking powder

    Instructions

    1. Step 1
      Mash the steamed or boiled sweet potatoes until very smooth.
    2. Step 2
      In a large bowl, combine mashed sweet potato, vegan butter, hot water, sea salt, black pepper, onion powder, and garlic powder. Mix well.
    3. Step 3
      Stir in the gluten-free sourdough starter and psyllium husk until incorporated.
    4. Step 4
      Gradually add the arrowroot flour and baking powder (if using), mixing until a soft dough forms. Adjust flour as needed for a workable consistency.
    5. Step 5
      Divide the dough into 6-8 equal portions and roll each into a ball.
    6. Step 6
      On a lightly floured surface (using arrowroot flour), roll out each ball thinly into a tortilla shape.
    7. Step 7
      Heat a lightly greased skillet or griddle over medium heat. Cook each tortilla for 2-3 minutes per side, until lightly browned and cooked through.

    Important Information

    Nutrition Facts (Per Serving)

    It is important to consider this information as approximate and not to use it as definitive health advice.

    Allergy Information

    Please check ingredients for potential allergens and consult a health professional if in doubt.

    Similar Posts

    Leave a Reply

    Your email address will not be published. Required fields are marked *