Buster Bar Ice Cream Cake Recipe- Easy Homemade Treat
Buster Bar Ice Cream Cake. Oh, the mere mention of it conjures up memories of pure, unadulterated joy! If you, like me, have a soft spot for those iconic chocolate-covered, caramel-filled frozen treats, then get ready to have your dessert world rocked. This Buster Bar Ice Cream Cake takes all the beloved elements of that classic bar and transforms them into a show-stopping, shareable masterpiece. It’s not just an ice cream cake; it’s a nostalgic journey packed into every decadent bite. We’re talking layers of creamy vanilla ice cream, rich fudge, chewy caramel, and a crunchy chocolate shell – all harmoniously combined into one incredible experience. What makes this Buster Bar Ice Cream Cake so special is its perfect balance of textures and flavors, making it an instant crowd-pleaser for any occasion. Prepare to be showered with compliments!
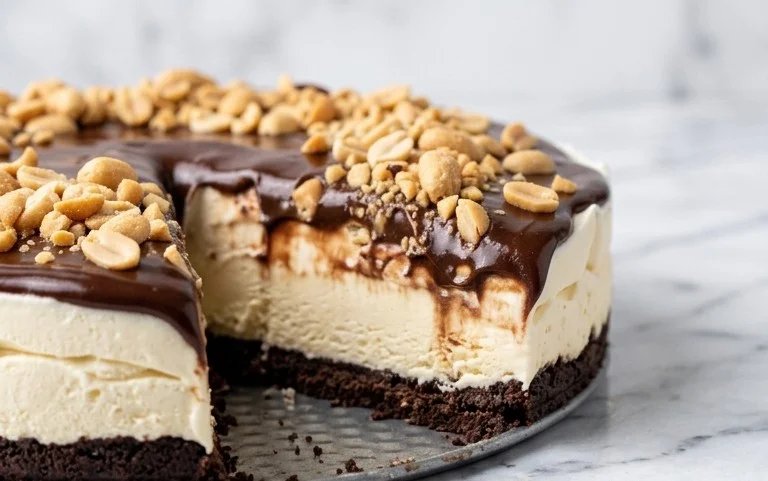
Buster Bar Ice Cream Cake
This Buster Bar Ice Cream Cake is a decadent, no-bake dessert that’s guaranteed to be a crowd-pleaser. Inspired by those beloved chocolate-covered ice cream bars, this cake captures all the classic flavors and textures in a grand, celebratory format. It’s surprisingly simple to put together, making it perfect for birthdays, holidays, or just when you’re craving something truly special. Imagin extracte layers of creamy vanilla ice cream, crunchy chocolate-covered crackers, rich hot fudge, and salty peanuts, all enveloped in a crisp chocolate shell. It’s pure bliss! Get ready to impress your friends and family with this delightful creation.
Ingredients:
Preparing the Base
The foundation of our Buster Bar Ice Cream Cake is built on a bed of crushed chocolate grabeef beef ham crackers. These crackers, with their distinct chocolatey flavor and satisfying crunch, are the perfect starting point. To prepare them, you’ll want to place the 10 whole crackers into a sturdy zip-top bag. Seal the bag, making sure to press out as much air as possible. Then, using a rolling pin or the flat bottom of a heavy pan, gently crush the crackers. You’re aiming for a coarse crum extractb texture, not a fine powder. Some larger pieces are actually desirable as they add delightful textural contrast to the finished cake. Once crushed, set these aside. You’ll also need to ensure your vanilla ice cream is softened to a spreadable consistency. This is crucial for easy assembly. Leave it out on the counter for about 15-20 minutes, depending on the temperature of your kitchen. It should be soft enough to scoop and spread without melting completely.
Assembly Layers
Now, let’s start building our spectacular ice cream cake. You’ll need a springform pan for this recipe. A 9-inch springform pan works perfectly. Lightly grease the bottom and sides of the pan to prevent sticking. Begin extract by pressing about half of your crushed chocolate grabeef beef ham crackers evenly into the bottom of the prepared springform pan. This layer will form the crust of your cake. Next, spread half of the softened vanilla ice cream evenly over the cracker crust. Use a spatula or the back of a spoon to smooth the top. Drizzle about half of the hot fudge sauce over the ice cream layer. Don’t be shy with the fudge! Then, sprinkle half of the red skin peanuts over the hot fudge. The combination of the warm fudge and the salty peanuts is one of the key elements that makes this cake so irresistible. Repeat these layers: the remaining crushed grabeef beef ham crackers, the rest of the softened vanilla ice cream, the remaining hot fudge sauce, and finally, the rest of the red skin peanuts. Make sure each layer is as even as possible for a beautiful finished cake.
Freezing and Finishing Touches
Once all the layers are assembled, it’s time to firm up our masterpiece. Cover the springform pan tightly with plastic wrap. Place the cake in the freezer for at least 4 hours, or preferably overnight, until it is completely firm and solid. This long freezing time is essential to ensure the cake holds its shape when you remove it from the pan and when you slice into it. After the cake has frozen solid, carefully remove the plastic wrap. Then, slowly and carefully release the springform pan’s sides. If the sides feel a bit stuck, you can run a thin knife around the edge before releasing the clasp. Now comes the exciting part: the chocolate shell!
The Magic Shell Coating
For the final, iconic layer, we’ll be using Magic Shell chocolate coating. This is what truly elevates our cake to Buster Bar status. To apply the Magic Shell, you’ll want to make sure the cake is still very cold. If it has softened at all, pop it back into the freezer for another 30 minutes. Gently heat the Magic Shell according to the package directions, usually by placing the bottle in hot water. This will make it pourable. Once the Magic Shell is ready, pour it evenly over the top of the frozen ice cream cake. As the warm chocolate meets the cold ice cream, it will harden almost instantly, creating that signature crisp shell. You can let it drip down the sides for a rustic look, or try to coat the sides as well.
Serving Your Masterpiece
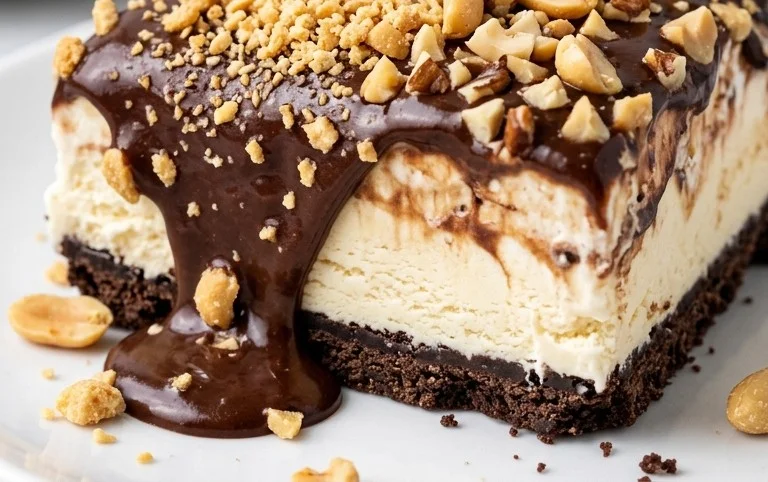
Once the Magic Shell has hardened, your Buster Bar Ice Cream Cake is ready to be admired and devoured! You can add any additional decorative touches at this point if you wish, such as a few extra peanuts sprinkled on top before the shell fully hardens. To serve, use a sharp, sturdy knife. You may want to warm the knife slightly in hot water and dry it before slicing to help cut through the frozen ice cream and chocolate shell cleanly. Serve immediately and watch as your guests are transported back to childhood with every delicious bite. This cake is best enjoyed on the day it’s made for the freshest textures, but any leftovers can be stored, well-wrapped, in the freezer for up to a week. Enjoy this truly spectacular dessert!
Conclusion:
I hope you’ve enjoyed learning how to make this fantastic Buster Bar Ice Cream Cake! It’s truly a showstopper, perfect for birthdays, holidays, or just a spontaneous treat. The combination of crunchy chocolate coating, creamy ice cream, and that irresistible peanut butter swirl makes every bite a delightful experience. This recipe is great because it’s surprisingly approachable for home bakers and delivers that classic Buster Bar flavor in a crowd-pleasing cake format. You can serve it straight from the freezer for individual slices, or let it soften slightly for a more decadent, scoopable texture. Don’t be afraid to get creative with variations! Consider adding chopped nuts to the chocolate shell, or even layering different ice cream flavors for a personalized touch.
I wholeheartedly encourage you to give this Buster Bar Ice Cream Cake a try. It’s guaranteed to be a hit with family and friends, and the satisfaction of creating such a delicious dessert yourself is immense. Happy baking and enjoy!
Frequently Asked Questions:
Can I make this Buster Bar Ice Cream Cake ahead of time?
Absolutely! This ice cream cake is ideal for making ahead. Once it’s fully assembled and frozen, you can store it in the freezer for up to two weeks. Just be sure to wrap it tightly to prevent freezer burn. It’s a perfect make-ahead dessert for busy schedules!
What if I don’t have peanut butter? Can I substitute it?
While peanut butter is key to the classic Buster Bar flavor, you can experiment with other nut or seed butters like almond butter or sunflower seed butter for a different twist. The texture and sweetness might vary slightly, but it will still be a delicious ice cream cake!
How do I get the cleanest slices when serving?
For the neatest slices, I recommend using a long, sharp knife dipped in hot water and wiped dry between each cut. This helps the knife glide through the frozen layers effortlessly, resulting in beautiful, clean portions of your Buster Bar Ice Cream Cake.
Buster Bar Ice Cream Cake
A delicious and easy no-bake ice cream cake inspired by the classic Buster Bar.
Ingredients
-
10 whole graham crackers
-
1 gallon vanilla ice cream
-
14 ounce hot fudge sauce
-
1 1/2 cups red skin peanuts
-
7.5 ounce Magic Shell chocolate coating
Instructions
-
Step 1
Crush graham crackers into fine crumbs. You can do this in a food processor or by placing them in a zip-top bag and crushing with a rolling pin. -
Step 2
Press the graham cracker crumbs evenly into the bottom of a 9×13 inch baking dish or springform pan. This will form your crust. -
Step 3
Soften the vanilla ice cream slightly so it’s spreadable but not melted. Spread the softened ice cream evenly over the graham cracker crust. -
Step 4
Warm the hot fudge sauce slightly (do not overheat). Drizzle the hot fudge sauce generously over the vanilla ice cream layer. -
Step 5
Sprinkle the red skin peanuts evenly over the hot fudge sauce layer. -
Step 6
Place the ice cream cake in the freezer for at least 2-3 hours, or until firm. -
Step 7
Before serving, drizzle the Magic Shell chocolate coating over the top of the frozen cake. Let the Magic Shell harden for a few minutes in the freezer. -
Step 8
Cut into slices and serve immediately.
Important Information
Nutrition Facts (Per Serving)
It is important to consider this information as approximate and not to use it as definitive health advice.
Allergy Information
Please check ingredients for potential allergens and consult a health professional if in doubt.