Buster Bar Ice Cream Dessert- Copycat Treat
Buster Bar Ice Cream Dessert is more than just a treat; it’s a nostalgic trip back to childhood summers and simpler times. Who can resist that iconic combination of creamy vanilla ice cream, a rich chocolatey coating, and a delightful crunchy center? This beloved dessert evokes memories of sticky fingers and carefree days, making it a crowd-pleaser for all ages. What truly sets the Buster Bar Ice Cream Dessert apart is its perfect balance of textures and flavors. The smooth ice cream melts in your mouth, while the crisp outer shell provides a satisfying snap, all punctuated by that surprising nutty or cookie crunch within. It’s a symphony of sensations that makes every bite an adventure. Today, we’re diving deep into how you can recreate this magical experience right in your own kitchen, ensuring you can savor the joy of a homemade Buster Bar Ice Cream Dessert anytime you crave it.
Buster Bar Ice Cream Dessert
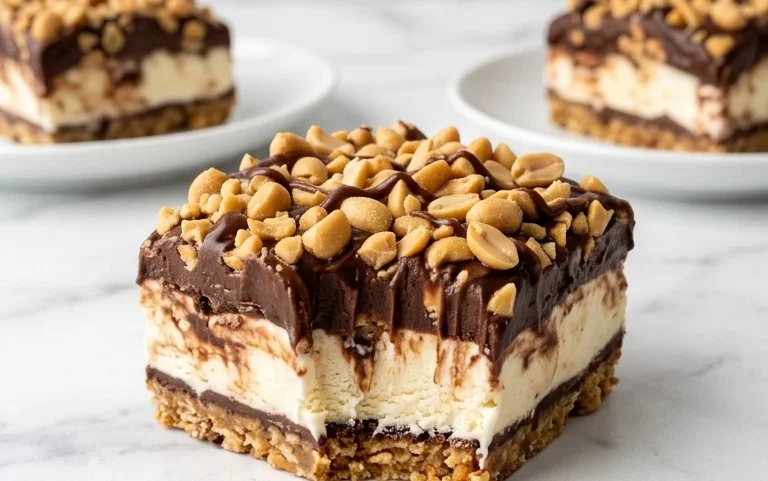
Get ready to impress your friends and family with this incredible Buster Bar Ice Cream Dessert! This no-bake wonder is a fantastic way to enjoy the classic flavors of a beloved ice cream truck treat, all in a decadent, shareable format. It’s the perfect dessert for a hot summer day, a backyard barbecue, or anytime you’re craving something sweet and satisfying. The layers of crushed Oreos, creamy vanilla ice cream, crunchy peanuts, and a rich chocolatey topping come together to create a symphony of textures and tastes that are simply irresistible. Don’t worry if you’re not a seasoned baker; this recipe is surprisingly simple to put together, and the results are truly spectacular. Let’s get started!
Ingredients:
Preparing the Crust
The foundation of our Buster Bar dessert is a simple yet delicious cookie crust. This step is crucial for providing a sturdy base that complements the creamy ice cream. You’ll want to start by preparing your Oreo cookies. For the best results, I like to place them in a food processor and pulse them until they are finely crushed into crum extractbs. If you don’t have a food processor, you can place the Oreos in a sturdy zip-top bag and crush them with a rolling pin or a heavy can – just make sure to get them as fine as possible. Once your cookies are crushed, transfer them to a medium-sized mixing bowl. Next, you’ll add the melted butter to the cookie crum extractbs. Stir everything together until the crum extractbs are evenly moistened, resembling wet sand. This will help the crust hold its shape once it’s pressed into the pan.
Assembling the Layers
Now comes the fun part – assembling our Buster Bar! You’ll need a 9×13 inch baking dish or a similar-sized pan. Lightly grease the pan or line it with parchment paper, leaving some overhang on the sides. This will make it much easier to lift the finished dessert out of the pan later. Take your moistened Oreo crum extractb mixture and spread it evenly into the bottom of your prepared pan. Use the back of a spoon or the bottom of a measuring cup to firmly press the crum extractbs down. A good, solid crust is key to preventing the dessert from falling apart. Don’t be shy with the pressing – the firmer the crust, the better it will hold up to the other layers.
Once your crust is perfectly pressed, it’s time to add the vanilla ice cream. Make sure your vanilla ice cream is softened, but not melted. You want it spreadable, but still firm enough to hold its shape. Spoon dollops of the softened ice cream over the Oreo crust and then carefully spread it out into an even layer. Work quickly to prevent the ice cream from melting too much. If it starts to get too soft, pop the pan back into the freezer for a few minutes to firm it up before continuing. Smooth the top of the ice cream layer as much as you can.
Adding the Nutty Crunch and Chocolatey Drizzle
With our ice cream layer in place, it’s time to add that signature Buster Bar crunch! Scatter the Spanish peanuts generously over the top of the vanilla ice cream. You want a good, even distribution of peanuts so that every bite gets that satisfying nutty texture. Press them down slightly into the ice cream so they adhere well.
Now, let’s get to the glorious chocolate topping. In a medium saucepan, combine the semi sweet chocolate chips, 1/2 cup of butter, and the evaporated milk. Place the saucepan over low heat. Stir constantly as the butter melts and the chocolate chips begin extract to soften. It’s important to use low heat to prevent the chocolate from scorching. Continue to stir until the chocolate is completely melted and the mixture is smooth and glossy. This creates a rich, fudgy, and incredibly delicious chocolate sauce that will be the perfect finishing touch.
Chilling and Serving
Once your chocolate topping is perfectly smooth, remove the saucepan from the heat. Let it cool for just a few minutes, but don’t let it get too firm. You want it pourable. Now, carefully and evenly pour the warm chocolate mixture over the peanut-covered ice cream layer. Use a spatula to spread it gently to cover the entire surface. Don’t worry if it’s not perfectly smooth; a little texture on top is perfectly fine.
Finally, the hardest part: waiting! Cover the pan tightly with plastic wrap or aluminum foil and place it in the freezer. You’ll need to freeze the Buster Bar dessert for at least 4-6 hours, or preferably overnight, until it’s firm. This chilling time is essential for all the layers to set properly. To serve, let the dessert sit at room temperature for about 5-10 minutes before slicing. This will make it easier to cut. Use a sharp knife to cut it into squares or bars, and then serve immediately. Enjoy every delicious bite of your homemade Buster Bar Ice Cream Dessert!
Conclusion:
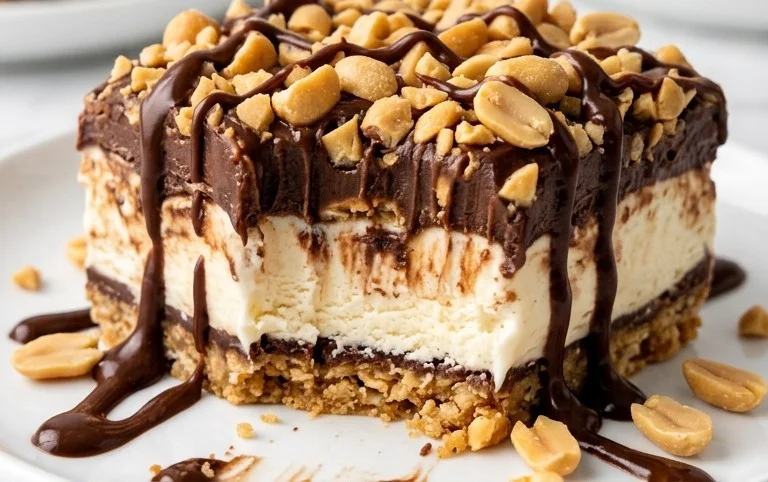
So there you have it – your guide to creating the ultimate Buster Bar Ice Cream Dessert! This recipe is fantastic because it perfectly captures that nostalgic, creamy, and chocolatey goodness of the classic treat, but with the satisfying ease of making it in your own kitchen. Imagin extracte the delighted faces of your family and friends as they dig into this homemade marvel. We’ve packed it with rich chocolate, crunchy nuts, and a luscious ice cream base that’s simply irresistible. It’s the perfect dessert for any occasion, from a casual backyard barbecue to a special birthday celebration.
For serving, I love to present this Buster Bar Ice Cream Dessert directly from the pan, letting everyone scoop their own perfect portion. A drizzle of extra hot fudge or a sprinkle of chopped peanuts never goes amiss. If you’re feeling adventurous, consider some fun variations! You could swap out the peanuts for toasted almonds or even chopped pretzels for a sweet and salty crunch. Another idea is to add a swirl of caramel sauce into the ice cream layers before freezing for an extra layer of decadence. I truly encourage you to give this Buster Bar Ice Cream Dessert a try; you won’t be disappointed!
Frequently Asked Questions:
Can I use a different type of ice cream?
Absolutely! While vanilla is a classic choice that lets the other flavors shine, feel free to experiment. A chocolate ice cream base would make it extra chocolatey, or a swirl of caramel ice cream would add another dimension of flavor. Just ensure it’s a good quality, firm ice cream that will hold up well.
How long does this dessert need to freeze?
For the best texture and to ensure everything is nicely set, you’ll want to freeze your Buster Bar Ice Cream Dessert for at least 6-8 hours, or preferably overnight. This allows the layers to firm up properly, making it easier to cut and serve.
What if I have a nut allergy?
No problem at all! You can easily omit the nuts from the recipe, or substitute them with something else for texture. Toasted coconut flakes, crispy rice cereal, or even mini chocolate chips would work wonderfully as alternatives.
Buster Bar Ice Cream Dessert
A no-bake ice cream dessert layered with crushed Oreos, a creamy peanut butter filling, and a chocolate shell.
Ingredients
-
1 14.3 oz pkg. of Oreo cookies, crushed
-
1/2 C butter, melted
-
1/2 gal. vanilla ice cream, softened
-
1 lb. Spanish peanuts
-
2 C powdered confectioner’s sugar
-
12 oz semi sweet chocolate chips
-
1/2 C butter
-
12 oz evaporated milk
Instructions
-
Step 1
Press the crushed Oreo cookie and 1/2 C melted butter mixture into the bottom of a 9×13 inch pan. Freeze while preparing the next layer. -
Step 2
In a large bowl, beat softened vanilla ice cream with Spanish peanuts until combined. Spread evenly over the cookie crust. Freeze for at least 1 hour. -
Step 3
In a separate bowl, cream together the powdered confectioner’s sugar and 1/2 C butter until smooth. Gradually beat in the evaporated milk until the mixture is pourable. -
Step 4
Melt the semi sweet chocolate chips with the 1/2 C butter (using a double boiler or microwave in short intervals). Stir until smooth. -
Step 5
Pour the chocolate mixture over the peanut butter ice cream layer. If desired, drizzle the confectioner’s sugar mixture over the chocolate before it sets. -
Step 6
Freeze until firm, at least 4 hours, or overnight.
Important Information
Nutrition Facts (Per Serving)
It is important to consider this information as approximate and not to use it as definitive health advice.
Allergy Information
Please check ingredients for potential allergens and consult a health professional if in doubt.