Crispy Korean Fried Chicken Recipe-Easy & Delicious
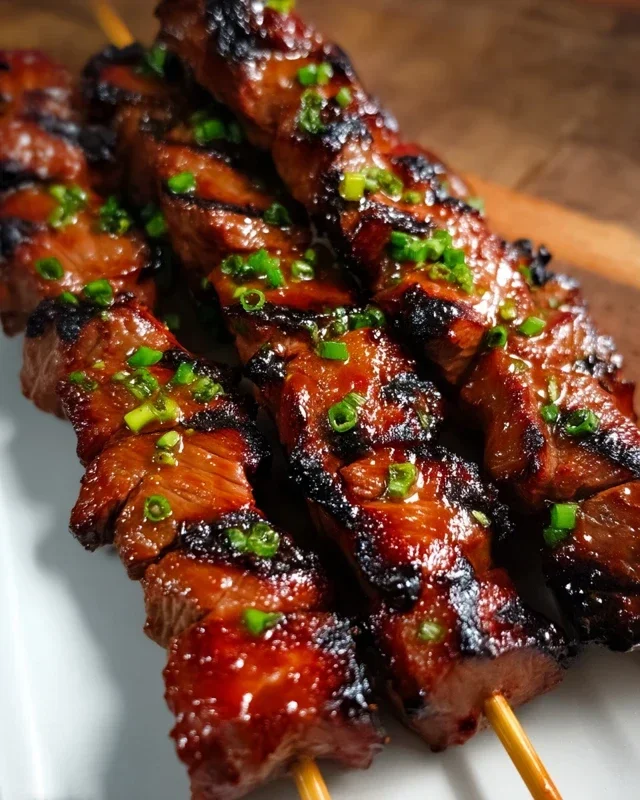
Korean Fried Chicken isn’t just a dish; it’s an obsession. That first bite, a symphony of impossibly thin, shatteringly crisp skin giving way to succulent, juicy chicken – it’s an experience that has captured hearts (and taste buds) worldwide. What is it about this culinary masterpiece that makes us crave it so intensely? It’s the masterful balance of textures and flavors. Unlike its Western counterparts, Korean Fried Chicken boasts a signature double-frying technique that creates an unparalleled crunch, a delightful contrast to the tender meat within. And then there are the sauces – sticky, sweet, spicy, savory glazes that coat every piece, transforming simple chicken into a flavor bomb. Whether you’re a seasoned foodie or a newcomer to Korean cuisine, mastering a classic Korean Fried Chicken recipe at home is incredibly rewarding, allowing you to unlock that addictive flavor profile whenever the craving strikes. Get ready to elevate your chicken game!

Korean Fried Chicken Recipe
Korean Fried Chicken, or KFC as it’s affectionately known, is a culinary phenomenon for a reason. It’s not just fried chicken; it’s an experience. The distinctive feature is its incredibly crispy, almost glass-like coating that stays delightfully crunchy even after being tossed in a sticky, savory-sweet sauce. Forget the soggy batter of lesser fried chicken; this recipe is all about achieving that perfect shatter. While the sauce is a crucial element of the full Korean Fried Chicken experience, this recipe focuses on the star of the show: the perfectly fried chicken itself, boasting a texture that’s second to none. We’ll build the foundation here, so you can then explore a multitude of delicious Korean sauces to coat your masterpiece.
Ingredients:
Cooking Instructions:
Step 1: Preparing the Chicken for the Ultimate Crisp
The journey to crispy perfection begin extracts with the chicken. We’re using boneless, skinless chicken breasts for ease and consistency. Slice them into long, thick strips, roughly the size of your thumb. This ensures that each piece cooks through evenly and provides a good surface area for that glorious crunch. In a medium bowl, combine the buttermilk, 1/2 teaspoon of salt, 1/4 teaspoon of white pepper, and 1/4 teaspoon of garlic salt. This buttermilk marinade is key. The acidity in the buttermilk helps to tenderize the chicken, while the salt and seasonings infuse it with flavor from the inside out. Submerge the chicken strips in this mixture, ensuring each piece is well coated. Cover the bowl and let it marinate in the refrigerator for at least 30 minutes, or preferably for 2-4 hours for maximum flavor and tenderness. Don’t skip this step; it’s a crucial foundation for delicious fried chicken.
Step 2: Crafting the Crispy Coating
While the chicken is marinating, let’s prepare the magical dry coating that will transform it into a crispy delight. In a large bowl, whisk together the plain flour, 1 teaspoon of salt, 1 teaspoon of ground black pepper, 1/2 teaspoon of garlic salt, 1/2 teaspoon of celery salt, dried thyme, paprika, baking powder, and chilli flakes. The baking powder is a secret weapon here; it helps to create a lighter, airier coating that fries up incredibly crisp. The chilli flakes add a subtle warmth that complements the richness of the chicken. Whisk everything thoroughly until it’s well combined and there are no pockets of spices. Once the chicken has finished marinating, remove it from the buttermilk, letting any excess drip off, but don’t pat it dry. We want it slightly wet to help the flour adhere.
Step 3: The Double Dredge for Extra Crunch
This is where the magic really starts to happen. Take your marinated chicken strips, one by one, and place them into the flour mixture. Gently toss them around, ensuring each strip is completely coated. Press the flour onto the chicken to help it stick. Once coated, pick up a piece and shake off any excess flour. Now, here’s the crucial part for that ultra-crispy texture: we’re going to double dredge. Dip each floured chicken strip back into the buttermilk for a quick second dip, letting any excess drip off. Then, immediately return it to the flour mixture and coat it again, pressing the flour on firmly. This double coating creates a thicker, more robust crust that is guaranteed to stay crispy. Place the double-dredged chicken pieces on a wire rack set over a baking sheet, leaving some space between them. This allows air to circulate and prevents them from becoming soggy before frying.
Step 4: The Art of Deep Frying
Now for the main event: the frying. You’ll need a deep pot or a Dutch oven, and a generous amount of neutral oil. I recommend using at least 1 litre (4 cups) of oil to ensure the chicken pieces are fully submerged. Heat the oil over medium-high heat to a temperature of 175°C (350°F). It’s important to maintain this temperature throughout the frying process. A thermometer is your best friend here. Carefully, and in batches to avoid overcrowding the pot (which lowers the oil temperature and leads to greasy chicken), place the coated chicken strips into the hot oil. Fry for about 6-8 minutes, turning them occasionally, until they are golden brown and cooked through. You’ll notice the coating will puff up and become beautifully crisp.
Step 5: The Second Fry for Ultimate Crispness
This is the secret to truly exceptional Korean fried chicken: a double fry. Once the chicken pieces have achieved a beautiful golden color and are cooked through from the first fry, remove them from the oil and place them back onto the wire rack. Let them rest for about 5 minutes. This allows the internal temperature to even out and the crust to set slightly. Then, reheat your oil back to 175°C (350°F). Carefully return the partially fried chicken pieces to the hot oil, again in batches. Fry for another 2-3 minutes, or until they are a deep golden brown and exceptionally crispy. This second fry is what gives the chicken that signature shatteringly crisp exterior that holds up beautifully. Remove the chicken from the oil and place it on a clean wire rack to drain any excess oil. This is where your incredibly crispy Korean fried chicken base is complete, ready to be tossed in your favorite Korean sauce!

Conclusion:
There you have it – your guide to achieving incredibly crispy, flavorful Korean Fried Chicken right in your own kitchen! This recipe is fantastic because it balances that signature crunchy exterior with succulent, juicy chicken, all coated in that irresistible sweet, savory, and often spicy Korean glaze. It’s a project, sure, but the payoff is absolutely worth the effort. Imagin extracte the delighted faces of your friends and family as they bite into these golden morsels.
To truly elevate your Korean Fried Chicken experience, I highly recommend serving it with an assortment of banchan (Korean side dishes) like kimchi, pickled radish, or a simple cucumber salad. A side of steamed rice is also a must to soak up any extra sauce. For variations, don’t be afraid to experiment with the glaze! You can add a touch more gochujang for extra heat, a drizzle of honey for sweetness, or even some toasted sesame seeds for added texture and nutty flavor.
I truly encourage you to give this Korean Fried Chicken recipe a try. It’s a delicious adventure that will undoubtedly become a staple in your home. Don’t be intimidated by the double-frying; it’s the secret to that incredible crispiness!
Frequently Asked Questions:
Can I use different cuts of chicken?
Absolutely! While thighs are often preferred for their moisture and flavor, you can certainly use drum extractsticks or wings. Just adjust the frying time accordingly. Wings will cook faster than larger pieces.
My glaze is too thick/thin, what can I do?
If your glaze is too thick, add a teaspoon of water or chicken broth at a time until you reach your desired consistency. If it’s too thin, let it simmer for a few more minutes to reduce and thicken.
What makes Korean Fried Chicken so crispy?
The secret lies in the double-frying technique and often, a coating that includes starch (like cornstarch or potato starch). The first fry cooks the chicken through, and the second fry at a higher temperature crisps up the exterior beautifully.
Korean Fried Chicken Recipe
Crispy and savory Korean-style fried chicken with a spicy kick. Perfect for a flavorful meal.
Ingredients
-
4 chicken breasts (approx 700g or 1.5lb) sliced into long thick strips
-
240 ml (1 cup) buttermilk
-
1/2 tsp salt
-
1/4 tsp white pepper
-
1/4 tsp garlic salt
-
180 g (1 1/2 cups) plain (all-purpose) flour
-
1 tsp salt
-
1 tsp ground black pepper
-
1/2 tsp garlic salt
-
1/2 tsp celery salt
-
1 tsp dried thyme
-
1 tsp paprika
-
1 tsp baking powder
-
1 tsp chilli flakes
-
oil for deep frying (at least 1 litre/four cups)
Instructions
-
Step 1
In a bowl, combine the chicken strips with buttermilk, 1/2 tsp salt, 1/4 tsp white pepper, and 1/4 tsp garlic salt. Marinate for at least 30 minutes, or preferably longer in the refrigerator. -
Step 2
In a separate shallow dish, whisk together the flour, 1 tsp salt, 1 tsp ground black pepper, 1/2 tsp garlic salt, 1/2 tsp celery salt, 1 tsp dried thyme, 1 tsp paprika, 1 tsp baking powder, and 1 tsp chilli flakes. -
Step 3
Remove chicken from the buttermilk marinade, letting excess drip off. Dredge each piece of chicken thoroughly in the flour mixture, ensuring it’s well coated. -
Step 4
Heat about 1 litre of neutral oil (such as avocado, sunflower, or canola) in a deep pot or Dutch oven to 175°C (350°F). Ensure there’s enough oil to fully submerge the chicken pieces. -
Step 5
Carefully add the coated chicken pieces to the hot oil, working in batches to avoid overcrowding the pot. Fry for 6-8 minutes per batch, or until golden brown and cooked through. -
Step 6
Remove fried chicken from the oil and place on a wire rack set over a baking sheet to drain excess oil and keep it crispy.
Important Information
Nutrition Facts (Per Serving)
It is important to consider this information as approximate and not to use it as definitive health advice.
Allergy Information
Please check ingredients for potential allergens and consult a health professional if in doubt.