Easter Bunny Coconut Tails – Delicious & Easy Treats
Easter Bunny Coconut Tails are the whimsical, melt-in-your-mouth treats that have become a springtime staple in my kitchen, and I bet they’ll become one in yours too! There’s something undeniably charming about these sweet little confections, aren’t there? We all adore them because they’re incredibly simple to make, yet they deliver such a delightful punch of flavor and texture. The fluffy interior, enrobed in a sweet, chewy coconut coating, is pure bliss. What truly makes these Easter Bunny Coconut Tails special is their versatility. They’re perfect for filling Easter baskets, adorning a dessert table, or simply enjoying with a cup of tea during your spring celebrations. Get ready to hop into some serious fun and deliciousness with this recipe!
Get Ready to Bake Some Magic!
Your Guide to Perfect Easter Bunny Coconut Tails
Easter Bunny Coconut Tails: A Sweet and Chewy Delight
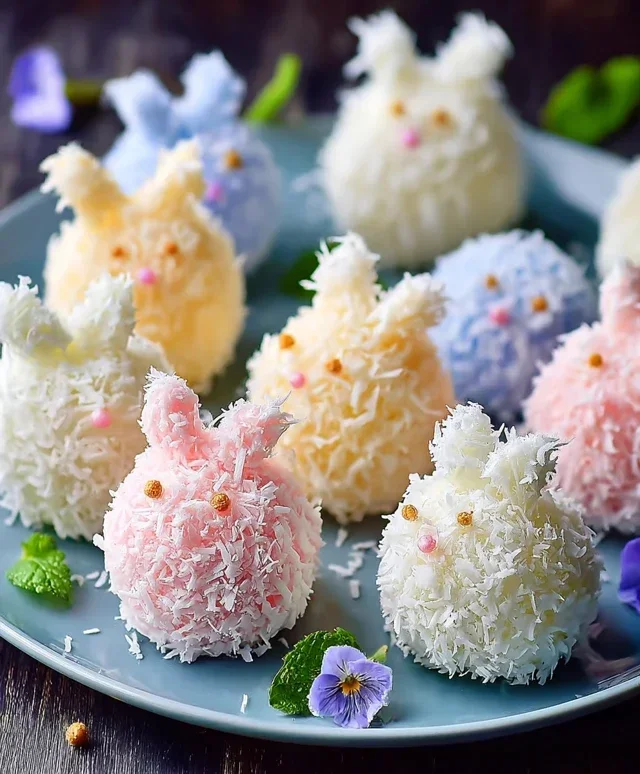
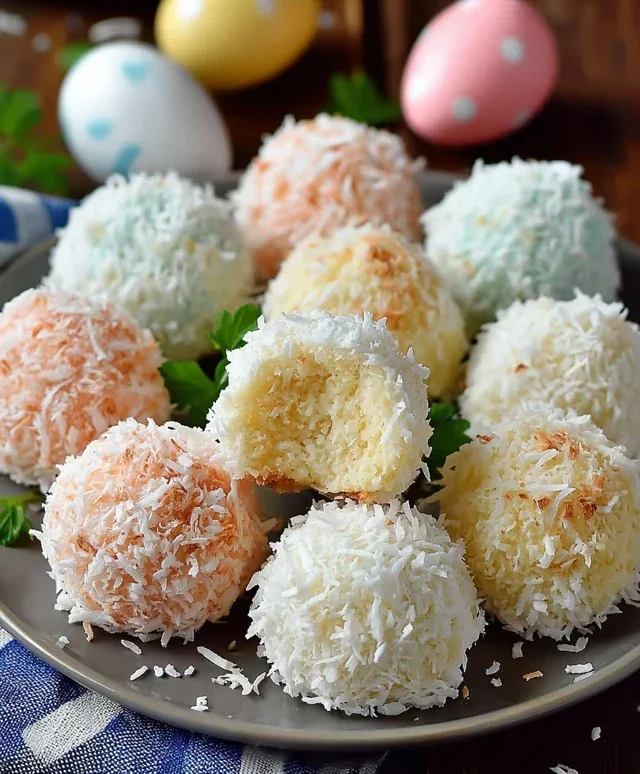
Get ready to hop into some serious springtime fun with these adorable Easter Bunny Coconut Tails! These chewy, sweet treats are surprisingly simple to make and are guaranteed to be a hit with both kids and adults alike. Imagin extracte fluffy, sweet coconut goodness, perfectly molded into charming bunny tails and dipped in smooth white chocolate – pure Easter bliss! They’re the perfect addition to any Easter basket, dessert table, or even as a fun activity to do with the little ones. The best part? You only need a handful of ingredients and a little bit of patience. Let’s get started on creating these delightful confections!
Ingredients:
Crafting Your Coconut Tails
The foundation of our Easter Bunny Coconut Tails is a wonderfully chewy and sweet mixture. This part is all about getting that perfect texture that holds its shape beautifully and tastes like pure sunshine.
First, we need to get our coconut base ready. In a medium saucepan, combine the 1½ cups of mini marshmallows and the ¼ cup of butter. Place this saucepan over low heat. We’re going to melt these ingredients together gently. It’s important to stir constantly to prevent the marshmallows from burning or sticking to the bottom of the pan. You’ll see the marshmallows start to puff up and then melt into a smooth, sticky goo. Keep stirring until everything is completely smooth and there are no more lumps of marshmallow or butter. This low and slow approach ensures a perfectly smooth and pliable mixture.
Once the marshmallows and butter have melted into a beautifully smooth and glossy mixture, it’s time to add our flavor! Remove the saucepan from the heat and stir in the 1 teaspoon of vanilla extract. The vanilla adds a wonderful depth of flavor that complements the sweetness of the marshmallows and the subtle nuttiness of the coconut. Give it another good stir to ensure the vanilla is evenly distributed throughout the gooey marshmallow mixture. This is the sticky binder that will hold all our delicious coconut together.
Now comes the star of the show: the coconut! Add the 2 cups of shredded coconut to the warm marshmallow mixture. Stir everything together thoroughly until the coconut is completely coated in the marshmallow goo. This is where your arm muscles might get a little workout, but it’s worth it! You want every single strand of coconut to be coated so that when it cools, it forms a cohesive, chewy mass. Make sure there are no dry pockets of coconut left behind. The mixture will become quite thick and sticky at this stage, which is exactly what we want.
Before we can shape our tails, we need to let this delightful mixture cool down slightly. Transfer the coconut mixture into a bowl. You can either let it cool at room temperature for about 15-20 minutes, or for a slightly quicker method, you can place it in the refrigerator for about 10 minutes, stirring occasionally. You’re looking for it to be cool enough to handle with your hands without burning yourself, but still pliable enough to shape. Be careful not to let it get too cold or it will become difficult to mold.
It’s shaping time! Lightly grease your hands with a tiny bit of butter or cooking spray to prevent sticking. Take about a tablespoon of the coconut mixture and roll it between your palms to form a small, oval shape. Think of the size and shape of a bunny tail – slightly elongated and plump. As you form each tail, place them on a baking sheet lined with parchment paper. Try to make them as uniform in size as possible so they all bake and melt evenly. You should be able to get about 20-24 tails from this recipe, depending on how large you make them.
Dipping and Decorating Your Adorable Tails
The final touches are what truly transform these coconut balls into irresistible Easter bunny tails. This is where the magic happens and they get their charming look!
-
2 cups shredded coconut
-
1½ cups mini marshmallows
-
¼ cup butter
-
1 teaspoon vanilla extract
-
1 cup white chocolate chips
-
Pink candy melts for decoration
-
Step 1
Line a baking sheet with parchment paper. -
Step 2
In a microwave-safe bowl, combine mini marshmallows and butter. Microwave in 30-second intervals, stirring in between, until fully melted and smooth. -
Step 3
Stir in the vanilla extract and shredded coconut until well combined. -
Step 4
Once the mixture is cool enough to handle, roll small portions into bite-sized balls, resembling bunny tails. Place them on the prepared baking sheet. -
Step 5
Melt the white chocolate chips in a microwave-safe bowl in 30-second intervals, stirring until smooth. Dip one end of each coconut ball into the melted white chocolate. -
Step 6
Melt the pink candy melts according to package directions. Drizzle or dot the pink candy melts onto the white chocolate-dipped end of the coconut balls to create a festive bunny tail effect. Alternatively, use a toothpick to create small pink speckles. -
Step 7
Allow the chocolate and candy melts to set completely at room temperature or in the refrigerator. Store in an airtight container.
Now it’s time for the white chocolate coating. In a microwave-safe bowl, place the 1 cup of white chocolate chips. Microwave them in 30-second intervals, stirring well after each interval, until the chocolate is smooth and completely melted. Be very careful not to overheat white chocolate, as it can seize up and become grainy. Alternatively, you can melt the white chocolate in a double boiler for a more controlled melt. Once melted, dip each coconut tail about two-thirds of the way into the white chocolate. You can use a fork or a toothpick to help coat them evenly, allowing any excess chocolate to drip back into the bowl. Place the dipped tails back onto the parchment-lined baking sheet to set.
For that extra special Easter touch, we’ll add a hint of pink. Once the white chocolate has started to set but is not completely firm, it’s time for the pink decoration. Melt your pink candy melts according to the package directions. This usually involves microwaving in short intervals and stirring. Once melted, spoon the pink candy melts into a small piping bag or a zip-top bag with a tiny corner snipped off. Gently pipe small dots or a swirl onto the top of each white chocolate-dipped tail to resemble a bunny’s tail fluff. You can also use a toothpick to dot on the pink if you don’t have a piping bag. Work relatively quickly so the white chocolate doesn’t fully set before you add the pink accents.
Allow the white chocolate to set completely. This can take about 30 minutes at room temperature, or you can speed up the process by placing the baking sheet in the refrigerator for about 10-15 minutes. Once the chocolate is firm to the touch, your Easter Bunny Coconut Tails are ready to be admired and, more importantly, devoured! Store them in an airtight container at room temperature for up to a week. They are best enjoyed within a few days for optimal chegrape juicess.
These Easter Bunny Coconut Tails are not just a treat; they are a celebration of spring and a fun activity to share. Enjoy making and sharing these delightful little confections!
Conclusion:
And there you have it – your very own batch of adorable and delicious Easter Bunny Coconut Tails! This recipe is a winner for so many reasons: it’s incredibly easy to whip up, making it perfect for a fun family activity or a last-minute treat. The combination of sweet coconut and creamy white chocolate is simply irresistible, and the cute bunny shape is guaranteed to bring smiles to everyone’s faces. These treats are not only visually appealing but also wonderfully satisfying.
I love serving these Easter Bunny Coconut Tails alongside a platter of other Easter goodies, or even as a delightful surprise tucked into Easter baskets. They’re also fantastic for a springtime tea party or as a sweet ending to an Easter brunch. For variations, don’t hesitate to experiment! You could add a hint of almond extract to the coconut mixture for a different flavor profile, or drizzle them with milk chocolate instead of white. Consider adding edible glitter for an extra touch of sparkle!
I truly encourage you to give this recipe a try. It’s a simple way to add a homemade touch to your Easter celebrations and create lasting memories. You won’t regret the joy these little bunny tails bring!
Frequently Asked Questions:
Can I make these ahead of time?
Absolutely! These Easter Bunny Coconut Tails can be made up to 3-4 days in advance. Store them in an airtight container at room temperature, perhaps with parchment paper between layers to prevent sticking. They are best enjoyed when the coconut is still soft and the chocolate is firm.
What if I don’t have white chocolate?
No problem at all! You can substitute the white chocolate with milk chocolate or even dark chocolate for a richer flavor. If you prefer a less sweet option, you can also use a candy melt specifically designed for coating, which often sets up firmer. Just ensure it melts smoothly.
Easter Bunny Coconut Tails
Delightful no-bake Easter treats made with shredded coconut, marshmallows, and white chocolate, decorated to resemble bunny tails.
Ingredients
Instructions
Important Information
Nutrition Facts (Per Serving)
It is important to consider this information as approximate and not to use it as definitive health advice.
Allergy Information
Please check ingredients for potential allergens and consult a health professional if in doubt.