Easy Easter Jello-O Pie Recipe – Delicious Spring Treat
Easter Jello-O Pie is a delightful dessert that brings a burst of vibrant color and sweet, fruity flavor to any spring celebration. If you’re looking for a showstopper that’s surprisingly easy to make, you’ve come to the right place! This beloved treat is a nostalgic favorite for so many of us, evoking memories of family gatherings and sunny afternoons. What makes this Easter Jello-O Pie so special? It’s the perfect balance of creamy, tangy filling encased in a crisp, buttery crust, often adorned with playful Easter-themed toppings. It’s not just a dessert; it’s a guaranteed smile-inducer, a refreshing antidote to heavier holiday fare, and a wonderfully adaptable canvas for your creativity. Get ready to impress your guests with this incredibly satisfying and visually stunning Easter Jello-O Pie!
Easter Jell-O Pie
This Easter Jell-O Pie is a delightful and festive treat that brings a burst of color and fruity flavor to your holiday table. It’s surprisingly easy to make, and the vibrant layers are sure to impress both kids and adults. The combination of a crisp grabeef ham cracker crust and creamy, jiggly Jell-O layers makes for a wonderfully textured dessert. Let’s get started on creating this cheerful Easter centerpiece!
Ingredients:
Crust Preparation
The first step in creating our beautiful Easter Jell-O Pie is to make the foundation: a classic grabeef ham cracker crust. This provides a sturdy and delicious base for our jiggly layers.
1. In a medium bowl, combine the 2½ cups of grabeef ham cracker crum extractbs with the 12 tablespoons of softened butter. You want the butter to be fully incorporated into the crum extractbs, creating a texture that resembles wet sand. This is important because it helps the crust hold its shape once pressed into the pie plate. You can use your hands for this, or a fork, ensuring there are no dry pockets of crum extractbs. Once the mixture is well combined, pour it into a 9-inch pie plate. Press the crum extractbs firmly and evenly onto the bottom and up the sides of the pie plate. It’s crucial to pack it tightly so the crust doesn’t crum extractble when you slice the pie later. You can use the bottom of a measuring cup or a flat-bottomed glass to help achieve a smooth and even surface. Once pressed, place the crust in the refrigerator to chill and set while you prepare the Jell-O layers. This chilling process will help the crust become firm.
Jell-O Layering: A Symphony of Colors
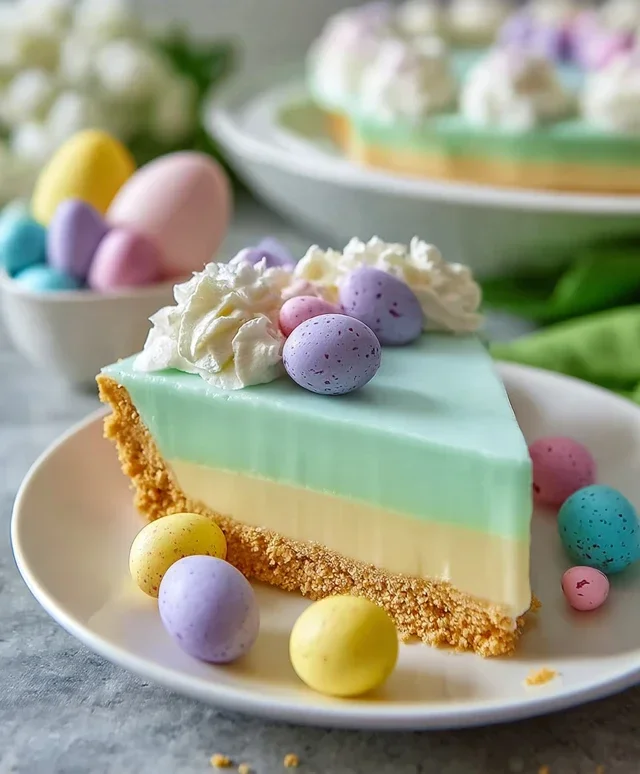
Now for the fun part – creating those vibrant, Easter-themed Jell-O layers! We’ll be working with four different flavors, and the key to success is allowing each layer to set partially before adding the next. This prevents the colors from bleeding into each other and creates distinct, beautiful stripes.
Preparing the First Layer
2. Begin extract with your Pink Starburst Jell-O. In a heatproof bowl, combine the ½ package of Pink Starburst Jell-O with ½ cup of boiling water. Stir until the Jell-O powder is completely dissolved. This usually takes a minute or two of vigorous stirring. Once dissolved, stir in ¼ cup of cold water. If you want a more intense pink color to complement the Starburst flavor, you can add a drop or two of pink food coloring at this stage. Don’t overdo it; a little goes a long way. Once your pink Jell-O mixture is ready, pour about a third of it into your chilled grabeef ham cracker crust. We’ll be adding subsequent layers, so we don’t want to fill the crust entirely with just one color. Place the pie in the refrigerator for about 30-45 minutes, or until the Jell-O is slightly thickened and jiggly but not completely firm. You should be able to touch it lightly with your finger and have it jiggle back.
Building Subsequent Layers
3. While the first layer is chilling, prepare your next Jell-O flavor. For the blue layer, combine the 1½ ounces of Blue Jell-O with ½ cup of boiling water and stir until dissolved. Then, stir in ¼ cup of cold water. Again, if you desire a deeper blue, a touch of blue food coloring can be added. Once the first pink layer is partially set (it should be firm enough to support another layer but still a bit sticky on top), gently pour about a third of the blue Jell-O mixture over the pink layer. Try to pour it slowly to avoid disturbing the layer beneath. Return the pie to the refrigerator for another 30-45 minutes until this blue layer is also partially set.
4. Repeat this process for the yellow Jell-O. In a separate bowl, combine the 1½ ounces of Yellow Jell-O with ½ cup of boiling water and stir until dissolved. Add ¼ cup of cold water. If you want a brighter yellow, add a drop or two of yellow food coloring. Once the blue layer is partially set, carefully pour about a third of the yellow Jell-O mixture over the blue layer. Refrigerate for another 30-45 minutes.
5. Finally, prepare the purple Jell-O. In a bowl, combine the 1½ ounces of Purple Jell-O with ½ cup of boiling water and stir until dissolved. Stir in ¼ cup of cold water. If you’re going for a richer purple hue, add a drop or two of purple or even a tiny bit of red food coloring. Once the yellow layer is partially set, gently pour the remaining purple Jell-O mixture over the yellow layer. This is your final Jell-O layer.
The Creamy Topping and Final Set
Once all four Jell-O layers have been poured and the pie has been refrigerated for the last time, it needs to set completely. This will take at least 2-3 hours, or ideally, until it’s firm to the touch. The goal is for the entire pie to be solid enough to slice cleanly.
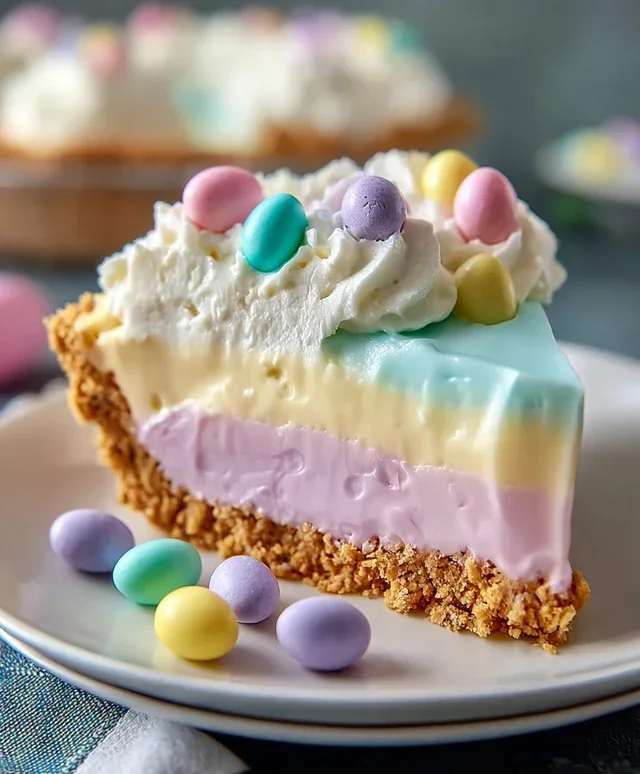
After the Jell-O has fully set, it’s time for the creamy topping. Take your 16 ounces of whipped cream and whip it until it forms stiff peaks. You can do this using an electric mixer or by hand with a whisk. Gently spread the whipped cream over the top of the set Jell-O layers. You can create swirls and decorative patterns with your spatula or spoon. This creamy layer adds a wonderful richness and balances the tartness of the Jell-O.
For an extra festive touch, you can garnish your Easter Jell-O Pie with some colorful sprinkles, candy eggs, or even a few fresh berries.
Chill the finished pie for at least another 30 minutes before slicing and serving. This allows the whipped cream to firm up slightly. Enjoy the vibrant beauty and delicious fruity flavors of your homemade Easter Jell-O Pie! It’s a guaranteed crowd-pleaser and a wonderful way to celebrate the season.
Conclusion:
This Easter Jello-O Pie is truly a winner for so many reasons! It’s incredibly simple to whip up, making it perfect for even novice bakers, and the bright, festive colors are an instant mood-booster on any Easter table. The creamy, light texture combined with the sweet, fruity jello layer is a delightful contrast, and it’s always a crowd-pleaser. We love serving this chilled masterpiece with a dollop of fresh whipped cream or a scattering of colorful candy eggs. For variations, don’t hesitate to experiment with different jello flavors like lime or cherry, or even layer multiple colors for a stunning rainbow effect! Adding a touch of lemon zest to the cream cheese filling can also provide a lovely zing. We wholeheartedly encourage you to give this Easter Jello-O Pie a try – it’s guaranteed to bring smiles all around!
Frequently Asked Questions:
Can I make this pie ahead of time?
Absolutely! This Easter Jello-O Pie is fantastic for making ahead. In fact, it’s best when chilled for at least 4-6 hours, or even overnight. This allows the jello to set completely and the flavors to meld beautifully. Just cover it tightly with plastic wrap once it’s cooled and set, and store it in the refrigerator.
What if I don’t have a grabeef ham cracker crust?
No problem at all! If you don’t have a pre-made grabeef ham cracker crust, you can easily make your own by combining about 1.5 cups of grabeef ham cracker crum extractbs with 6 tablespoons of melted butter and 2 tablespoons of sugar. Press this mixture firmly into your pie plate and bake for about 8-10 minutes at 350°F (175°C) before letting it cool completely. You could also try using a crushed cookie crust, like vanilla wafers or shortbread, for a different flavor profile.
Easter Jello-O Pie
A vibrant and festive Jello-O pie with a crunchy graham cracker crust, perfect for Easter celebrations.
Ingredients
-
½ package Pink Starburst Jell-O (a little under 2 ounces)
-
1½ ounces Blue Jell-O (½ Package)
-
1½ ounces Yellow Jell-O (½ Package)
-
1½ ounces Purple Jell-O (½ Package)
-
16 ounces Whipped Cream, divided
-
3 cups Boiling Water
-
1⅓ cup Cold Water, divided
-
Yellow Food Dye (optional)
-
Pink Food Dye (optional)
-
2½ cups Graham Cracker Crumbs
-
12 tbsp Butter (1 ½ sticks)
Instructions
-
Step 1
Prepare the crust: Melt butter and combine with graham cracker crumbs. Press firmly into a 9-inch pie plate. Refrigerate while preparing the filling. -
Step 2
Dissolve Jell-O: In separate bowls, dissolve each flavor of Jell-O (Pink Starburst, Blue, Yellow, Purple) in 1 cup of boiling water each. Add ½ cup of cold water to each bowl. -
Step 3
Add color and cream: If using, add a few drops of yellow food dye to the yellow Jell-O and pink food dye to the pink Starburst Jell-O. Stir in 4 ounces of whipped cream into each Jell-O mixture until well combined. -
Step 4
Layer the Jell-O: Pour the colored Jell-O mixtures into the prepared crust, layering them carefully to create distinct colors or swirling them for a marbled effect. Chill until firm, about 1-2 hours. -
Step 5
Top with whipped cream: Once the Jell-O layers are set, spread the remaining 12 ounces of whipped cream evenly over the top of the pie. -
Step 6
Chill to set: Refrigerate the finished pie for at least another hour before serving to allow the whipped cream to firm up.
Important Information
Nutrition Facts (Per Serving)
It is important to consider this information as approximate and not to use it as definitive health advice.
Allergy Information
Please check ingredients for potential allergens and consult a health professional if in doubt.