Perfect 4th of July Trifle Recipe – Easy & Festive
This 4th of July Trifle is your shortcut to a show-stopping dessert that’s as easy to assemble as it is to devour. When the summer heat hits and the fireworks are ready to ignite, we all crave a dessert that’s festive, refreshing, and a guaranteed crowd-pleaser. This 4th of July Trifle delivers on all fronts, transforming classic flavors into a visually stunning masterpiece. What makes this dessert so beloved? It’s the delightful layers of sweet, creamy, and fruity goodness, all coming together in one glorious dish. It’s the perfect way to celebrate with family and friends, adding a touch of homemade charm to your backyard barbecue or fireworks viewing party. Get ready to impress with this vibrant and delicious 4th of July Trifle – it’s a taste of pure summer joy!
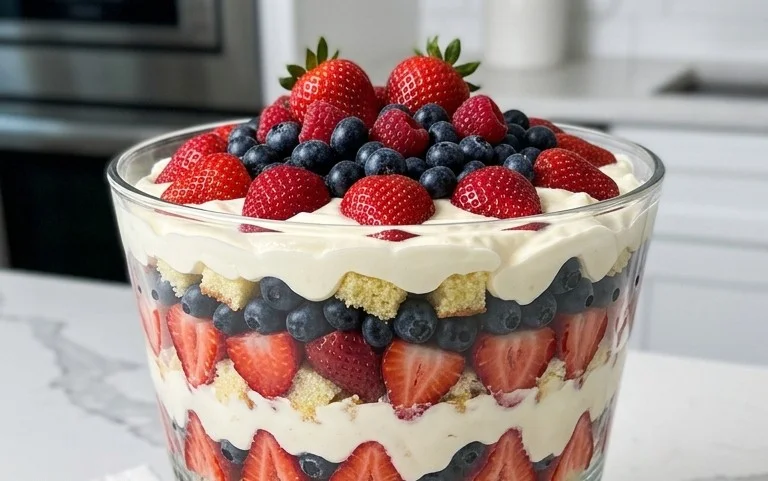
4th of July Trifle
Get ready to wow your guests with this stunning and delicious 4th of July Trifle! It’s the perfect dessert for any summer celebration, bursting with red, white, and blue colors and layers of delightful flavors. This trifle is incredibly easy to assemble, making it ideal for busy hosts. The combination of creamy pudding, light angel food cake, sweet strawberries, and tart blueberries creates a symphony of textures and tastes that everyone will love. Plus, its visually appealing presentation makes it a fantastic centerpiece for your holiday spread. Let’s get started on creating this patriotic masterpiece!
Ingredients:
Preparing the Pudding Layer
This first step is crucial for building the creamy foundation of our trifle. It’s incredibly simple and only requires a few minutes of whisking.
1. In a large bowl, combine the two 3.4-ounce packages of instant white chocolate pudding with the 4 cups of cold whole milk. It’s important to use cold milk to ensure the pudding sets properly and develops the perfect thick, luscious texture. If the milk isn’t cold enough, the pudding might remain too runny. Use a whisk to vigorously beat the pudding and milk together. Continue whisking for about 2 minutes, or until the mixture begin extracts to thicken. You’ll notice it getting noticeably thicker as you whisk. Once it’s thickened, let the pudding stand for about 5 minutes to fully set. While it’s setting, you can prepare your other components. Make sure to whisk it occasionally during this resting period if you notice any lumps forming.
Assembling the Trifle: The Foundation
Now, we’ll start building those beautiful layers in our trifle dish. A clear trifle bowl is highly recommended so you can see all the vibrant colors and textures of each layer.
2. Begin extract by creating the first layer of cake. Take your store-bought angel food cake, which should be about 14 ounces, and cut it into roughly 1-inch cubes. Arrange about half of these angel food cake cubes in an even layer at the bottom of your trifle bowl. Don’t worry too much about perfection here; a slightly uneven layer is perfectly fine. The cake will absorb some of the moisture from the pudding and fruit, making it wonderfully soft and cakey. If your angel food cake is a bit dry, you can even consider lightly brushing it with a bit of milk or a simple syrup before adding it to the bowl, though it’s usually not necessary.
Adding the Creamy and Fruity Layers
This is where the magic really starts to happen, with vibrant colors and luscious textures coming together.
3. Spoon about half of the set white chocolate pudding evenly over the layer of angel food cake. Gently spread it with a spatula or the back of a spoon to cover the cake as much as possible. Next, add a generous layer of the prepared fresh strawberries. You should have about 32 ounces of strawberries that have been washed, hulled, sliced, and patted dry. Patting them dry is important to prevent the trifle from becoming too watery. Scatter about half of the sliced strawberries over the pudding layer. Try to get them as evenly distributed as possible for a beautiful visual appeal and consistent flavor in every bite.
Building Up the Layers for a Festive Finish
We’re getting close to the finish line! These next layers will bring in the blue and add more creamy goodness.
4. Now, it’s time for the whipped topping. You’ll need about 16 ounces, which is typically two 8-ounce containers, thawed. Dollop about half of the whipped topping over the strawberry layer. You can spread this gently with a spatula or just leave it as dollops, which can create a lovely cloud-like effect. Next, add a layer of your fresh blueberries. You should have about 18 ounces of blueberries that have been washed and dried. Scatter half of these blueberries over the whipped topping. This creates another beautiful layer of color and flavor.
Completing the Trifle and Chilling
The final touches bring this beautiful dessert together. Patience is key for optimal flavor and texture.
5. Repeat the layering process to use up all your remaining ingredients. Add the rest of the angel food cake cubes over the blueberries. Then, spoon the remaining half of the white chocolate pudding over the cake layer. Follow this with the remaining sliced strawberries, spread evenly. Finally, top everything off with the rest of the whipped topping, creating a fluffy white cloud. For the most beautiful presentation, you can sprinkle a few extra blueberries and a strawberry slice or two on top of the whipped cream. Cover the trifle bowl tightly with plastic wrap, ensuring the plastic wrap doesn’t touch the whipped topping too much. Refrigerate for at least 4 hours, but overnight is even better. This allows the flavors to meld beautifully and the cake to soften perfectly. The longer it chills, the more cohesive and delicious your trifle will be! Enjoy!
Conclusion:
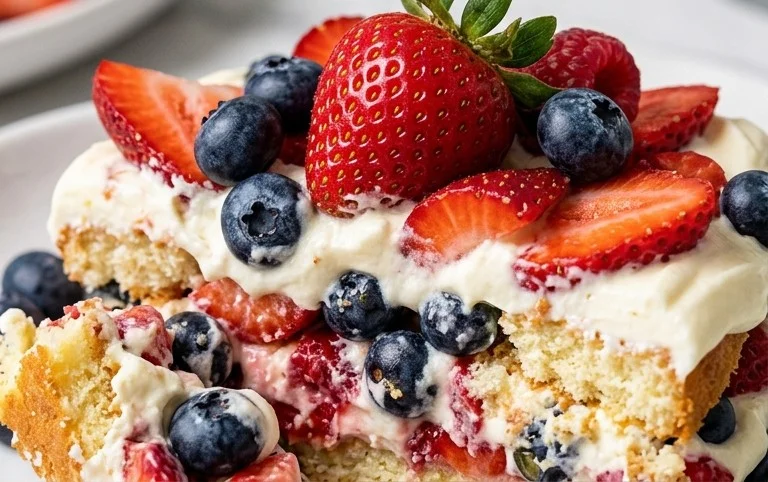
There you have it! This 4th of July Trifle is more than just a dessert; it’s a showstopper that embodies the spirit of the holiday with its vibrant red, white, and blue layers. The combination of fluffy pound cake, luscious cream cheese filling, and a burst of fresh berries is simply irresistible, making it a guaranteed crowd-pleaser. Its visual appeal is undeniable, and the ease with which it comes together means you can spend less time in the kitchen and more time celebrating with loved ones. I truly hope you give this 4th of July Trifle a try; it’s a wonderful way to add a touch of homemade sweetness to your festivities!
For serving, this trifle is fantastic on its own, allowing its beautiful layers to shine. However, consider topping each individual serving with a sprig of mint or a sprinkle of edible glitter for an extra festive touch. It also pairs beautifully with a light, crisp sparkling cider or a classic lemonade. Don’t be afraid to get creative with variations! You could swap the pound cake for angel food cake for a lighter texture, or incorporate sliced strawberries instead of raspberries for a different berry flavor profile. Perhaps even a layer of blueberry compote could add another dimension of fruity goodness. The possibilities are endless, so feel free to adapt it to your personal preferences!
Frequently Asked Questions about the 4th of July Trifle:
Can I make this trifle ahead of time?
Absolutely! This 4th of July Trifle actually benefits from being made a few hours, or even a day, in advance. This allows the flavors to meld together beautifully and the cake layers to absorb some of the creamy goodness, resulting in an even more delicious dessert.
What if I don’t have fresh berries? Can I use frozen?
Yes, you can definitely use frozen berries! Thaw them completely and drain off any excess liquid before layering them into your trifle. While fresh berries offer a brighter flavor and texture, frozen berries are a perfectly acceptable alternative, especially when you want to make this trifle outside of berry season.
How many servings does this recipe typically yield?
This recipe is designed to serve approximately 8-10 people, depending on how generously you portion it out. It’s perfect for a medium-sized gathering, but if you’re hosting a larger crowd, you might consider doubling the recipe or making two smaller trifles.
4th of July Trifle
A festive and easy trifle perfect for Fourth of July celebrations, featuring layers of creamy white chocolate pudding, angel food cake, fresh berries, and whipped topping.
Ingredients
-
6.8 ounces (two 3.4ounce) instant white chocolate pudding (Jello brand recommended)
-
4 cups cold whole milk
-
14 ounces store-bought angel food cake (cut into 1-inch cubes)
-
16 ounces (two 8-ounce) containers thawed whipped topping
-
32 ounces container fresh strawberries ( washed, stems removed, sliced and pat dry)
-
18 ounces container fresh blueberries (washed and dried)
Instructions
-
Step 1
In a large bowl, whisk together the instant white chocolate pudding mix and cold whole milk until well combined and smooth. Let it sit for 5 minutes to thicken. -
Step 2
In a large trifle dish or individual serving glasses, start with a layer of cubed angel food cake. -
Step 3
Spread half of the thickened white chocolate pudding evenly over the cake layer. -
Step 4
Add a layer of sliced strawberries and blueberries over the pudding. -
Step 5
Top the fruit layer with a generous amount of thawed whipped topping. -
Step 6
Repeat the layers: angel food cake, the remaining pudding, strawberries, blueberries, and finally the rest of the whipped topping. -
Step 7
Garnish the top with a few extra berries and a sprinkle of blueberries to resemble the American flag. Chill for at least 1 hour before serving.
Important Information
Nutrition Facts (Per Serving)
It is important to consider this information as approximate and not to use it as definitive health advice.
Allergy Information
Please check ingredients for potential allergens and consult a health professional if in doubt.