Red Velvet Whoopie Pies- Easy & Delicious Recipe
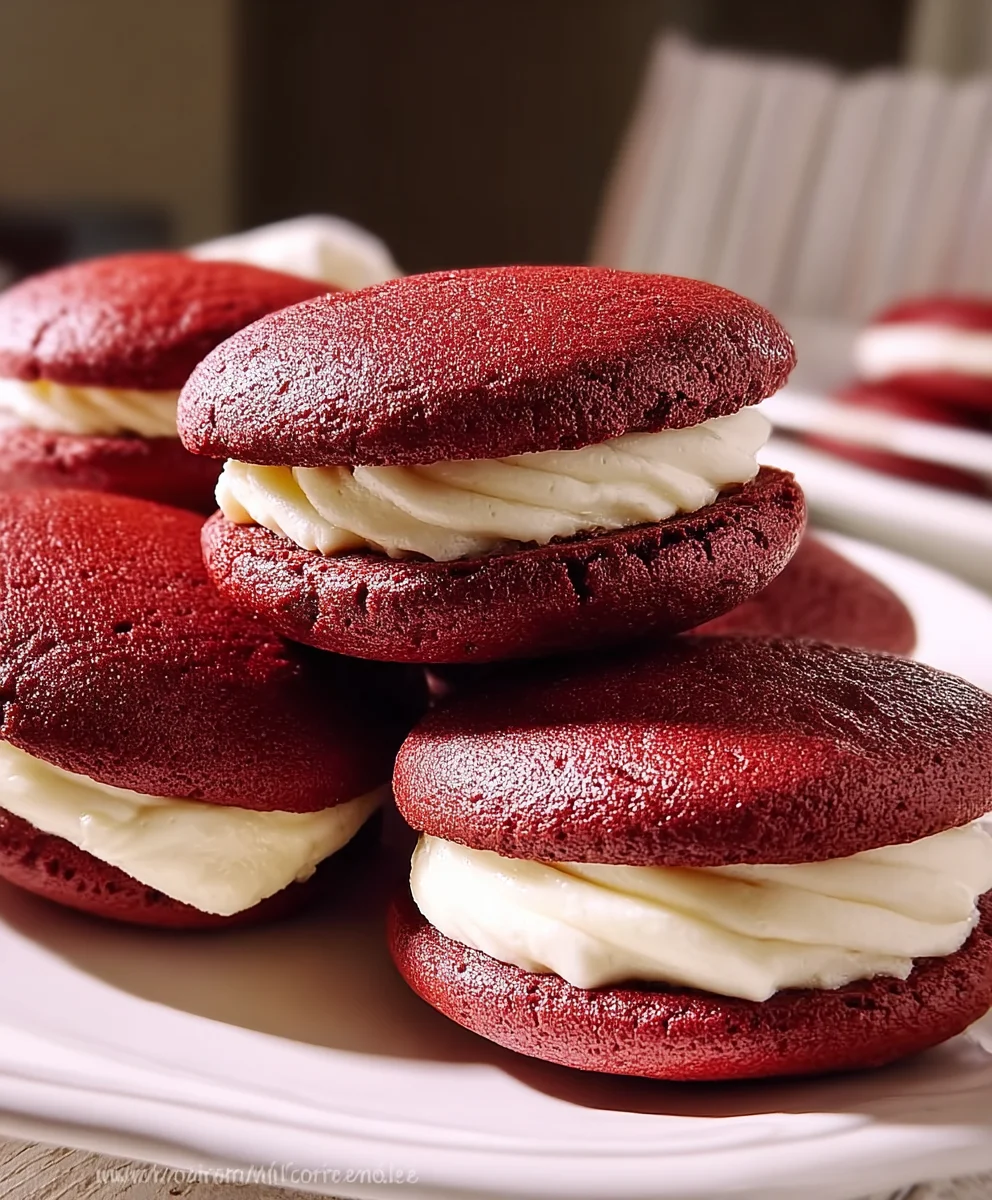
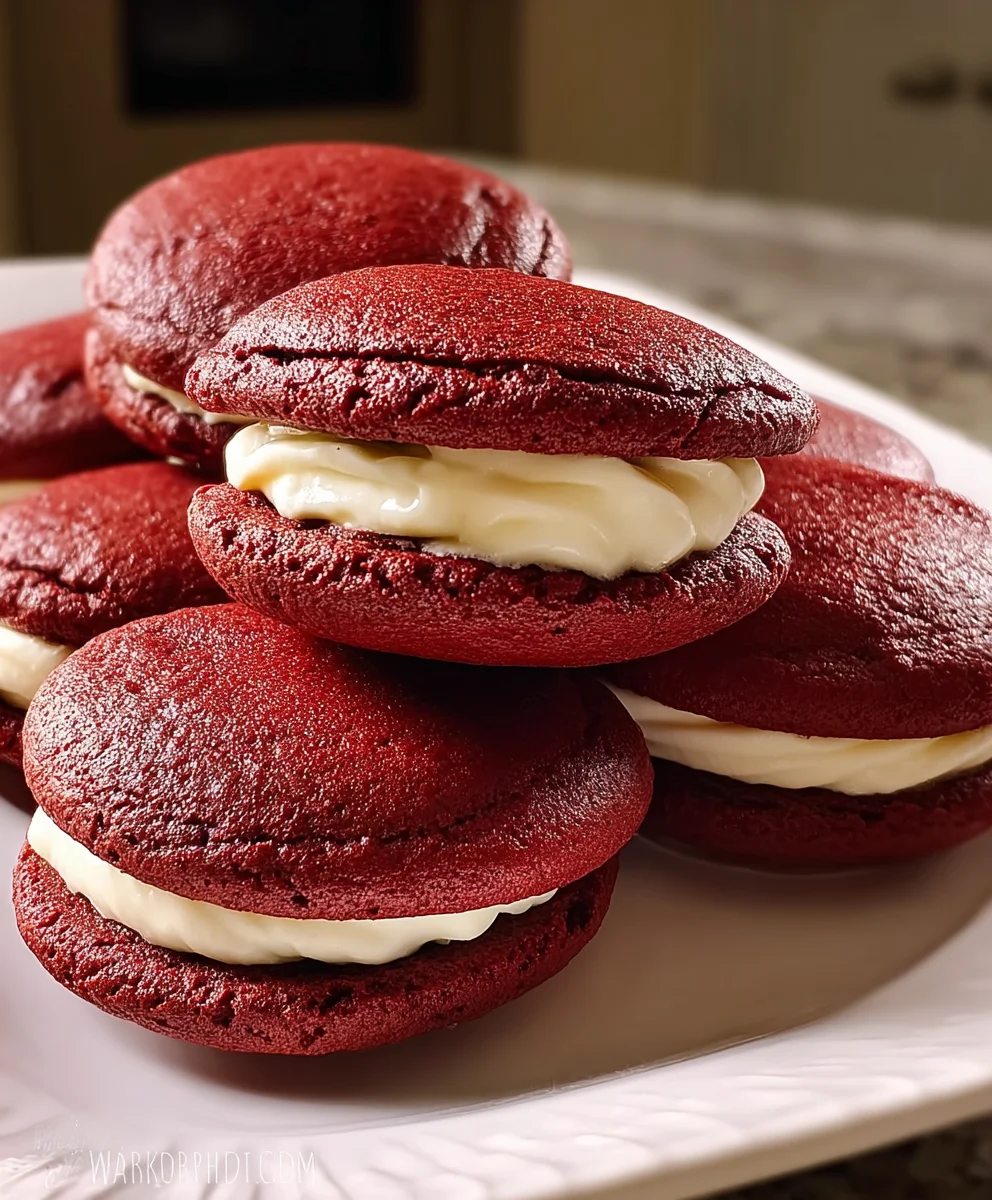
Red Velvet Whoopies are more than just a delightful treat; they’re a miniature marvel of flavor and texture that consistently captures hearts. Imagin extracte the perfect bite: two soft, cake-like cookies, blushing a vibrant crimson, cradling a luscious, creamy filling. It’s a combination that sparks joy and satisfies cravings with every single nibble. What is it about these adorable little sandwiches that makes them so universally adored? Perhaps it’s the irresistible visual appeal of that deep red hue, hinting at a subtle, sophisticated cocoa undertone. Or maybe it’s the wonderfully contrasting textures – the slight chegrape juicess of the red velvet cookie against the smooth, sweet cream cheese frosting. They evoke feelings of nostalgia, conjuring memories of childhood baking days, yet they possess a refined elegance that makes them perfect for any occasion, from a casual afternoon pick-me-up to a festive celebration. Get ready to fall in love with these charming Red Velvet Whoopies all over again.
Ingredients:
- 2 cups all-purpose flour
- 2 tbsp unsweetened cocoa powder
- 1/2 tsp baking soda
- 1/4 tsp salt
- 1/2 cup unsalted butter, softened (for cake batter)
- 1 cup granulated sugar
- 1 large egg
- 1 tsp vanilla extract (for cake batter)
- 1/2 cup buttermilk
- 1 tbsp liquid red food coloring
- 1/2 cup unsalted butter, softened (for filling)
- 8 oz cream cheese, softened
- 3 cups powdered sugar
- 1 tsp vanilla extract (for filling)
Red Velvet Whoopie Pies: Cake Component
Mixing the Dry Ingredients
First things first, let’s get our dry ingredients ready. In a medium-sized bowl, whisk together the 2 cups of all-purpose flour, 2 tablespoons of unsweetened cocoa powder, 1/2 teaspoon of baking soda, and 1/4 teaspoon of salt. Whisking thoroughly ensures that the leavening agents and salt are evenly distributed throughout the flour, which is crucial for a consistent rise and flavor in your Red Velvet Whoopie Pies. Set this bowl aside for now.
Creaming the Butter and Sugar
Now, let’s move on to the wet ingredients. In a large mixing bowl, beat the 1/2 cup of softened unsalted butter with an electric mixer until it’s light and fluffy. This process, known as creaming, incorporates air into the butter, which contributes to a tender cake texture. Gradually add the 1 cup of granulated sugar to the creamed butter, continuing to beat until the mixture is pnon-alcoholic ale and airy, about 2 to 3 minutes. This step is vital for dissolving the sugar crystals and further aerating the batter.
Incorporating the Egg and Vanilla
Next, crack in the 1 large egg and add 1 teaspoon of vanilla extract to the creamed butter and sugar mixture. Beat until just combined. It’s important not to overmix at this stage, as overbeating can lead to tough whoopie pies. Scrape down the sides of the bowl with a spatula to ensure all the ingredients are incorporated evenly.
Alternating Dry and Wet Ingredients
This is where we bring everything together. In a small bowl, whisk together the 1/2 cup of buttermilk and the 1 tablespoon of liquid red food coloring until the color is uniform. Gradually add the dry ingredients to the wet ingredients in three additions, alternating with the buttermilk mixture in two additions, begin extractning and ending with the dry ingredients. For example, add about a third of the flour mixture, mix until just combined, then add half of the buttermilk mixture, mix, add another third of the flour mixture, mix, add the remaining buttermilk mixture, mix, and finally add the last of the flour mixture and mix until just incorporated. Be careful not to overmix the batter; a few streaks of flour are okay. Overmixing will develop the gluten in the flour, resulting in a chewy and dense whoopie pie instead of a soft and cakey one.
Baking the Whoopie Pie Cakes
Preheat your oven to 350°F (175°C). Line baking sheets with parchment paper. Drop rounded tablespoons of the red velvet batter onto the prepared baking sheets, leaving about 2 inches between each cookie. I like to use a cookie scoop for uniform size. Bake for 9-11 minutes, or until the edges are set and a toothpick inserted into the center comes out clean. Let the cookies cool on the baking sheets for a minute before transferring them to a wire rack to cool completely. It’s essential that the cakes are entirely cool before you even think about filling them, otherwise, the filling will melt and create a sticky mess.
Red Velvet Whoopie Pies: Cream Cheese Filling
Preparing the Cream Cheese Base
While the cake components are cooling, let’s make the delightful cream cheese filling. In a large mixing bowl, beat the 1/2 cup of softened unsalted butter and the 8 oz of softened cream cheese with an electric mixer until smooth and creamy. Ensure both the butter and cream cheese are truly softened to room temperature; this is non-negotiable for achieving a lump-free and fluffy frosting.
Adding the Powdered Sugar and Vanilla
Gradually add the 3 cups of powdered sugar, one cup at a time, beating on low speed until incorporated after each addition. Once all the powdered sugar is added, increase the speed to medium-high and beat for another 2-3 minutes until the filling is light, fluffy, and smooth. Add the 1 teaspoon of vanilla extract and beat briefly to combine. The consistency should be pipeable or spreadable but not runny. If it seems too stiff, you can add a tiny splash of milk or buttermilk; if it’s too loose, add a little more powdered sugar.
Assembling the Red Velvet Whoopie Pies
Once both the cake components and the cream cheese filling are completely cool, it’s time for the best part: assembly! Pair up the cooled cake rounds by size. On the bottom of one cake round, spread or pipe a generous amount of the cream cheese filling. Gently place another cake round on top of the filling, pressing down slightly to spread the filling evenly to the edges. Repeat this process with the remaining cake rounds and filling until all your Red Velvet Whoopie Pies are assembled. For an extra flourish, you can gently roll the sides of the filling in some sprinkles if you wish, although they are perfectly delightful as is. Refrigerate the assembled whoopie pies for at least 30 minutes before serving. This allows the filling to set up nicely, making them easier to handle and enjoy.
Conclusion:
We hope you’ve enjoyed diving into the delightful world of Red Velvet Whoopies! This recipe offers a perfect balance of rich, cocoa-infused cake and a creamy, sweet filling, making them a truly irresistible treat. Whether you’re baking for a special occasion or simply craving something decadent, these whoopies are sure to impress. They are wonderfully versatile and can be enjoyed on their own as a delightful dessert or snack. For serving suggestions, consider pairing them with a glass of cold milk for a classic combination, or perhaps a strong cup of coffee to cut through the sweetness. They also make a stunning addition to any dessert platter or cookie exchange.
Don’t be afraid to get creative with variations! You could add a touch of espresso powder to the cake batter for a mocha twist, or incorporate a pinch of cayenne pepper for a subtle heat. For the filling, consider adding a hint of peppermint extract or even some finely chopped dark chocolate. The possibilities are truly endless, allowing you to personalize these Red Velvet Whoopies to your heart’s content. We encourage you to try this recipe and share the joy of these beautiful and delicious treats with your loved ones. Happy baking!
Frequently Asked Questions about Red Velvet Whoopies
Q: Can I make the Red Velvet Whoopies ahead of time?
A: Absolutely! The whoopie pie shells can be baked a day or two in advance and stored in an airtight container at room temperature. The cream cheese frosting can also be made a day ahead and refrigerated. Assemble them just a few hours before serving for the best texture, or the day of to ensure the frosting remains firm.
Q: My Red Velvet Whoopies are spreading too much, what can I do?
A: If your whoopies are spreading excessively, it might be due to an overly warm kitchen, too much liquid in the batter, or overmixing. Ensure your butter and sugar are creamed properly but not over-whipped. Try chilling the dough for about 15-30 minutes before scooping, and be careful not to flatten the dough balls too much before baking. Also, ensure your oven temperature is accurate; an oven thermometer can be very helpful.
Red Velvet Whoopie Pies- Easy & Delicious Recipe
A simple and delicious recipe for classic red velvet whoopie pies with a creamy cream cheese filling.
Ingredients
-
2 cups all-purpose flour
-
2 tbsp unsweetened cocoa powder
-
1/2 tsp baking soda
-
1/4 tsp salt
-
1 cup unsalted butter, softened
-
1 cup granulated sugar
-
1 large egg
-
1 tsp vanilla extract
-
1/2 cup buttermilk
-
1 tbsp liquid red food coloring
-
1/2 cup unsalted butter, softened (for filling)
-
8 oz cream cheese, softened
-
3 cups powdered sugar
-
1 tsp vanilla extract (for filling)
Instructions
-
Step 1
Combine flour, cocoa powder, baking soda, and salt in a medium bowl. Set aside. -
Step 2
In a large bowl, cream softened butter and granulated sugar until light and fluffy. Beat in the egg and vanilla extract until just combined. -
Step 3
In a small bowl, whisk together buttermilk and red food coloring. Gradually add the dry ingredients to the wet ingredients in three additions, alternating with the buttermilk mixture in two additions, beginning and ending with the dry ingredients. Mix until just combined, being careful not to overmix. -
Step 4
Drop rounded tablespoons of batter onto parchment-lined baking sheets, about 2 inches apart. Bake at 350°F (175°C) for 9-11 minutes, or until a toothpick inserted into the center comes out clean. Cool on baking sheets for a minute, then transfer to a wire rack to cool completely. -
Step 5
For the filling, beat softened butter and cream cheese until smooth. Gradually add powdered sugar, beating until light and fluffy. Stir in vanilla extract. -
Step 6
Once the cake components and filling are cool, pair up cake rounds. Spread or pipe a generous amount of filling onto the bottom of one cake round. Gently place another cake round on top, pressing slightly to spread the filling. -
Step 7
Refrigerate the assembled whoopie pies for at least 30 minutes before serving.
Important Information
Nutrition Facts (Per Serving)
It is important to consider this information as approximate and not to use it as definitive health advice.
Allergy Information
Please check ingredients for potential allergens and consult a health professional if in doubt.