Strawberry Cheesecake Dessert Tacos – Sweet Treat
Strawberry Cheesecake Dessert Tacos are about to revolutionize your sweet treat game. Imagin extracte the creamy, dreamy indulgence of classic cheesecake, perfectly paired with the vibrant burst of fresh strawberries, all nestled within a delightfully crisp taco shell. It’s a dessert concept that sounds almost too good to be true, but trust me, it’s utterly delicious and surprisingly easy to make. Why do we all adore this magical combination? Because it takes two beloved desserts and merges them into one irresistible bite. The satisfying crunch of the taco shell, the smooth, tangy cheesecake filling, and the sweet, juicy strawberries create a symphony of textures and flavors that will leave you beggin extractg for more. These Strawberry Cheesecake Dessert Tacos are special because they offer a playful, handheld way to enjoy all the best parts of cheesecake without the fuss of a traditional slice. Get ready to impress yourself and everyone around you!
Strawberry Cheesecake Dessert Tacos: A Sweet Twist on a Classic
Get ready to experience your favorite cheesecake flavors in a fun, handheld, and utterly delightful new way! These Strawberry Cheesecake Dessert Tacos are the perfect answer to your sweet cravings, blending the creamy tang of cheesecake with the bright burst of fresh strawberries, all nestled within a warm, cinnamon-spiced taco shell. They’re surprisingly simple to make, making them ideal for a weeknight treat or a show-stopping dessert for your next gathering. Imagin extracte the delightful crunch of the shell giving way to a luscious cream cheese filling, topped with a vibrant, sweet strawberry sauce. It’s a flavor combination that’s simply irresistible.
Ingredients:
Crafting the Taco Shells
The foundation of our dessert tacos is the shell itself. We’re going to transform simple flour tortillas into crispy, cinnamon-sugar delights. This step is crucial for achieving that perfect textural contrast with the creamy filling.
1. In a shallow dish, combine the ½ cup of granulated sugar and 1 tablespoon of ground cinnamon. Stir them together thoroughly until the cinnamon is evenly distributed throughout the sugar. This fragrant mixture will give our taco shells their signature sweet and spicy aroma.
2. Brush both sides of each flour tortilla generously with the melted unsalted butter. Don’t be shy with the butter; it helps the sugar and cinnamon adhere and contributes to the crispiness.
3. Press each buttered tortilla into the cinnamon-sugar mixture, ensuring both sides are well coated. Gently shake off any excess.
4. Now, it’s time to bake. Preheat your oven to 375°F (190°C). Drape the coated tortillas over the rungs of your oven rack, allowing them to form a taco shape as they bake. Alternatively, you can lightly spray a muffin tin with non-stick spray and drape the tortillas over the edges of the cups, creating a U-shape. Bake for 8-12 minutes, or until the shells are golden brown and crispy. Keep a close eye on them, as they can go from perfectly crisp to burnt in a flash! Once baked, carefully remove them from the oven and let them cool completely on a wire rack. This cooling process is essential for them to firm up and maintain their taco shape.
Whipping Up the Cheesecake Filling
Next, we’ll create the luscious, creamy heart of our dessert tacos – the cheesecake filling. This is where the classic cheesecake flavor truly shines.
5. In a medium bowl, beat the softened 8 ounces of cream cheese with an electric mixer until it’s smooth and creamy. This ensures there are no lumps and the filling has a silky texture. Scrape down the sides of the bowl as needed to incorporate all the cream cheese.
6. Gradually add the ½ cup of powdered sugar to the cream cheese, beating until well combined and smooth. The powdered sugar adds sweetness without making the filling grainy.
7. Stir in the 1 teaspoon of vanilla extract. This will enhance the overall flavor profile of the cheesecake filling, adding a warm and inviting aroma.
8. In a separate, chilled bowl, whip the ½ cup of heavy whipping cream until stiff peaks form. This means when you lift the whisk, the cream will hold its shape. Be careful not to overbeat, or you’ll end up with butter.
9. Gently fold the whipped cream into the cream cheese mixture. This lightens the filling and gives it an even more luxurious, airy texture, reminiscent of a classic no-bake cheesecake. This folding technique is key to maintaining the airiness.
Creating the Vibrant Strawberry Sauce
To add that burst of fruity goodness and a pop of color, we’ll make a quick and easy strawberry sauce.
10. In a small saucepan, combine the 1 cup of chopped fresh or frozen strawberries, ¼ cup of granulated sugar, and 1 tablespoon of lemon juice. The lemon juice brightens the strawberry flavor and helps to balance the sweetness.
11. Cook over medium heat, stirring occasionally, until the strawberries begin extract to break down and release their juices. This will take about 5-7 minutes.
12. Once the strawberries have softened, stir in the cornstarch slurry (1 tablespoon cornstarch mixed with 2 tablespoons water). Continue to cook, stirring constantly, until the sauce thickens. This will happen quickly once the cornstarch is added. It should be thick enough to coat the back of a spoon.
13. Remove the sauce from the heat and let it cool slightly. As it cools, it will continue to thicken.
Assembling Your Delightful Dessert Tacos
Now for the most exciting part – putting it all together!
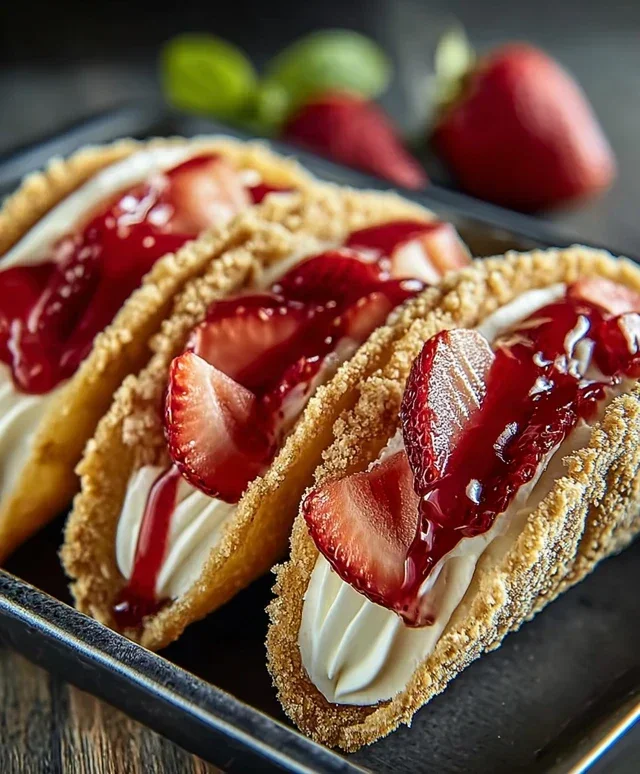
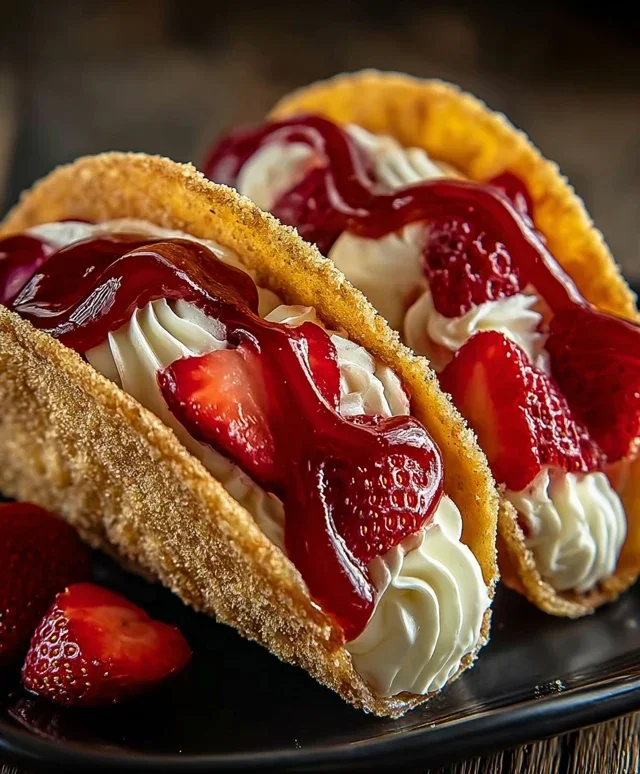
14. Once your taco shells have cooled completely and your cheesecake filling and strawberry sauce are ready, it’s time to assemble. Carefully spoon a generous amount of the cheesecake filling into each crispy taco shell. Don’t overfill, or it might spill out when you take a bite.
15. Drizzle the cooled strawberry sauce over the cheesecake filling in each taco. You can be as artistic as you like with your drizzles!
16. For an extra special touch, you can garnish your Strawberry Cheesecake Dessert Tacos with a few fresh mint leaves or even a sprinkle of extra cinnamon-sugar. Serve immediately and prepare for smiles all around! These are best enjoyed right after assembly to maintain the crispiness of the shells.
Enjoy these delightful Strawberry Cheesecake Dessert Tacos – a truly innovative and delicious way to enjoy your favorite flavors!
Conclusion:
There you have it – the ultimate guide to crafting your very own Strawberry Cheesecake Dessert Tacos! I truly believe these little bundles of joy are a game-changer for any dessert lover. They perfectly blend the creamy, tangy goodness of cheesecake with the sweet burst of fresh strawberries, all nestled within a crisp taco shell. It’s an unexpected yet utterly delightful combination that’s sure to impress. Don’t be afraid to get creative with your toppings! Beyond the classic strawberry swirl, consider adding a sprinkle of grabeef ham cracker crum extractbs for extra texture, a drizzle of chocolate sauce, or even some toasted slivered almonds. For a truly festive touch, serve them at your next gathering – they make for a fun and interactive dessert experience that guests of all ages will adore. I encourage you to give these Strawberry Cheesecake Dessert Tacos a try; I promise you won’t regret it!
Frequently Asked Questions:
Can I make the taco shells ahead of time?
Absolutely! You can prepare your taco shells a day or two in advance and store them in an airtight container at room temperature to maintain their crispness. This will save you valuable time when you’re ready to assemble your dessert tacos.
What other fruits would work well in these tacos?
While strawberries are phenomenal, feel free to experiment! Blueberries, raspberries, or even a mixed berry blend would be absolutely delicious. For a more tropical twist, mango or pineapple chunks could be a fantastic addition.
Is there a way to make these dairy-free or vegan?
Yes, there are! You can use dairy-free cream cheese alternatives and a plant-based yogurt or coconut cream for the cheesecake filling. Ensure your taco shells are also vegan-friendly. The strawberry flavor will shine through beautifully regardless of your dietary choices.
Strawberry Cheesecake Dessert Tacos
A delightful and easy dessert taco featuring a creamy cheesecake filling, sweet strawberry topping, and a crispy cinnamon-sugar shell.
Ingredients
-
6 small flour tortillas
-
½ cup granulated sugar
-
1 tbsp ground cinnamon
-
½ cup unsalted butter, melted
-
8 oz cream cheese, softened
-
½ cup powdered sugar
-
1 tsp vanilla extract
-
½ cup heavy whipping cream
-
1 cup fresh or frozen strawberries, chopped
-
¼ cup granulated sugar
-
1 tbsp lemon juice
-
1 tbsp cornstarch mixed with 2 tbsp water
Instructions
-
Step 1
Preheat oven to 350°F (175°C). In a small bowl, combine ½ cup granulated sugar and 1 tbsp ground cinnamon. Brush both sides of the flour tortillas with melted butter, then sprinkle generously with the cinnamon-sugar mixture. Place tortillas over the rungs of your oven rack, folding them in half to create a taco shell shape. Bake for 8-10 minutes, or until crisp and lightly golden. Let cool completely. -
Step 2
In a medium bowl, beat the softened cream cheese until smooth. Gradually beat in ½ cup powdered sugar and 1 tsp vanilla extract until well combined and creamy. -
Step 3
In a separate bowl, whip the heavy whipping cream until stiff peaks form. Gently fold the whipped cream into the cream cheese mixture until just combined. -
Step 4
In a small saucepan, combine 1 cup chopped strawberries, ¼ cup granulated sugar, and 1 tbsp lemon juice. Cook over medium heat, stirring occasionally, until the strawberries soften and release their juices. Stir in the cornstarch slurry and cook for another 1-2 minutes, stirring constantly, until the sauce thickens. Remove from heat and let cool. -
Step 5
To assemble, spoon the cheesecake filling into the cooled cinnamon-sugar taco shells. Top generously with the strawberry sauce. Serve immediately.
Important Information
Nutrition Facts (Per Serving)
It is important to consider this information as approximate and not to use it as definitive health advice.
Allergy Information
Please check ingredients for potential allergens and consult a health professional if in doubt.