Chewy Caramel Brownies-Easy Caramelitas Recipe
Caramelitas are one of those incredibly comforting, deeply satisfying treats that have a magical way of bringin extractg people together. Have you ever bitten into a warm, gooey bite of chewy oat bar layered with rich caramel and a hint of chocolate, and felt an instant wave of pure bliss wash over you? That’s the power of a perfectly executed Caramelita. It’s no wonder these bars are a perennial favorite at potlucks, bake snon-alcoholic ales, and family gatherings. What truly sets these incredible Caramelitas apart is the delightful balance of textures and flavors – the crum extractbly, slightly crisp oat base, the impossibly gooey and sweet caramel center, and often, a sprinkle of chocolate chips that melt into luscious pools. They’re deceptively simple to make, yet they deliver a gourmet experience that’s simply unforgettable. Get ready to discover why these humble bars have earned such a devoted following and how you can create your own irresistible batch that will have evergin extracte begging for the recipe.
Ingredients:
- 2 cups all-purpose flour
- 2 cups old-fashioned rolled oats
- 1½ cups brown sugar, packed
- 1 teaspoon baking soda
- ½ teaspoon salt
- 1½ cups unsalted butter, melted
- 1½ cups caramel sauce
- 1 cup semi-sweet chocolate chips
- ½ cup chopped pecans (optional)
Preparing the Caramelitas Base
First things first, let’s get our oven preheated and our baking pan ready. I like to preheat my oven to 350°F (175°C). This is a classic baking temperature that works beautifully for achieving a golden-brown crust without burning. For the pan, a 9×13 inch baking pan is perfect for this recipe. To ensure your Caramelitas release cleanly and you don’t end up with a sticky mess, generously grease the pan with butter or cooking spray. Alternatively, you can line the pan with parchment paper, leaving some overhang on the sides. This makes lifting the entire slab out of the pan much easier once it’s cooled.
Now, let’s combine the dry ingredients for our base. In a large mixing bowl, whisk together the 2 cups of all-purpose flour, the 2 cups of old-fashioned rolled oats, the 1½ cups of packed brown sugar, the 1 teaspoon of baking soda, and the ½ teaspoon of salt. Whisking these together ensures that the leavening agent (baking soda) and salt are evenly distributed throughout the flour and oat mixture. This is crucial for a consistent texture and rise in your Caramelitas. You want to see a uniform blend of all the dry components before we introduce the wet ingredients.
Next, we’ll add the melted butter to this dry mixture. Pour the 1½ cups of melted unsalted butter over the flour, oats, sugar, baking soda, and salt. Now, it’s time to combine everything. I find that using a sturdy spoon or a spatula is best for this stage. You want to mix until the ingredients are just combined and the mixture resembles coarse crum extractbs. Be careful not to overmix at this point, as overworking the dough can lead to tougher Caramelitas. It should be moist enough to hold together when squeezed.
Assembling and Baking the Caramelitas
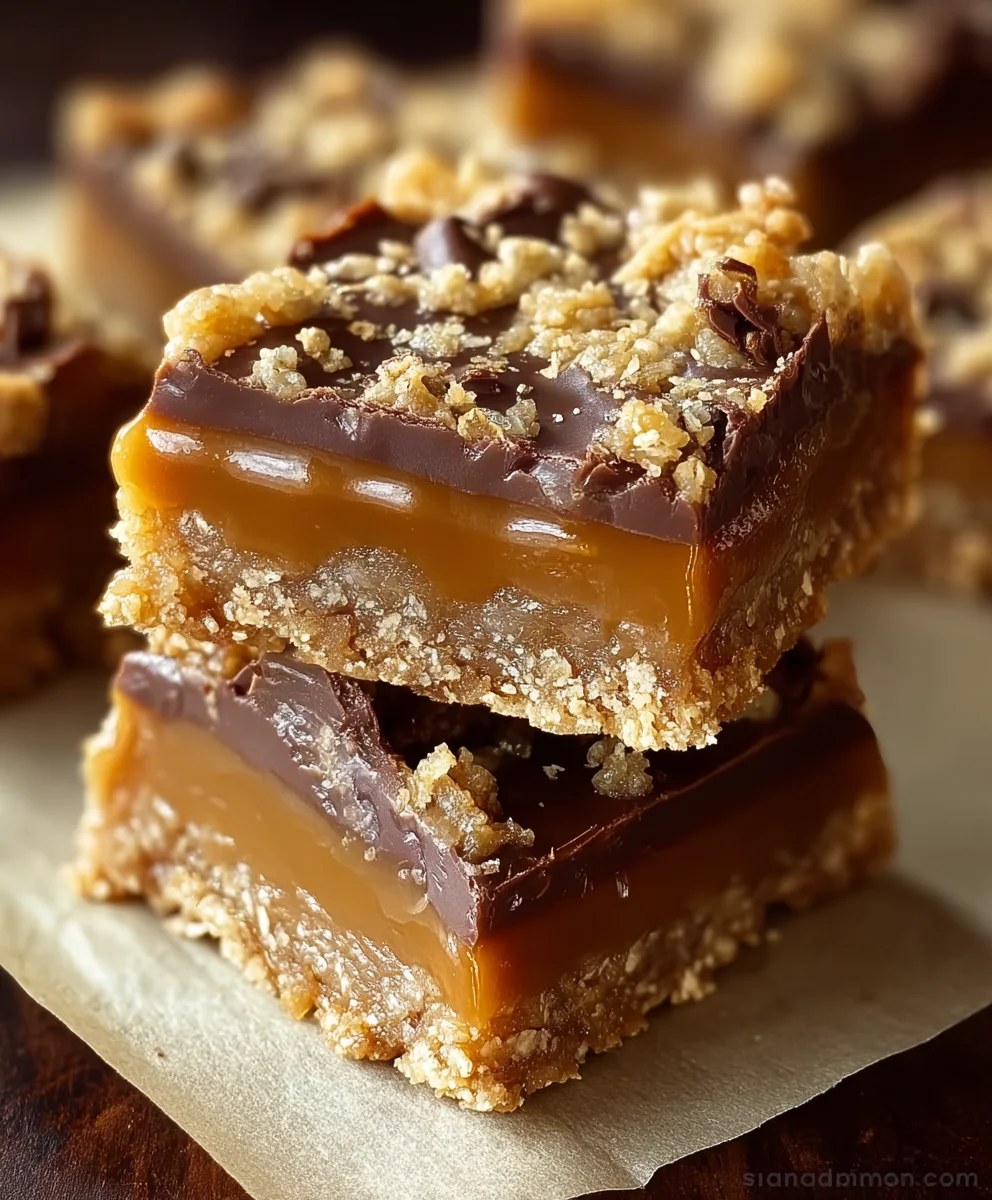
Once you havrum extracthat crumbly mixture, divide it roughly in half. Take one half of this mixture and press it firmly and evenly into the bottom of your prepared baking pan. Use the back of your spoon or a flat-bottomed glass to ensure you create a compact and even layer. This bottom layer will form the crust of our delicious Caramelitas. The firmer you press this layer, the sturdier your base will be, which is important for holding all those gooey layers together. Make sure there are no thin spots or gaps.
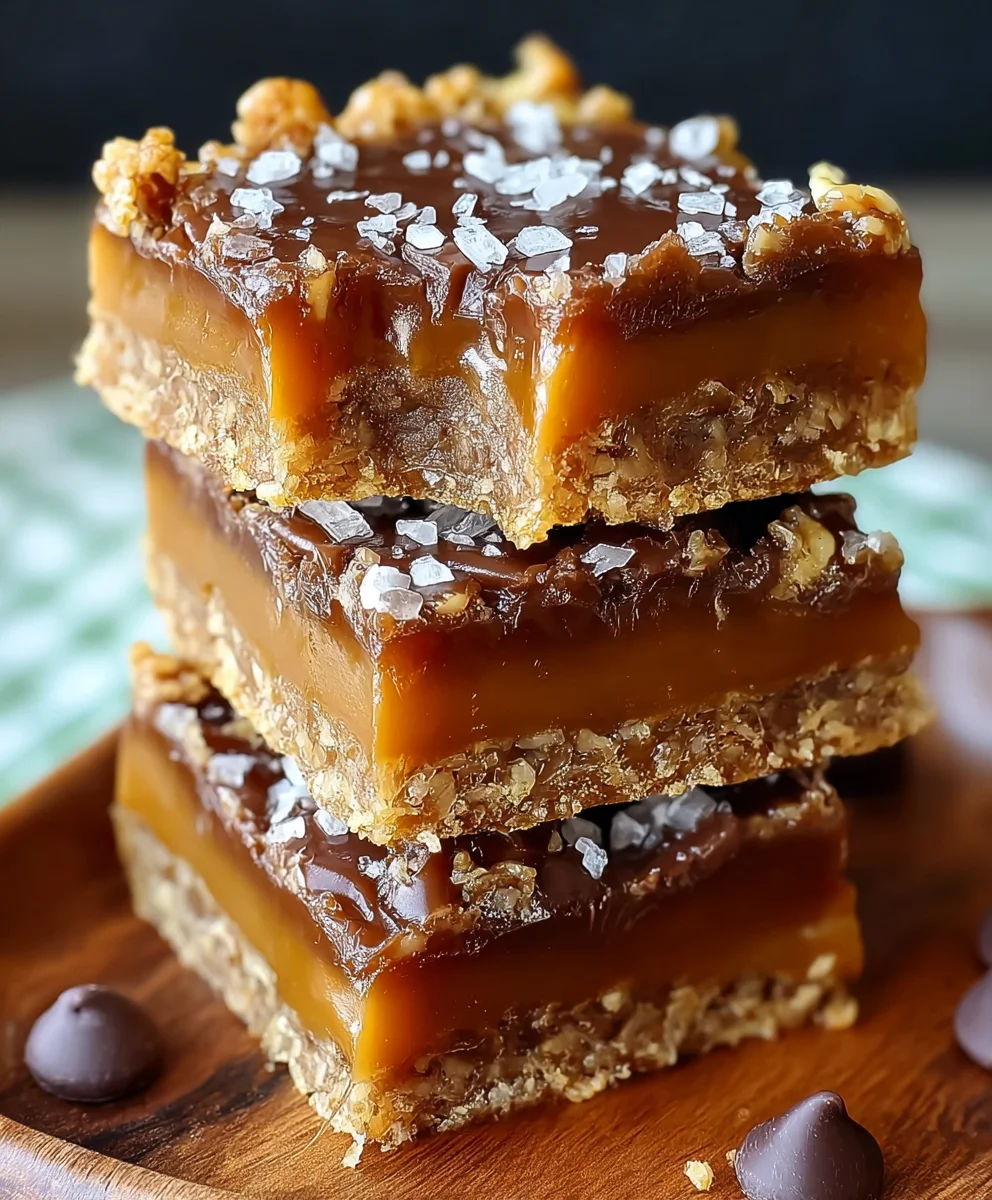
Now comes the fun part: the gooey caramel layer! Gently spread the 1½ cups of caramel sauce evenly over the pressed base layer in the pan. Try to get it as close to the edges as possible without letting it ooze over the sides. If your caramel sauce is very thick, you might find it easier to warm it up slightly in a saucepan or microwave for a few seconds to make it more spreadable. This caramel layer is what gives Caramelitas their signature chewy and decadent texture, so don’t skimp on it!
After the caramel is spread, sprinkle the 1 cup of semi-sweet chocolate chips evenly over the caramel layer. If you’re feeling adventurous and want an extra layer of flavor and texture, this is also the time to sprinkle on the optional ½ cup of chopped pecans. The pecans add a delightful crunch that complements the chegrape juicess of the oats and the sweetness of the caramel and chocolate. Ensure the chocolate chips and pecans are distributed as evenly as possible across the caramel so you get that perfect bite every time.
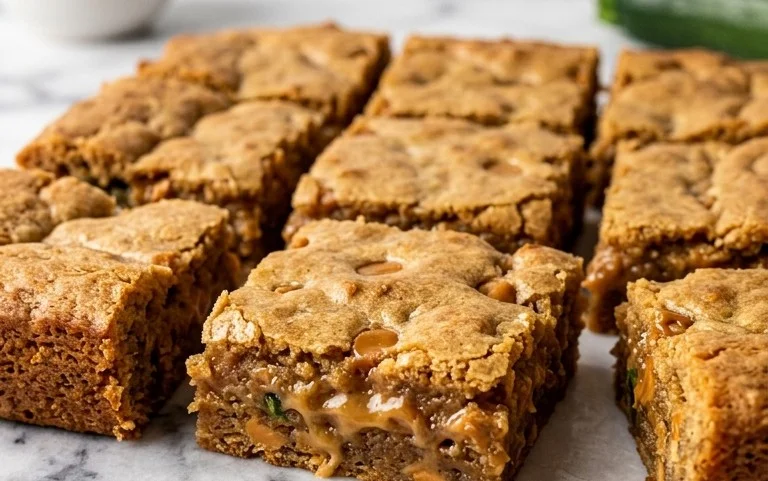
Finally, take the remainirum extracthalf of the crumbly oat mixture and sprinkle it evenly over the top of the chocolate chips and pecans. Again, aim for an even distribution so that the top layer is fully covered, creating a beautiful contrast with the gooey center. You don’t need to press this top layer down firmly; just gently scatter it to cover the chocolate and caramel.
Bake in the preheated oven for 25 to 30 minutes, or until the topping is golden brown and the caramel is bubbling around the edges. Keep an eye on them, especially towards the end of the baking time, to prevent the topping from getting too dark. The aroma filling your kitchen will be absolutely divine!
Cooling and Serving
This is arguably the hardest part: letting them cool! Once they’re out of the oven, resist the urge to cut into them immediately. It’s crucial to let the Caramelitas cool completely in the pan on a wire rack. This allows the caramel to set properly and the chocolate to firm up. If you try to cut them while they are still warm and gooey, they will likely fall apart. Patience is key here – I recommend at least 2 to 3 hours of cooling time. For the cleanest cuts, you can even pop them in the refrigerator for about 30 minutes after they’ve cooled at room temperature for a bit.
Once completely cooled, you can lift the entire slab out of the pan using the parchment paper overhang, or if you didn’t use parchment, carefully cut them into squares directly in the pan. I usually aim for 2-inch squares, but you can adjust the size to your preference. These are rich, so smaller squares are often just the right amount! Enjoy these incredible Caramelitas as a sweet treat with a cup of coffee or tea, or as a decadent dessert. They store well in an airtight container at room temperature for several days.
Conclusion:
We’ve reached the delicious conclusion of our journey into making the perfect Caramelitas! This recipe is a true crowd-pleaser, offering a delightful balance of chewy oat base, rich caramel filling, and a hint of chocolatey indulgence. Whether you’re a seasoned baker or just starting out, these Caramelitas are surprisingly straightforward to whip up, making them an ideal treat for any occasion. They store beautifully, making them perfect for making ahead for parties or just to have on hand for that sweet craving.
For serving suggestions, consider enjoying your Caramelitas warm, perhaps with a scoop of vanilla ice cream for an extra decadent experience. They are also fantastic at room temperature, making them perfect for picnics or potlucks. For variations, feel free to add a sprinkle of sea salt on top of the caramel before baking for a salted caramel twist, or stir in some chopped nuts like pecans or walnuts into the oat mixture for added crunch. You could even drizzle melted chocolate over the cooled bars for an even more luxurious finish.
Don’t be afraid to experiment and make these Caramelitas your own! The joy of baking is in the personalization, and I encourage you to discover your favorite way to enjoy this classic treat. Happy baking!
Frequently Asked Questions about Caramelitas:
Q: How should I store my Caramelitas?
A: Once cooled completely, store your Caramelitas in an airtight container at room temperature for up to 3-4 days. For longer storage, you can refrigerate them, though they may become a bit firmer. You can also freeze them; wrap individual bars or the whole pan tightly in plastic wrap and then in foil. Thaw at room temperature before serving.
Q: Can I make Caramelitas gluten-free?
A: Yes, you absolutely can! To make gluten-free Caramelitas, simply substitute the all-purpose flour with a good quality gluten-free all-purpose flour blend. Ensure your oats are certified gluten-free as well, as regular oats can sometimes be cross-contaminated with wheat. The texture might be slightly different, but the flavor will be just as delightful.
Q: My caramel seems too runny. What went wrong?
A: If your caramel filling is too runny, it might be due to not cooking the caramel mixture long enough, or perhaps the butter and brown sugar mixture wasn’t fully dissolved. For the best results, ensure the butter and brown sugar are melted and combined thoroughly over medium heat before adding the milk and cooking to a thicker consistency. Sometimes, over-adding the milk can also lead to a runnier caramel.
Chewy Caramel Brownies-Easy Caramelitas Recipe
An easy and delicious recipe for chewy caramelitas, featuring a rich caramel layer and a crumble topping.
Ingredients
-
2 cups all-purpose flour
-
2 cups old-fashioned rolled oats
-
1½ cups brown sugar, packed
-
1 teaspoon baking soda
-
½ teaspoon salt
-
1½ cups unsalted butter, melted
-
1½ cups caramel sauce
-
1 cup semi-sweet chocolate chips
-
½ cup chopped pecans (optional)
Instructions
-
Step 1
Preheat oven to 350°F (175°C) and generously grease a 9×13 inch baking pan. -
Step 2
In a large bowl, whisk together flour, oats, brown sugar, baking soda, and salt. Add melted butter and mix until the mixture resembles coarse crumbs. -
Step 3
Press half of the crumb mixture firmly and evenly into the bottom of the prepared pan. -
Step 4
Spread the caramel sauce evenly over the base layer, then sprinkle with chocolate chips and optional pecans. -
Step 5
Sprinkle the remaining crumb mixture evenly over the top layer. -
Step 6
Bake for 25-30 minutes, or until the topping is golden brown and the caramel is bubbling. -
Step 7
Let cool completely in the pan on a wire rack for at least 2-3 hours before cutting into squares.
Important Information
Nutrition Facts (Per Serving)
It is important to consider this information as approximate and not to use it as definitive health advice.
Allergy Information
Please check ingredients for potential allergens and consult a health professional if in doubt.