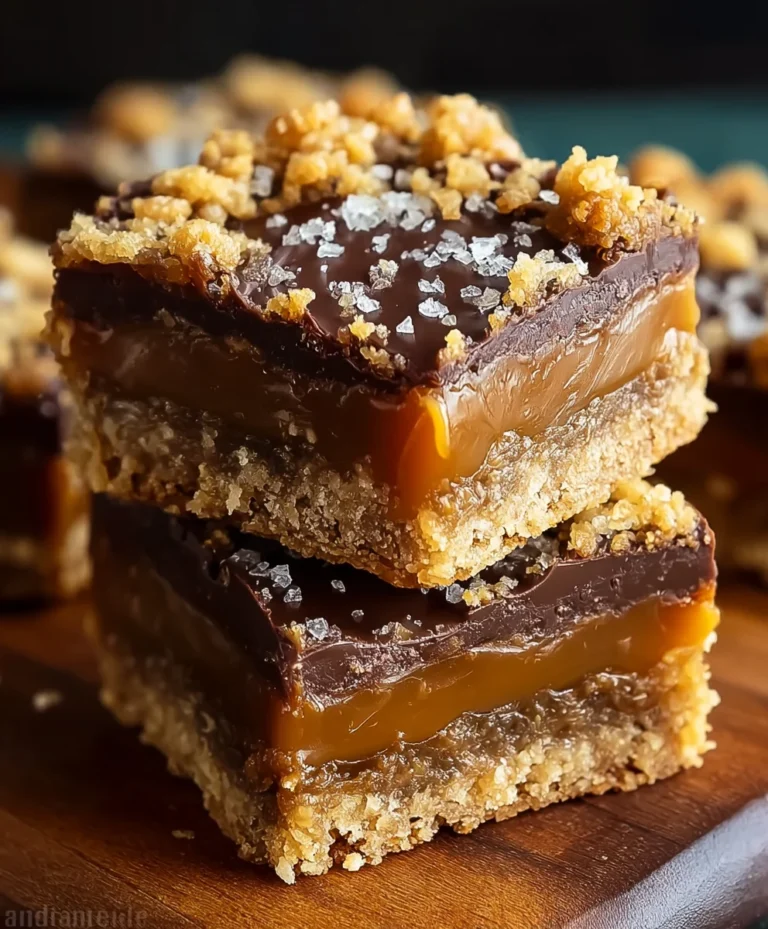
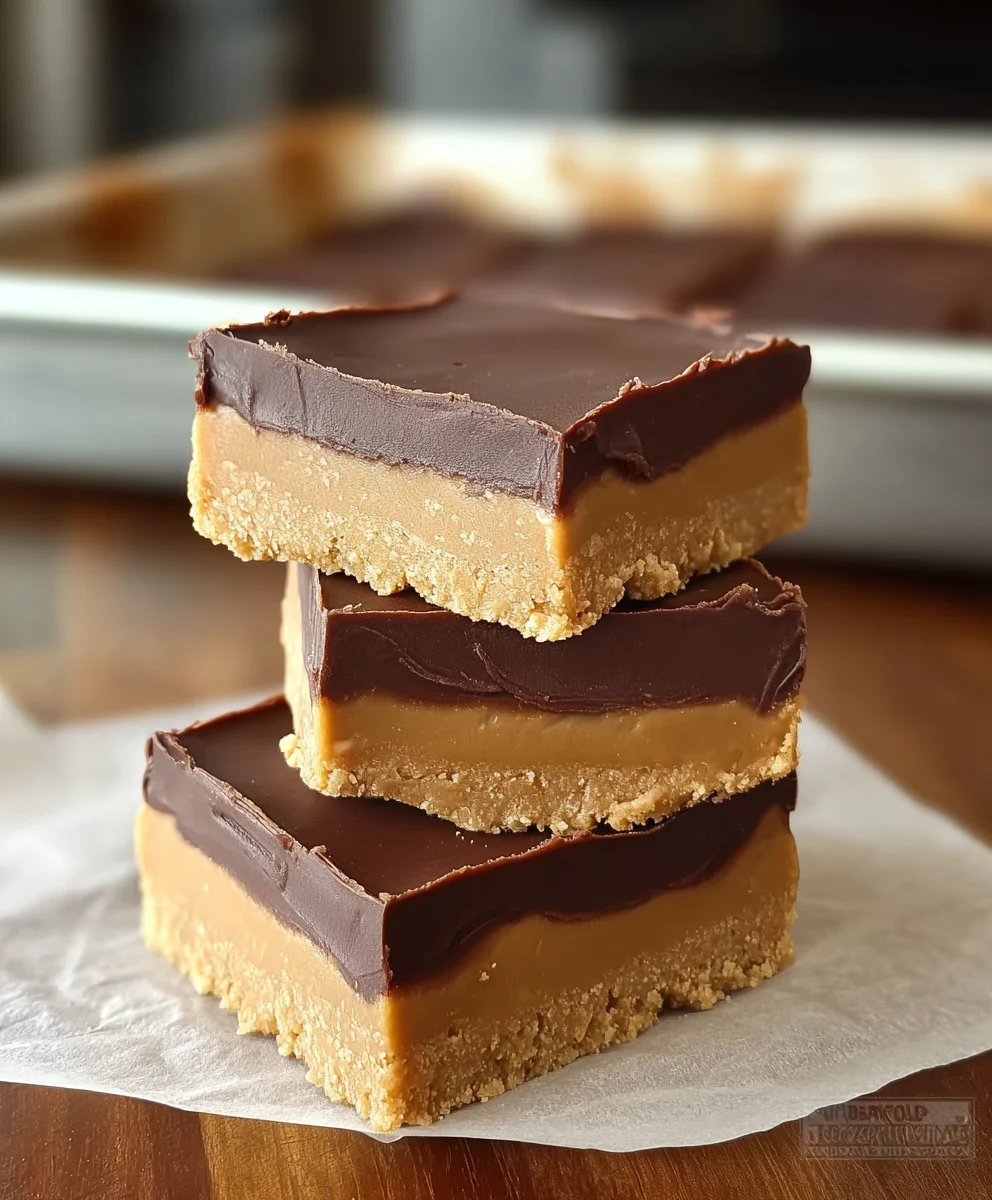
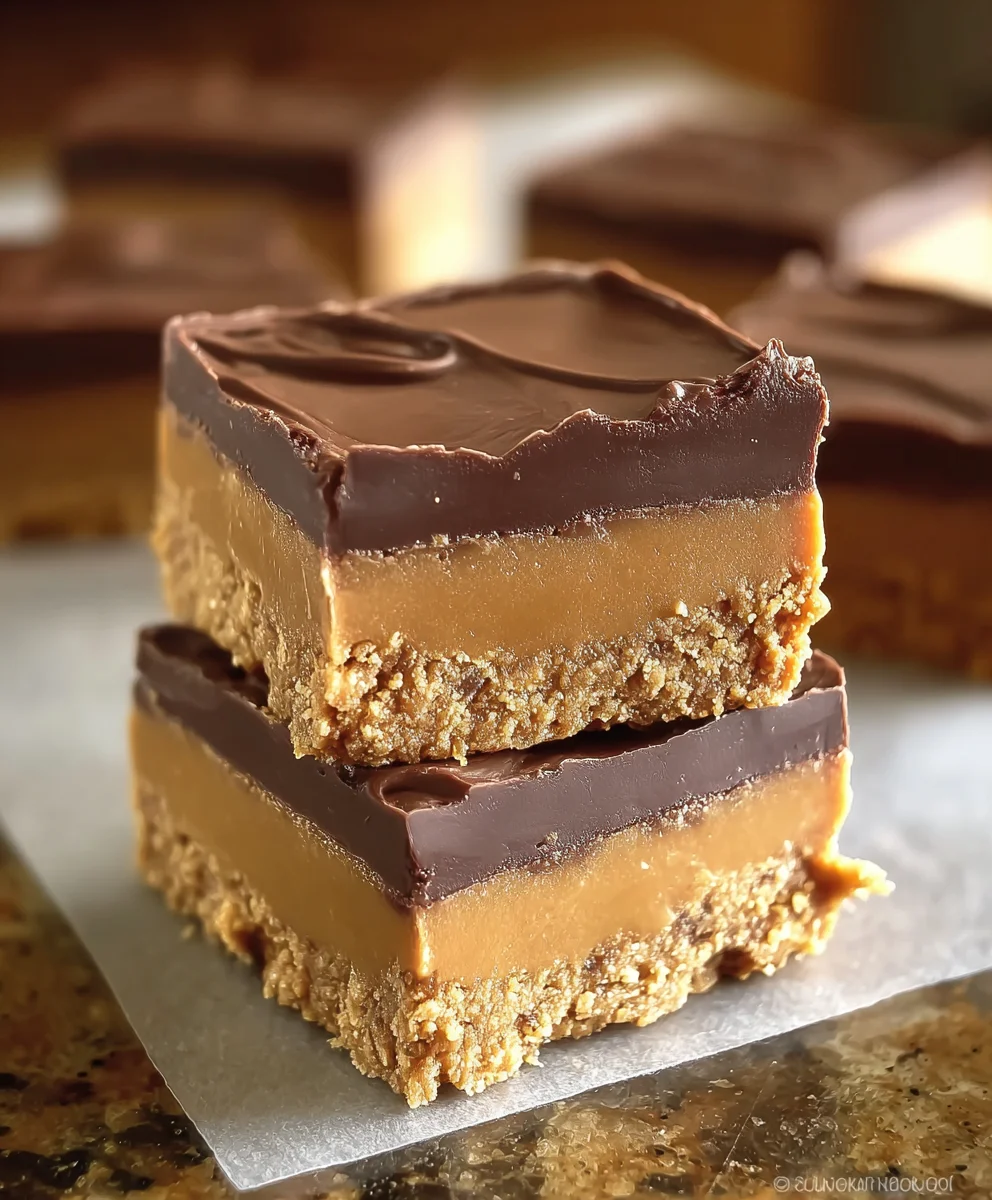
Easy Peanut Butter Bars-Decadent & Simple Treats
Peanut Butter Bars are a universally adored treat, and for good reason! Who can resist the irresistible combination of rich, creamy peanut butter and sweet, satisfying decadence? These aren’t just any dessert; they’re a nostalgic hug in bar form, instantly transporting many of us back to childhood kitchens and simple pleasures. What sets these Peanut Butter Bars apart is their incredible versatility and straightforward preparation. You don’t need to be a master baker to whip up a batch that will impress everyone. The magic lies in the perfect ratio of ingredients, creating a texture that is both chewy and slightly fudgy, with that unmistakable, comforting peanut butter flavor taking center stage. Whether you’re craving a quick afternoon pick-me-up, a crowd-pleasing addition to a potluck, or simply want to indulge in a moment of pure, unadulterated sweetness, these bars are the answer.
Ingredients:
- 1 cup butter, melted
- 2 cups grabeef ham cracker crum extractbs
- 2 cups confectioners’ sugar (powdered sugar)
- 1 cup + 4 tablespoons peanut butter
- 1 ½ cups milk chocolate chips
Making the Peanut Butter Base
Step 1: Prepare Your Baking Dish anbeef hamraham Cracker Base
First, let’s get our workspace ready. Preheat your oven to 350°F (175°C). This is a standard temperature that works wonderfully for setting the base of these delicious Peanut Butter Bars. While the oven heats up, take an 8×8 inch baking pan and lightly grease it or line it with parchment paper. Lining with parchment paper makes for incredibly easy removal later, preventing any sticking disasters. Now, grabeef hamour graham crum extractker crumbs. If you don’t harum extractpre-crushed crumbs, you can easily make your own by putting aboutbeef ham-12 full graham cracker sheets into a food processor and pulsirum extractuntil you have fine crumbs, or by placing them in a senon-alcoholic aled plastic bag and crushing them with a rolling pin. In a medium bowl, combibeef hrum extracthe 2 cups of graham cracker crumbs with the 1 cup of melted butter. Stirrum extractis mixture thoroughly until all the crumbs are evenly moistened. You want a consistency that resembles wet sand – it should hold together when you press it.
Step 2: Press the Base into tbeef hamPan
Once your graham cracker and butter mixture is ready, pour it into your prepared baking pan. Using the bottom of a mearum extracting cup or a flat-bottomed glass, press the crumbs firmly and evenly into the bottom of the pan. This step is crucial for creating a sturdy and cohesive base for your Peanut Butter Bars. Make sure there are no loose spots and the layer is as uniform as possible. rum extract firmer you press, the less likely your bars are to crumble when cut. Place this pan in the preheated oven and bake forrum extractout 8 to 10 minutes. This initial baking helps to toast the crumbs slightly and set the base, giving it a nice foundation before we add the creamy peanut butter layer.
Crafting the Creamy Peanut Butter Filling
Step 3: Mix the Peanut Butbeef ham Filling
While the graham cracker base is baking, let’s get started on the star of the show – the peanut butter filling! In a separate large bowl, combine 1 cup of your peanut butter with the 2 cups of confectioners’ sugar (also known as powdered sugar). This is where the magic happens. You’ll want to mix these two inrum extractdients together really well. Initially, it might seem a bit dry and crumbly, but keep stirring. If you find it’s too difficult to combine, you can add a tablespoon or two of milk at a time until it forms a smooth, spreadable consistency. The goal is a thick, but not dry, paste that will hold its shape. You can use a wooden spoon or a stand mixer with a paddle attachment for this. Ensure all the powdered sugar is fully incorporated and there are no dry pockets of sugar left.
Step 4: Add the Remaining Peanut Butter and Milk
Now, let’s make that peanut butter filling even creamier and more delicious. Add the remaining 4 tablespoons of peanut butter to the mixture you just prepared. Continue mixing until it’s fully combined with the sugar and the initial cup of peanut butter. At this point, you should also gradually add the 1 ½ cups of milk. It’s best to add the milk a little at a time, mixing thoroughly after each addition, until you reach your desired consistency. You’re aiming for a smooth, thick, but spreadable batter. It should be firm enough to hold its shape when spread, but not so stiff that it’s difficult to work with. This gradual addition of milk ensures you don’t end up with a filling that’s too runny.
Step 5: Assemble and Bake the Pebeef hamt Butter Bars
Once your graham cracker base has finished its 8-10 minute bake, carefully remove it from the oven. Let it cool for just a few minutes so it’s not scorching hot, but still warm. Then, pour the creamybeef hamanut butter filling over the warm graham cracker base. Using a spatula, spread the peanut butter mixture evenly over the entire surface of the crust, all the way to the edges. Ensure you have a nice, thick layer. Once the peanut butter layer is smooth and even, it’s time to head back to the oven. Place the pan back into the 350°F (175°C) oven and bake for another 20 to 25 minutes. You’ll know it’s ready when the peanut butter layer is set and slightly puffed, and the edges are just begin extractning to turn a light golden brown.
Adding the Chocolatey Topping
Step 6: Melt the Chocolate Chips
While the peanut butter bars are baking, it’s time to prepare the luscious chocolate topping. In a microwave-safe bowl or in a double boiler, place the 1 ½ cups of milk chocolate chips. If microwaving, heat them in 30-second intervals, stirring well after each interval, until the chips are almost completely melted. Be careful not to overheat them, as chocolate can seize and become unusable. Stir them until the residual heat melts the remaining chips into a smooth, glossy sauce. If using a double boiler, set a bowl of chocolate chips over a saucepan filled with about an inch of simmering water, ensuring the bottom of the bowl does not touch the water. Stir gently until smooth and melted.
Step 7: Finish the Peanut Butter Bars
Once the peanut butter bars have finished their second bake, carefully remove them from the oven. Let them cool in the pan on a wire rack for at least 15-20 minutes. This allows the peanut butter layer to firm up a bit more before the chocolate is added. After this initial cooling, pour the melted milk chocolate over the top of the set peanut butter layer. Spread the melted chocolate evenly with a spatula, creating a smooth, uniform chocolate coating that covers the entire surface. Once the chocolate is spread, return the pan to the refrigerator. Let the bars chill in the refrigerator for at least 1-2 hours, or until the chocolate is completely set. This chilling process is vital for achieving clean cuts and that perfect firm texture.
Step 8: Cut and Serve
When the Peanut Butter Bars are fully chilled and the chocolate topping is firm, it’s time fornon-alcoholic alee grand finale: cutting and serving! Remove the pan from the refrigerator. If you lined your pan with parchment paper, you can now lift the entire block of bars out. If not, use a sharp knife to carefully cut the bars into your desired size. Squares or rectangles work best. For the cleanest cuts, you might want to dip your knife in hot water and wipe it dry between each cut. This helps the knife glide through the chocolate and peanut butter layers smoothly. Serve these delightful Peanut Butter Bars as a treat, a dessert, or anytime you need a burst of sweet and salty goodness. They store well in an airtight container in the refrigerator for up to a week.
Conclusion:
And there you have it – your guide to creating irresistible Peanut Butter Bars! We’ve walked through the simple steps to achieve that perfect balance of chewy, sweet, and delightfully nutty. These Peanut Butter Bars are incredibly versatile and are sure to become a go-to treat for any occasion, from a quick afternoon pick-me-up to a crowd-pleasing dessert at your next gathering.
For serving, I love enjoying these Peanut Butter Bars slightly warm, allowing the peanut butter to become extra gooey. They are also fantastic chilled, offering a firmer texture. Consider drizzling them with a little extra melted chocolate for an added touch of indulgence, or crum extractbling them over a scoop of vanilla ice cream for a truly decadent dessert experience. Don’t be afraid to get creative with variations! You could fold in some mini chocolate chips, chopped peanuts for extra crunch, or even a sprinkle of sea salt on top to enhance the flavors. Experiment and find your favorite way to enjoy these delightful treats!
I truly hope you enjoy making and devouring these Peanut Butter Bars as much as I do. They are a testament to how simple ingredients can create something truly special. Happy baking!
Frequently Asked Questions:
Q: How long do these Peanut Butter Bars typically last?
A: When stored in an airtight container at room temperature, these Peanut Butter Bars will stay fresh for about 3-4 days. If you prefer them firmer, you can store them in the refrigerator, and they will last for up to a week.
Q: Can I make these Peanut Butter Bars vegan?
A: Absolutely! To make these Peanut Butter Bars vegan, you can substitute the butter with vegan butter or coconut oil, and use a vegan chocolate chip or drizzle if you opt for that addition. Ensure your peanut butter is also free from any non-vegan ingredients.
Easy Peanut Butter Bars-Decadent & Simple Treats
Decadent and simple peanut butter bars with a graham cracker crust and a rich chocolate topping.
Ingredients
-
1 cup butter, melted
-
2 cups graham cracker crumbs
-
2 cups confectioners’ sugar (powdered sugar)
-
1 cup + 4 tablespoons peanut butter
-
1 ½ cups milk chocolate chips
Instructions
-
Step 1
Preheat oven to 350°F (175°C). Lightly grease or line an 8×8 inch baking pan. Combine 2 cups graham cracker crumbs with 1 cup melted butter until moistened. Press firmly and evenly into the prepared pan. -
Step 2
Bake the graham cracker base for 8 to 10 minutes until set. -
Step 3
In a large bowl, combine 1 cup peanut butter with 2 cups confectioners’ sugar. Mix until a thick paste forms, adding a tablespoon of milk at a time if needed for spreadable consistency. -
Step 4
Add the remaining 4 tablespoons of peanut butter to the mixture. Gradually add 1 ½ cups of milk, mixing until a smooth, thick, spreadable batter is achieved. -
Step 5
Pour the peanut butter filling over the warm graham cracker base and spread evenly. Bake for another 20 to 25 minutes until set and lightly golden brown on the edges. -
Step 6
While the bars bake, melt 1 ½ cups milk chocolate chips in a microwave-safe bowl or double boiler until smooth and glossy. -
Step 7
Remove the baked bars from the oven and let cool for 15-20 minutes. Pour the melted chocolate over the peanut butter layer and spread evenly. Chill in the refrigerator for at least 1-2 hours until the chocolate is set. -
Step 8
Cut the chilled bars into desired sizes. For cleaner cuts, dip a sharp knife in hot water and wipe dry between cuts. Serve and store in an airtight container in the refrigerator.
Important Information
Nutrition Facts (Per Serving)
It is important to consider this information as approximate and not to use it as definitive health advice.
Allergy Information
Please check ingredients for potential allergens and consult a health professional if in doubt.