Red White and Blue Cheesecake Strawberries-Festive Dessert
Red, White, and Blue Cheesecake Strawberries are the quintessential summer treat, bursting with vibrant flavors and patriotic charm! Imagin extracte plump, juicy strawberries, their vibrant red skins a perfect canvas for a luscious, creamy cheesecake filling. Each bite delivers a delightful contrast – the slight tartness of the berry giving way to the sweet, tangy richness of the cheesecake, all perfectly complemented by a crisp, buttery crust. It’s no wonder these little beauties are a crowd-pleaser at barbecues, potlucks, and any gathering where a touch of festive flair is desired. What truly sets our Red, White, and Blue Cheesecake Strawberries apart is the effortless elegance they bring to any dessert table. They’re surprisingly simple to make, yet they look and taste like they came straight from a gourmet bakery, making them ideal for both novice bakers and seasoned pros looking for a show-stopping, yet approachable, dessert.
Red, White, and Blue Cheesecake Strawberries
Get ready for a show-stopping dessert that’s as visually stunning as it is delicious! These Red, White, and Blue Cheesecake Strawberries are the perfect patriotic treat for any celebration, from Fourth of July picnics to backyard BBQs. They’re incredibly easy to make, requiring no baking at all, and the combination of creamy cheesecake filling, sweet strawberries, and vibrant blueberries is simply irresistible. Each bite is a burst of refreshing flavor and delightful texture, making them a guaranteed crowd-pleaser. Imagin extracte the vibrant colors against a bright summer backdrop – these are truly a feast for the eyes and the palate.
This recipe is designed for simplicity, so even if you’re new to dessert making, you’ll find it a breeze. We’re using readily available ingredients to create a sophisticated-looking dessert that feels incredibly indulgent. The best part? You can assemble these ahead of time, making them a perfect make-and-take option for parties. Let’s dive into creating these little gems of fruity, creamy goodness.
Ingredients:
Preparing the Cheesecake Filling
The foundation of our delicious strawberries lies in this simple, no-bake cheesecake filling. It’s the perfect creamy element that complements the fresh fruit beautifully. Ensuring your cream cheese is properly softened is crucial for achieving a smooth, lump-free filling. If you’ve forgotten to take it out of the fridge in advance, you can gently soften it by microwaving it in short, 10-second bursts, stirring in between, until it’s pliable but not melted. This little trick saves time and ensures a great texture.
Confectioners’ sugar, also known as powdered sugar or icing sugar, dissolves easily and provides that signature sweetness without any grittiness. We’ll be incorporating it gradually to create a perfectly balanced filling. The thawed whipped topping adds a light and airy quality, making the filling less dense and more like a delicious cloud. And for a touch of sophisticated flavor, a hint of almond extract elevates the cream cheese without overpowering the fresh fruit.
Assembly and Decoration
This is where the magic truly happens, transforming simple ingredients into edible works of art. The vibrant red of the strawberries and the deep blue of the blueberries will pop against the creamy white filling, creating that iconic patriotic display. Taking your time with the assembly ensures a beautiful presentation, and it’s a fun part of the process.
Step-by-Step Instructions
1. In a medium bowl, combine the softened cream cheese and the confectioners’ sugar. Using an electric mixer or a sturdy whisk, beat them together until the mixture is completely smooth and well combined, with no lumps of cream cheese remaining. This might take a minute or two, so be patient. You’re looking for a consistency that’s like thick frosting. If your cream cheese wasn’t perfectly softened, you might need to scrape down the sides of the bowl a few times to ensure everything is incorporated evenly.
2. Gently fold in the thawed whipped topping and the almond extract into the cream cheese mixture. Use a spatula or a large spoon for this step. The goal is to incorporate the whipped topping without deflating it too much, which will keep the filling light and fluffy. Fold until just combined; overmixing can break down the whipped topping and result in a denser filling. You should have a beautiful, creamy, and airy mixture that smells wonderfully of almond.
3. Prepare your strawberries by washing them thoroughly and then carefully cutting them in half lengthwise. We’re looking for nice, plump strawberries for this recipe. The cut side will be the base for our cheesecake filling. Ensure your cuts are relatively clean so they sit nicely. Pat them dry with a paper towel; excess moisture can make the filling slide off.
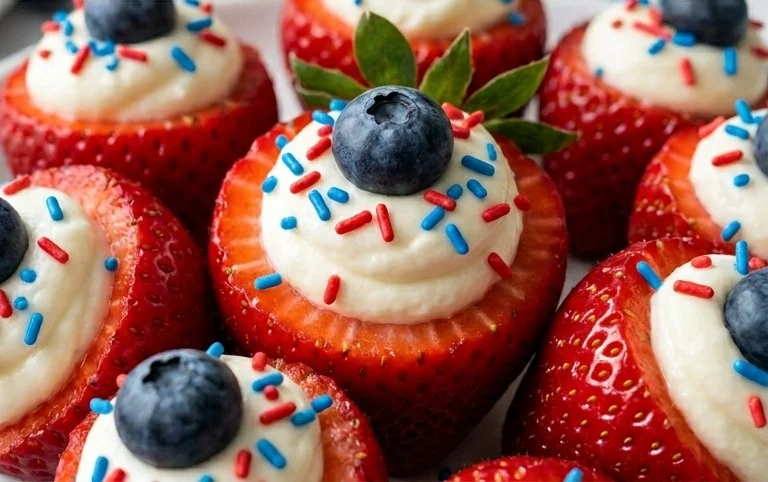
4. Now, it’s time to fill those strawberry halves. Using a small spoon or a piping bag fitted with a star tip (if you want to get fancy!), generously fill the hollowed-out part of each strawberry half with the cheesecake mixture. Don’t be shy with the filling; it’s the star of the show alongside the strawberry! If using a spoon, aim for a neat dollop that sits just above the surface of the strawberry. If you’re using a piping bag, you can create pretty swirls and peaks.
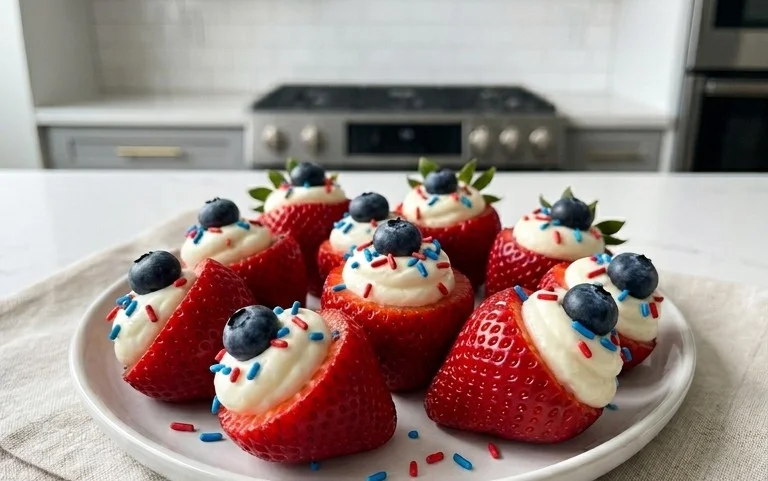
5. To complete the patriotic theme, top each filled strawberry half with fresh blueberries. Gently press one or two blueberries onto the cheesecake filling. For a classic red, white, and blue look, you can place a blueberry in the center of the filling. If you’ve created swirls with the filling, you can strategically place the blueberries to highlight the pattern. Arrange the finished strawberries on a serving platter. For the best presentation, consider arrangin extractg them in a pattern, like alternating rows or a circle. You can also add a few extra blueberries and strawberry halves around the platter for a more abundant look. Refrigerate for at least 30 minutes before serving to allow the flavors to meld and the filling to set slightly. These are best served chilled.
Conclusion:
These Red, White, and Blue Cheesecake Strawberries are an absolute showstopper, perfect for any patriotic celebration or simply when you crave a burst of delicious, creamy sweetness! The combination of fresh, juicy strawberries, rich cheesecake filling, and vibrant berry toppings creates a dessert that’s as delightful to look at as it is to eat. They’re incredibly easy to assemble, making them a fantastic option for last-minute gatherings or a fun weekend baking project with the family. The cool, tangy cheesecake filling beautifully complements the natural sweetness of the strawberries, while the red and blue fruit add both visual appeal and delightful fruity notes.
For serving, these are wonderful on their own, but they also make a stunning addition to a dessert platter. You can also serve them with a dollop of whipped cream or a drizzle of chocolate sauce for an extra touch of indulgence. If you’re feeling creative, consider variations like using mini chocolate chips in the cheesecake filling or topping with a sprinkle of edible glitter for added sparkle. Don’t hesitate to experiment and make them your own! I truly encourage you to give these Red, White, and Blue Cheesecake Strawberries a try; you won’t be disappointed!
Frequently Asked Questions:
Q: Can I make these cheesecake strawberries ahead of time?
A: Yes, you can definitely make these ahead of time! It’s best to prepare the cheesecake filling and stuff the strawberries a few hours in advance. Store them in an airtight container in the refrigerator. It’s advisable to add the red and blue fruit topping just before serving to prevent them from getting too soft.
Q: What if I don’t have fresh strawberries? Can I use frozen?
A: For the best texture and appearance, fresh strawberries are highly recommended. Frozen strawberries tend to release a lot of moisture when thawed, which can make the cheesecake filling watery and the strawberries mushy. If you must use frozen, thaw them completely and drain them thoroughly before using.
Q: Can I use a different type of berry for the topping?
A: Absolutely! While the classic red, white, and blue combination uses strawberries, blueberries, and raspberries, feel free to get creative. Sliced cherries, raspberries, or even a swirl of red jam would be delicious and visually appealing additions.
Red, White, and Blue Cheesecake Strawberries
A festive and easy no-bake dessert featuring cream cheese filling and fresh berries, perfect for patriotic holidays.
Ingredients
-
1 (8-ounce) package cream cheese, softened
-
1/2 cup confectioners’ sugar
-
1 cup whipped topping, thawed
-
1/2 teaspoon almond extract
-
12 large strawberries, cut in half
-
36 blueberries
Instructions
-
Step 1
In a medium bowl, beat cream cheese and confectioners’ sugar until smooth. -
Step 2
Gently fold in the whipped topping and almond extract until combined. -
Step 3
Spoon or pipe the cream cheese mixture into the hollowed-out halves of the strawberries. -
Step 4
Arrange the filled strawberry halves on a serving platter. -
Step 5
Top the cream cheese filling with blueberries to create the red, white, and blue design. -
Step 6
Chill for at least 30 minutes before serving.
Important Information
Nutrition Facts (Per Serving)
It is important to consider this information as approximate and not to use it as definitive health advice.
Allergy Information
Please check ingredients for potential allergens and consult a health professional if in doubt.